27
27
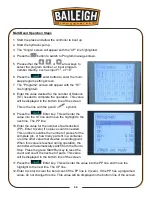
6. Define the lower limit position of the rams. This is the YP value.
7. Adjust the limit switch ramps for the travel limit switches so that the distance between the
upper die and lower die is only slightly more than the thickness of the material being run.
Doing so will reduce the chance of a foreign object getting between the dies and provide a
faster cycle time when doing production work.
8. Ensure no
rmal and standard “Inch” and “Semi-Auto” operation.
9. Position the safety light curtain sensors in front of the die opening so that if any part of the
body should enter the die area during a bend the bend will stop until the area is cleared. You
should notice the red scanning code and green light near the bottom of the emitter and a red
light on the receiver. If you wave an object through the beam the green light will turn red.
10. Safely start the machine. (The white power light will be lit)
11. Press the green pushbutton to start the hydraulic pump.
12. Place the cycle mode selector switch to the left INCH position and press the DOWN foot
pedal. The ram should come down.
13. Press the UP foot pedal to raise the ram back to the top position.
14. Put the test material in the middle part of the worktable for trial bending.
15.
Turn the cycle mode selector switch to “Semi-Auto” mode.
16. Press and hold the DOWN foot pedal until down travel block contacts the down travel limit
switch or until the ram is at the bottom of the stroke. After the HT (hold time) has expired, the
ram will raise and return to the top position and wait for the next command. If the operator
continues to hold the down foot pedal, the ram will start the next cycle automatically. There
will be approximately a 3
– 4 second delay before this next cycle begins.
WARNING:
IF A HAND OR OBJECT
BREAKS THE SAFETY BEAM AFTER
THE CYCLE HAS BEEN STARTED THE RAM WILL STOP UNTIL THE OBJECT IS
CLEARED.
Содержание BP-3305CNC
Страница 3: ...Back Gauge Adjustment 48 BEND TONNAGE CHART 50...
Страница 17: ...14 14...
Страница 21: ...18 18 GETTING TO KNOW YOUR MACHINE A B M L K D C E F G I H J I G...
Страница 22: ...19 19 N S T U X V O Q P R W...
Страница 44: ...41 41 INCLUDED LOWER AND UPPER TOOLING Lower Tool Die Upper Tool Punch...
Страница 54: ...51 51 NOTES...
Страница 55: ...52 52 NOTES...


