background image

Bischoff & Bischoff GmbH |2021-02-18 - Revision: 1

EN

45

44

Via

 | Foldable power wheelchair

Foldable power wheelchair | 

Via

3.3. Scope of delivery

Immediately on receiving the goods, check that the delivery is complete. 
The delivery consist of:

• 

Packing

• 

Foldable power wheelchair (ready to use incl. 2 batteries)

• 

Charger

• 

User manual

• 

Seat cushion

• 

Lap belt

• 

Anti-tip wheels (enclosed)

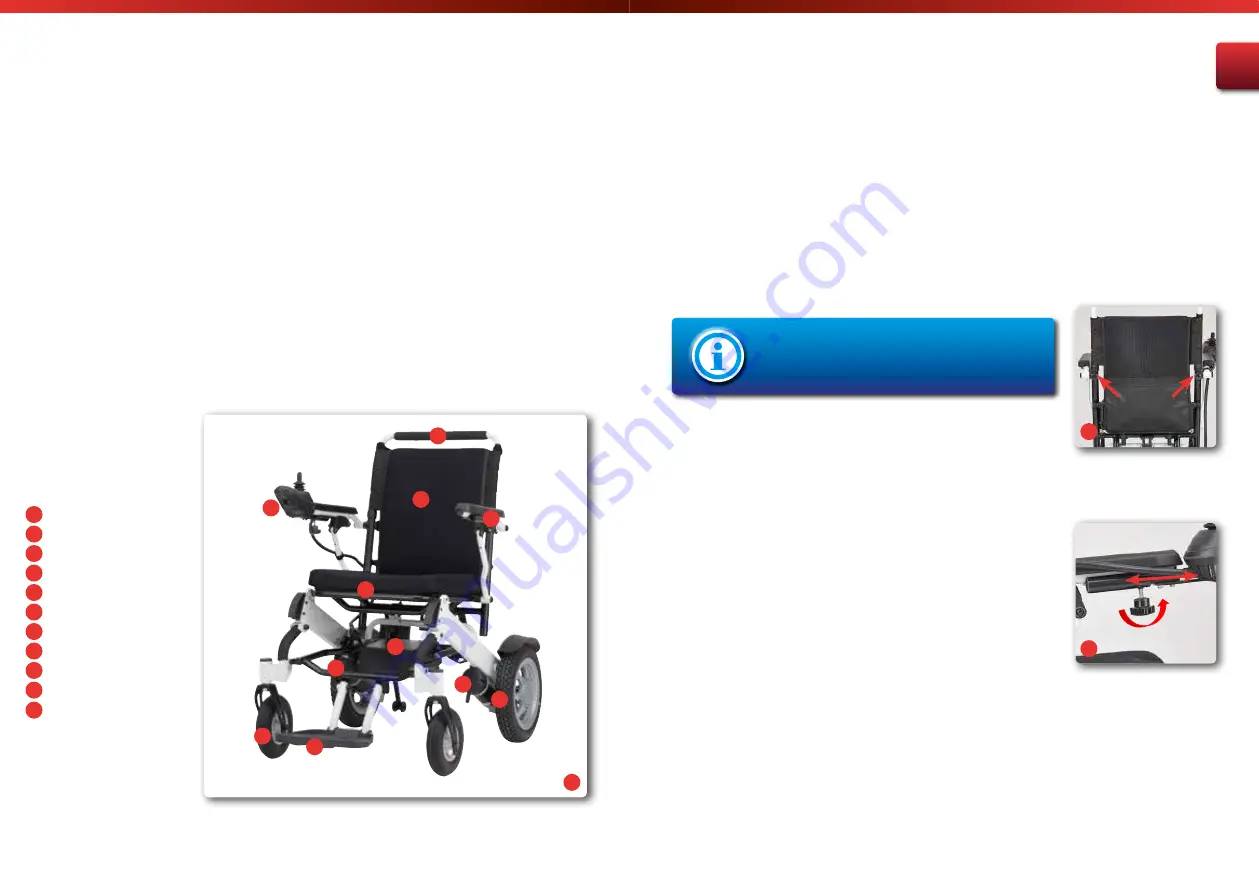
3.4. Overview

Control unit
Swing away armrest
Fold-down backrest
Seat cushion
Castors
Fold-down footplate
Bag
Battery housing
Electromotor
Drive wheel
Push bar

A

B

C

D

E

F

G

H

I

J

A

B

C

D

E

F

G

H

I

J

K

K

2

3.5. Basic setup

Before using it for the first time, adjust the foldable power wheelchair 
to suit the user. Adjusting the wheelchair allows fatigueless driving 
in a physiologically correct position. The basic setup of the foldable 
power wheelchair are described in this section. Carry these out in 
collaboration with the medical equipment retailer.

3.5.1. Backrest

Before setting off each time, check that the knurled 
screws on the rear of the backrest (Fig. 03) are tight.

You can adjust the slack in the backrest sling by tensioning the backrest 
sling as required and fixing it in the required position using the hook 
and loop straps. 

3.5.2. Control unit

You can mount the control unit on the left or right side. Your dealer can 
help you to do this.

• 

Push the tube below the control unit into the tube below the 
armrest

• 

Position the control unit at a distance which is comfortable for the 
user

• 

Fix the knurled screw below the armrest, by rotating in a clockwise 
direction and tighten by hand

In order to adjust the control unit position at a later date (Fig. 4), 

• 

undo the knurled screw,

• 

position the control unit at the required distance and 

• 

re-tighten the knurled screw by hand.

3

4

Содержание Via

Страница 1: ...Enjoy mobility DE EN ES FR Enjoy mobility Bedienungsanleitung Instruction manual Manual de instrucciones Mode d emploi Via ...

Страница 2: ...utzrollen 14 3 5 4 Beckengurt 14 3 5 5 Stockhalter optional 14 4 Benutzung des faltbaren Elektrorollstuhls 15 4 1 Funktion der Steuerung 15 4 1 1 Veränderungen an der Steuerung 17 4 2 Ein und Aussteigen 17 4 3 Fahren 18 4 4 Schiebebetrieb 20 4 4 1 Nothalt einleiten 21 4 5 Überlastsicherung 21 4 6 Vorbereiten des faltbaren Elektrorollstuhls zum Transport 22 4 7 Auseinanderbauen zur Lagerung 23 5 Te...

Страница 3: ...g beachten 2 Wichtige Sicherheitshinweise 2 1 Allgemeine Sicherheitshinweise Kontrollieren Sie vor Fahrtbeginn ob alle Anbauteile ordentlich befestigt sind Üben Sie vor der ersten Benutzung das Fahren auf ebenem und überschaubarem Gelände Machen Sie sich intensiv mit dem Brems und Beschleunigungsverhalten bei der Geradeausfahrt und bei Kurvenfahrten vertraut Beachten Sie dass sich bei der Gleichge...

Страница 4: ...t Er darf unter keinen Umständen als solcher verwendet werden Er erfüllt nicht die Anforderungen nach ISO 7176 19 Ein Zuwiderhandeln kann im Falle eines Unfalls schwerste Verletzungen mit Todesfolge verursachen A 2 3 Hinweise zu EMV Störungen Trotz Einhaltung aller anzuwendenden EMV Richtlinien und Normen ist es möglich dass der faltbare Elektrorollstuhl andere elektrische Geräte z B Mobiltelefone...

Страница 5: ...esem Elektrorollstuhl ist ungeeignet für Kinder zudem für erwachsene Personen mit starken Gleichgewichtsstörungen verminderter und nicht ausreichender Sehkraft starken Einschränkungen der kognitiven Fähigkeit 2 8 Konformitätserklärung Bischoff Bischoff erklärt als Hersteller in alleiniger Verantwortung dass der faltbare Elektrorollstuhl Via mit den Anforderungen der Richtlinie 93 42 EWG übereinsti...

Страница 6: ...Verbindung Tel 49 0 700 6000 7070 PrüfenSiedenInhaltaufVollständigkeit s Kap 3 3 undUnversehrtheit Im Falle von Unregelmäßigkeiten oder Beschädigungen setzen Sie sich mit unserem Kundenservice in Verbindung 3 2 Typenschild und Seriennummer Das Typenschild Abb 1 befindet sich auf dem Seitenrahmen Herstellerlogo Herstellerangabe Medizinprodukt CE Kennzeichen RoHS Logo Nicht als Sitz im Fahrzeug zuge...

Страница 7: ... des faltbaren Elektrorollstuhls beschrieben Führen Sie diese in Zusammenarbeit mit dem Sanitätsfachhandel durch 3 5 1 Rückenlehne Überprüfen Sie vor jedem Fahrtantritt dass die Rändelschrauben auf der Rückseite der Rückeneinheit Abb 03 fest angezogen sind Sie können den Durchhang der Rückenbespannung anpassen indem Sie die Rückenbespannung wie gewünscht spannen und mithilfe der Klettverschlüsse i...

Страница 8: ... Sie die Schnalle entsprechend positionieren Schließen Sie den Gurt mit dem Gurtschloss Öffnen Sie den Gurt indem Sie den Steckverschluss zusammendrücken 3 5 5 Stockhalter optional Der Stockhalter Abb 7 1 ist als Zubehör für den Via erhältlich Sie können Ihren Gehstock oder Ihre Unterarmgehstütze während der Fahrt in den Stockhalter am Rahmen stellen An der Rückenlehne befindet sich eine Schlaufe ...

Страница 9: ...ollstuhl benutzen verringert sich die Kapazität der Batterie Beachten Sie die Batteriehinweise s Kap 6 3 1 Hupe Die Hupe Abb 8 D ermöglicht es Ihnen in schwierigen Situationen auf sich aufmerksam zu machen A B C D 9 4 1 1 Veränderungen an der Steuerung Änderungen der Programmierung der Steuerung dürfen nur von einem autorisierten Fachhändler vorgenommen werden Änderungen an der Pro grammierung hab...

Страница 10: ...ch Ihr faltbarer Elektrorollstuhl nicht wie oben beschrieben verwenden Sie ihn nicht und übergeben Sie ihn Ihrem Fachhändler Geradeausfahren und Lenken Fahren Sie immer große Bögen um Ecken und Hindernisse und fahren Sie langsam und mit Sorgfalt Um sich vorwärts zu bewegen bewegen Sie den Joystick Abb 7 E nach vorn Je stärker Sie den Joystick bewegen desto höher wird die Geschwindigkeit im Rahmen ...

Страница 11: ...r Schiebefunktion gesperrt Achtung Lebensgefahr Die Antriebe dürfen nur auf ebenem Gelände ausgekoppelt werden 12 4 4 1 Nothalt einleiten Führen Sie einen Nothalt nur im absoluten Notfall durch Lassen Sie dazu den Joystick los und drücken Sie den Power Knopf Die Hinterräder blockieren dann sofort Beachten Sie dass Sie durch den abrupten Halt nach vorn geschleudert werden können Halten Sie sich zur...

Страница 12: ... und befestigen Sie diese Gehen Sie beim Auseinanderfalten in umgekehrter Reihenfolge vor Überprüfen Sie vor Fahrtantritt dass die Entriegelung am Rücken eingerastet ist 14 15 1 15 2 15 3 Schieben und Ziehen Packen Sie den Via am Rohr unter dem Sitz Abb 16 Sie können den Via im gefalteten Zustand aufrichten und für den Transfer z B zum Auto schieben oder ziehen 4 7 Auseinanderbauen zur Lagerung Ve...

Страница 13: ...mm ohne Sitzkissen 14 1090mm 690mm mit Steuerung 870mm 460mm 36kg 32kg inkl Batterien 24V 20Ah Lithium Ionen 480Wh 2 5 A 180 W Klasse F S2 10 min 4200 UPM PG VSI 50A PU 8 Luftbereifung 12 5 2 7bar Fahreigenschaften max Geschwindigkeit vorwärts Sichere Nenn Steigung Max Hindernishöhe Reichweite Wendebereich Bremsweg von max Geschwindigkeit Statische Stabilität Betätigungskräfte Fahrhebel Tasten an ...

Страница 14: ...s die Elektrik und Elektronik mit Flüssigkeit in Kontakt kommen Verwenden Sie keinen Hochdruck oder Dampfreiniger 6 2 Überprüfung vor Fahrtantritt 6 2 1 Bremsenüberprüfung Überprüfen Sie vor jedem Fahrtantritt die Funktionstüchtigkeit der Bremsanlage Fahren Sie vorsichtig an und lassen Sie den Fahrhebel anschließend los Der faltbare Elektrorollstuhl muss wie gewohnt zum Stillstand kommen Im Stand ...

Страница 15: ...zufuhr 230V beträgt Verbinden Sie das Ladegerät mit der Netzsteckdose 230V Verbinden Sie das Ladegerät mit der Batterie Ihres faltbaren Elektrorollstuhls Wenn die rote Lampe leuchtet lädt das Gerät 17 Der vollständige Ladevorgang dauert ca 8 10 Stunden Trennen Sie nach abgeschlossenem Ladevorgang den faltbaren Elektrorollstuhl vom Ladegerät ziehen Sie dann den Netzstecker 6 3 2 Austausch der Batte...

Страница 16: ...ckt werden Dann ist Ihr faltbarer Elektrorollstuhl während der Lagerung oder des Transportes optimal gegen Umwelteinflüsse geschützt 9 Entsorgung Wenn Ihr faltbarer Elektrorollstuhl nicht mehr verwendet wird und entsorgt werden soll wenden Sie sich bitte an Ihren Fachhändler Wenn Sie die Entsorgung selber übernehmen möchten erkundigen Sie sich bei ortsansässigen Entsorgungsunternehmen nach den Ent...

Страница 17: ... werden Ihnen von Ihrem Fachhändler gerne zur Verfügung gestellt Garantie Urkunde Produkt Via Seriennummer vom Händler einzutragen Fachhändler Datum Stempel Achten Sie auf unsere allgemeinen Geschäftsbedingungen Hinweisschilder befinden sich an der Sitzhalterung Nichtbeachtung der Betriebsanleitung sowie unsachgemäß durchgeführte Wartungsarbeiten als auch insbesondere technische Änderungen und Erg...

Страница 18: ...ls 46 3 5 4 Lap belt 46 3 5 5 Crutch holder optional 46 4 Operating the foldable power wheelchair 47 4 1 Operating the control unit 47 4 1 1 Adjustments 49 4 2 Getting in and out of the chair 49 4 3 Driving 50 4 4 Pushing the wheelchair mobility device in freewheel mode52 4 4 1 Initiating an emergency stop 53 4 5 Overload protection 53 4 6 Preparing the foldable power wheelchair for transport 54 4...

Страница 19: ...ixed in place Before using it for the first time practice on flat clear ground Familiarise yourself thoroughly with the braking and acceleration behaviour when driving in a straight line and into and out of curves Please note that through the shifting of weight through body movements or loading the risk of tipping over to the side or back can increase The foldable power wheelchair must only be use...

Страница 20: ...a vehicle seat Under no circumstances must it be used as such It does not fulfil the requirements in accordance with ISO 7176 19 Violation can cause the most serious injuries resulting in death in the case of an accident A 2 3 Notes on electromagnetic interference Despite compliance with all applicable EMC Directives and standards it is possible that the foldable power wheelchair may interfere wit...

Страница 21: ...elchair can be used properly 2 7 Contraindications Provision of this power wheelchair is not suitable for children and for adults with severe equilibrium disorders reduced and insufficient vision severe limitations of cognitive ability 2 8 Declaration of conformity As manufacturer Bischoff Bischoff declares with sole responsibility that the Via foldable power wheelchair meets the requirements of t...

Страница 22: ...vice immediately Tel 49 0 700 6000 7070 Check that the delivery is complete and undamaged see Chapter 3 3 In the case of anomalies or damage contact our Customer service 3 2 Product s identification label and serial number The product s identification label Fig 1 is located on the side frame Manufacturer s logo Manufacturer information Medical product CE mark RoHS logo Not approved as a vehicle se...

Страница 23: ...he basic setup of the foldable power wheelchair are described in this section Carry these out in collaboration with the medical equipment retailer 3 5 1 Backrest Before setting off each time check that the knurled screws on the rear of the backrest Fig 03 are tight You can adjust the slack in the backrest sling by tensioning the backrest sling as required and fixing it in the required position usi...

Страница 24: ...positioning the buckle accordingly Lock the belt with the buckle Unlock the belt by pressing the clasps together 3 5 5 Crutch holder optional The crutch holder Fig 7 1 is available as an accessory for the Via You can keep your walking stick or crutches in the crutch holder on the frame during your trip There is a loop on the backrest Fig 7 2 which will also hold the top end of your walking stick o...

Страница 25: ...is fully charged Using the foldable power wheelchair reduces the battery capacity Please follow the battery information see Chapter 6 3 1 Horn The horn Fig 8 D enables you to draw attention to yourself in difficult situations A B C D 9 4 1 1 Adjustments Changes to the programming of the control unit must only be carried out by an authorised dealer Changes to the programming have an impact on speed...

Страница 26: ...chair on otherwise an alarm signal will sound Driving and steering If your foldable power wheelchair is not behaving as described above do not use it and hand it over to your dealer Driving in a straight line and steering Always drive in large arcs round corners and obstacles and drive slowly with care To go forwards move the joystick Fig 7 E forwards The more you move the joystick the higher the ...

Страница 27: ...rive is disabled in push function Attention danger to life The electromagnetic brakes must only be disconnected when on flat ground 12 4 4 1 Initiating an emergency stop Only carry out an emergency stop in an absolute emergency Let go of the joystick and press the power button The drive wheels will lock immediately Please note that you may be thrown forward by stopping abruptly For safety hold ont...

Страница 28: ...in place To unfold repeat the procedure in reverse order Before setting off check that the interlock release on the backrest is in place 14 15 1 15 2 15 3 Pushing and pulling Take hold of the Via by the tube under the seat Fig 16 You can stand the Via upright when folded and push or pull it to transfer it to the car for example 4 7 Disassembling for storage Avoid using metal tools touching the bat...

Страница 29: ...hout seat cushion 14 1090 mm 690 mm with control unit 870 mm 460 mm 36 kg 32 kg incl batteries 24V 20Ah lithium ion 480 Wh 2 5A 180 W Class F S2 10 min 4200 RPM PG VSI 50A PU 8 12 5 pneumatic tyres 2 7 bar Drive characteristics max speed forwards Safe nominal slope Max Obstacle height Range Turning circle Braking distance from max speed Static stability Operating forces Joystick Keys on the contro...

Страница 30: ...rics and electronics do not come into contact with liquid Do not use high pressure or steam cleaners 6 2 Checks before driving 6 2 1 Checking the brakes Before setting off each time check that the brakes work properly Start up carefully and then release the joystick The foldable power wheelchair must come to a halt as usual When stationary the electromechanical brake must be locked in place with a...

Страница 31: ... supply is 230V Connect the charger to the power socket 230V Connect the charger to the battery of your foldable power wheelchair When the lamp lights up red the device is charging The complete charging procedure takes approx 8 10 hours Once the charging procedure is complete disconnect the foldable power wheelchair from the charger then unplug from the mains 17 6 3 2 Replacing the batteries Avoid...

Страница 32: ... longer in use and needs to be disposed of please contact your dealer If you want to handle the disposal yourself find out about the disposal regulations in your area from local disposal companies 10 Transfering the wheelchair When the wheelchair is transferred to a new owner please include all the technical documentation with it for the new user The wheelchair must be inspected in accordance with...

Страница 33: ...ncorrect information may occur in our User manual We reserve the right to make technical modifications Images may show accessories You can find the current version of the User manuals in the download area of our website www bischoff bischoff com Failure to observe the instructions in the User manual as well as not carrying out maintenance work properly as well as in particular making technical mod...

Страница 34: ...78 3 5 4 Cinturón de cadera 78 3 5 5 Soporte para bastones opcional 78 4 Uso de la silla de ruedas electrónica plegable 79 4 1 Manejo de la unidad de control mando 79 4 1 1 Modificaciones en la unidad de control mando 81 4 2 Sentarse y bajarse de la silla 81 4 3 Conducción 82 4 4 Funcionamiento manual 84 4 4 1 Inicio de una parada de emergencia 85 4 5 Protección contra sobrecargas 85 4 6 Preparaci...

Страница 35: ...es 2 Instrucciones importantes de seguridad 2 1 Información general de seguridad Antes de conducir compruebe que todos los accesorios de sujeción estén bien asegurados Antes de utilizar el producto por primera vez practique en un terreno llano y despejado Familiarícese a fondo con el comportamiento de frenada y aceleración en rectas y en curvas Tenga en cuenta que al desplazar el peso por los movi...

Страница 36: ...a no está diseñada para utilizarse como asiento en un vehículo En ningún caso debe utilizarse como tal El producto no cumple con los requisitos de la norma ISO 7176 19 La infracción de dicha regla en caso de accidente puede causar las lesiones más graves e incluso la muerte A 2 3 Notas sobre las interferencias de la CEM A pesar de cumplir con todas las directivas y normas de compatibilidad electro...

Страница 37: ...ministro de esta silla de ruedas electrónica no es adecuado para niños tampoco para adultos con trastornos graves del equilibrio visión reducida e insuficiente graves limitaciones de la capacidad cognitiva 2 8 Declaración de conformidad Como fabricante Bischoff Bischoff declara con total responsabilidad que la silla de ruedas electrónica plegable Via cumple con los requisitos de la Directiva 93 42...

Страница 38: ...n al cliente tel 34 931 600 029 Compruebe que el contenido está completo e intacto véase el capítulo 3 3 En caso de anomalías o daños póngase en contacto con nuestro servicio de atención al cliente 3 2 Etiqueta de identificación del producto y número de serie La etiqueta de identificación del producto Fig 1 se encuentra en la parte lateral del chasis Logo del fabricante Información del fabricante ...

Страница 39: ... correcta y sin fatiga En este apartado se describen los ajustes básicos de la silla de ruedas Realícelos en colaboración con el distribuidor de equipos médicos 3 5 1 Respaldo Antes de partir compruebe que los pomos de la parte posterior de la unidad trasera Fig 03 estén bien ajustados Puede ajustar la holgura del tapizado del respaldo tensándolo según sea necesario y fijándolo en la posición dese...

Страница 40: ...gún sus necesidades y coloque la hebilla en consecuencia Abroche el cinturón con la hebilla Desabroche el cinturón presionando los cierres al mismo tiempo 3 5 5 Soporte para bastones opcional El soporte para bastones Fig 7 1 está disponible como accesorio para el modelo Via Durante el viaje puede guardar su bastón o muletas en el soporte opcional incorporado al cuadro de la silla Hay un lazo en el...

Страница 41: ... la batería está completamente cargada El uso de la silla de ruedas reduce la capacidad de la batería Tenga en cuenta la información sobre la batería véase el capítulo 6 3 1 Bocina La bocina Fig 8 D le permite llamar la atención en situaciones difíciles A B C D 9 4 1 1 Modificaciones en la unidad de control mando Los cambios en la programación de la unidad de control mando sólo deben realizarse po...

Страница 42: ...omporta como se ha descrito anteriormente no la utilice y entréguela a su distribuidor Conducción en línea recta y dirección Cada vez que desee conducir tomando esquinas y obstáculos hágalo siempre con un gran ángulo de giro y conduzca lentamente con cuidado Para avanzar mueva la palanca de conducción joystick Fig 7 E hacia delante Cuanto más se mueva la palanca mayor será la velocidad dentro del ...

Страница 43: ... accionadores sólo deben desconectarse cuando se encuentre en terreno llano 12 4 4 1 Inicio de una parada de emergencia Realice una parada de emergencia sólo en caso de emergencia absoluta Suelte la palanca de conducción joystick y pulse el botón de encendido Las ruedas traseras se bloquearán inmediatamente Tenga en cuenta que puede salir despedido hacia delante si se detiene bruscamente Por segur...

Страница 44: ...nto en orden inverso Antes de partir compruebe que la trabilla del cierre del respaldo está en su lugar 14 15 1 15 2 15 3 Acciones de empujar y tirar Sujete la silla de ruedas Via por el tubo bajo el asiento Fig 16 Puede colocar la silla de ruedas en posición vertical cuando esté plegada y empujarla o tirar de ella para trasladarla al coche por ejemplo 4 7 Desmontaje para almacenamiento Evite util...

Страница 45: ...antero sin cojín 275 mm sin cojín de asiento 560 mm sin cojín de asiento 14 1090 mm 690 mm con unidad de control mando 870 mm 460 mm 36 kg 32 kg incluidas las baterías Ion de litio de 24V 20Ah 480 Wh 2 5 A 180 W Clase F S2 10 min 4200 RPM PG VSI 50A 5 Especificaciones técnicas Neumáticos Ruedas delanteras Ruedas traseras Características de la conducción velocidad máx hacia adelante Pendiente nomin...

Страница 46: ...es Utilice un desinfectante doméstico para limpiar Pulverice sobre las almohadillas y las asas según corresponda Antes de limpiarlo espere a que el producto actúe de acuerdo con las especificaciones del fabricante Al hacerlo asegúrese de que los componentes eléctricos y electrónicos no entren en contacto con el líquido No utilice limpiadores de alta presión o de vapor 6 2 Controles antes de partir...

Страница 47: ...ento de carga Utilice únicamente un cargador aprobado para cargar las baterías del tipo indicado en el capítulo 5 o proporcionado por el distribuidor B B Siga también las instrucciones de uso del cargador 17 Primero apague la silla de ruedas Antes de encender el cargador compruebe que la alimentación sea de 230V Conecte el cargador a la toma de corriente 230V Conecte el cargador a la batería de su...

Страница 48: ...ble cuando lo necesite Embale todas las piezas enchufables y sueltas y envuélvalas por separado en la caja de cartón Las piezas empaquetadas individualmente se pueden embalar juntas en una caja de cartón más grande De esta forma su silla de ruedas estará protegida de forma óptima contra las influencias ambientales durante el almacenamiento o el transporte 9 Eliminación Cuando su silla de ruedas el...

Страница 49: ...Certificado de garantía Producto Via Número de serie rellenar por el distribuidor Distribuidor Fecha y sello Preste atención a nuestros términos y condiciones generales Los avisos se encuentran en el soporte del asiento Nota A pesar de la comprobación y la edición puede que algún tipo de información incorrecta se haya incluido en nuestro Manual de instrucciones Nos reservamos el derecho a realizar...

Страница 50: ...4 Ceinture ventrale 110 3 5 5 Support de béquille en option 110 4 Utilisation du fauteuil roulant électrique pliant 111 4 1 Utilisation de l unité de commande 111 4 1 1 Modifications apportées à l unité de commande 113 4 2 Monter et descendre du fauteuil 113 4 3 Conduite 114 4 4 Fonctionnement manuel 116 4 4 1 Lancement d un arrêt d urgence 117 4 5 Protection contre les surcharges 117 4 6 Préparat...

Страница 51: ...ons de sécurité importantes 2 1 Informations de sécurité générales Avant de démarrer vérifier que tous les accessoires sont correctement fixés en place Avant de l utiliser pour la première fois pratiquez sur un terrain plat et dégagé Familiarisez vous avec le comportement de freinage et d accélération pour la conduite en ligne droite et dans les virages Veuillez noter que le risque de basculement ...

Страница 52: ...iège à bord d un véhicule Il ne doit en aucun cas être utilisé en tant que tel Il ne satisfait pas aux exigences de la norme ISO 7176 19 Toute violation de cette instruction peut causer des blessures très graves entraînant la mort en cas d accident A 2 3 Remarques sur les interférences CEM Malgré le respect de toutes les directives et normes CEM applicables il est possible que le fauteuil roulant ...

Страница 53: ...en raison de la déficience et que le fauteuil roulant électrique peut être utilisé correctement 2 7 Contre indications Ce fauteuil roulant électrique n est pas adapté aux enfants et aux adultes souffrant de troubles sévères de l équilibre vision réduite et insuffisante limitations sévères de la capacité cognitive 2 8 Déclaration de conformité En tant que fabricant Bischoff Bischoff déclare sous sa...

Страница 54: ...rt boîte en carton en présence de l agent expéditeur En cas de dommage apparent contactez immédiatement notre service clientèle Tél 33 0 800 79 90 79 90 Vérifiez que tous les éléments sont intacts et inclus dans le colis voir chapitre 3 3 En cas d anomalies ou de dommages contactez notre service client 3 2 Étiquette d identification et numéro de série du produit L étiquette d identification du pro...

Страница 55: ...ns fatigue Les réglages de base du fauteuil roulant électrique pliant sont décrits dans cette section Effectuez les en collaboration avec le détaillant d équipements médicaux 3 5 1 Dossier Avant chaque démarrage vérifiez que les vis moletées à l arrière de l unité arrière Fig 03 sont bien serrées Vous pouvez régler le mou de l élingue du dossier en la mettant sous tension au besoin et en la fixant...

Страница 56: ...itionnant la boucle en conséquence Fermez la ceinture avec la boucle Dévissez la ceinture en appuyant sur les fermoirs 3 5 5 Support de béquille en option Le support de béquille Fig 7 1 est disponible en accessoire pour le Via Vous pouvez garder votre canne ou vos béquilles dans le porte béquilles sur le cadre pendant votre trajet Il y a une boucle sur le dossier Fig 7 2 qui maintiendra également ...

Страница 57: ...il roulant électrique pliant réduit la capacité de la batterie Veuillez suivre les informations sur la batterie voir chapitre 6 3 1 Klaxon Le klaxon Fig 8 D vous permet d attirer l attention sur vous même si vous vous trouvez dans une situation difficile A B C D 9 4 1 1 Modifications apportées à l unité de commande Les modifications de la programmation de l unité de commande ne doivent être effect...

Страница 58: ... d alarme retentira Conduite et direction Si votre fauteuil roulant électrique pliant ne se comporte pas comme décrit ci dessus ne l utilisez pas et remettez le à votre revendeur Conduite en ligne droite et direction Conduisez toujours en effectuant de grands arcs dans les virages et autour d obstacles et conduisez lentement avec précaution Pour avancer déplacez la manette Fig 7 E vers l avant Plu...

Страница 59: ... doit être désactivé en mode manuel Attention danger pour la vie Les entraînements ne doivent être déconnectés que sur un sol plat 12 4 4 1 Lancement d un arrêt d urgence N effectuez un arrêt d urgence qu en cas d urgence absolue Lâchez la manette et appuyez sur le bouton d alimentation Les roues arrière se verrouilleront immédiatement Veuillez noter que vous pouvez être projeté vers l avant en vo...

Страница 60: ...r déplier le fauteuil répétez la procédure dans l ordre inverse Avant de partir vérifiez que le dispositif de déverrouillage du dossier est bien en place 14 15 1 15 2 15 3 Pousser et tirer Tenez le Via au niveau du tube sous le siège Fig 16 Vous pouvez tenir le Via en position verticale lorsqu il est plié et le pousser ou le tirer pour le transférer dans une voiture par exemple 4 7 Démontage pour ...

Страница 61: ...s coussin de siège 275 mm sans coussin de siège 560 mm sans coussin de siège 14 1090 mm 690 mm avec unité de commande 870 mm 460 mm 36 kg 32 kg batteries incluses 24 V 20 Ah lithium ion 480 Wh 2 5A 180 W Classe F S2 10 min 4 200 tr min PG VSI 50A 5 Spécifications techniques Pneumatiques Roues avant Roues arrière Pr ession d air Caractéristiques de conduite Vitesse maximale en marche avant Pente no...

Страница 62: ...oulant électrique pliant conformément aux instructions Utilisez un désinfectant ménager pour essuyer le fauteuil Pulvérisez le rembourrage et les poignées selon le cas Laissez le nettoyant agir conformément aux spécifications du fabricant avant de l essuyer Pour ce faire assurez vous que les pièces électriques et électroniques n entrent pas en contact avec le liquide N utilisez pas de nettoyeurs à...

Страница 63: ...echarge Utilisez uniquement un chargeur agréé pour charger les batteries type conforme au chapitre 5 ou fourni par le revendeur B B Veuillez également suivre les instructions d utilisation du chargeur Éteignez d abord le fauteuil roulant électrique pliant Avant d allumer le chargeur vérifiez que l alimentation est de 230V 17 Raccordez le chargeur à la prise d alimentation 230 V Connectez le charge...

Страница 64: ...t disponible au besoin Emballez toutes les pièces enfichables et détachées et emballez les chacun dans la boîte en carton Les pièces emballées individuellement peuvent ensuite être emballées ensemble dans une boîte en carton plus grande Votre fauteuil roulant électrique pliant est alors protégé de manière optimale contre les influences environnementales pendant son stockage ou son transport 9 Elim...

Страница 65: ...cat de garantie Produit Via Numéro de série À remplir par le revendeur Revendeur Date et cachet Veuillez prêter attention à nos conditions générales Des panneaux sont situés sur le support de siège Remarque Malgré des recherches et des modifications approfondies il se peut que des informations incorrectes se soient glissées dans notre manuel d instructions Nous nous réservons le droit d y apporter...

Страница 66: ...131 130 Notizen Notes Notas Notes Notizen Notes Notas Notes ...

Страница 67: ...07 Karlsbad www bischoff bischoff com MOVILIDAD B B IBERIA S L P I Can Mascaró C Ponent Nave 1 A E 08756 La Palma de Cervelló www bbiberia es B B France S A R L Centre d affaires Parc Lumière 46 avenue des Frères Lumière F 78190 Trappes www b bfrance fr ...

Отзывы: