background image

Bischoff & Bischoff GmbH | 16.06.2015

EN

15

14

TRIPLEX

 | Electric Wheelchair

Electric Wheelchair | 

TRIPLEX

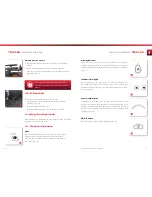
•  Remove the screw and adjust the seat to the desired angle.
•  Place the screws into the nearest hole and tighten them again.

Make sure that both pins, on the right and left, are 
fully engaged.

3.5.4. Electronic adjustment 

functions

Depending on the configuration it may also be possible to adjust the 
angle of the seat, backrest and footrests electronically. For further 
details, see chapter 4, “Using the wheelchair”.

Beware of the risk of to the user, carer and third 
parties when electronically adjusting the seat 
functions.

3.5.5. Side parts

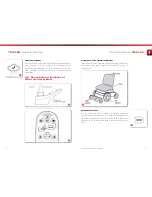
You can slide the side parts sideways.
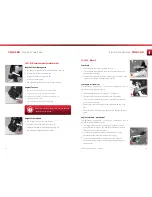
•  Undo the fastening screw underneath the seat and slide the side 

part into the desired position (fig. 10).

•  Tighten the screw again.

Make sure the fastening is firmly tightened.

10

3.5.6. Armrests

The armrests can be completely taken off to be able to get in and out 
of the chair from the side. In addition, the height of the armrests can 
be adjusted. They can also be adjusted sideways by adjusting the side 
parts (see side parts).

Removing the armrests

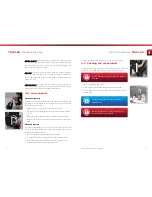
•  To remove the armrest, loosen the wing bolt and pull out the 

armrest to the top (fig. 11). 

•  When installing the armrest, make sure it is inserted all the way 

and fastened again. 

Adjusting the height

•  First take the armrest out of the mounting. 
•  Remove the arresting bolt and screw it back into the armrest at the 

desired position (fig. 12). 

•  The lowest hole represents the maximum height of the armrest. 

3.5.7. Control unit

•  The control unit can be mounted either on the right or left-hand 

side underneath the armrest each. 

•  The control unit must be adjusted by a qualified mobility dealer to 

warrant safe functionality of the wheelchair.

Adjusting the height

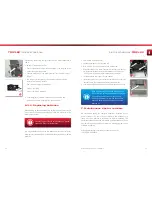
•  The distance to the armrest can be adjusted.
•  Loosen the screw connection on the inner side of the side part.  

(fig. 13)

•  Move the control unit into the desired position, then tighten the 

screw again. 

11

12

13

Содержание triplex

Страница 1: ...Enjoy mobility Bedienungsanleitung Enjoy mobility Instruction manual Triplex ...

Страница 2: ...cing batteries 30 7 Maintenance tips for retailers 31 8 Disposal 32 9 Transfering the wheelchair 32 10 Maintenance 32 11 Transport 33 12 Warranty 34 Inhaltsverzeichnis 1 Introduction 04 1 1 Signs and symbols 05 2 Important safety instructions 05 2 1 General safety instructions 05 2 2 Advice regarding EMC interference 07 2 3 Brakes 07 2 4 Use on public roads 07 2 5 Purpose 07 2 6 Indications for us...

Страница 3: ...nual is an integral and necessary part of the wheelchair This is why you should keep it close by and include it when passing on the wheelchair to someone else Any repairs and adjustments require special technical training and may therefore only be carried out by authorized B B dealers 1 1 Signs and symbols Warning These are especially safety relevant instructions Follow the directions in the manua...

Страница 4: ...e wheelchair should therefore only be used on level ground in this mode Non observance may lead to life threatening situations 2 2 Advice regarding EMC interference Despite meeting all applicable EMC guidelines and standards it is possible that the wheelchair will experience interference from other electrical devices e g cell phones or interfere with these Should you notice such interference eithe...

Страница 5: ...possible You may need it later for storage or to return the product Assembly adjustment to your body size and first instructions are taken care of by your qualified medical supply dealer If the wheelchair is shipped by rail or road the goods should be checked immediately for transport damages carton in the presence of the bearer Should there be any damage please contact our customer service Tel 49...

Страница 6: ...e This is the only way to ensure a physiologically correct posture allowing for long drives without tiring Below you find a description of the basic settings of the wheelchair You should carry out these adjustments with the help of your medical supply dealer 3 5 1 Mechanical footrests Length of lower leg supports The lower leg supports can be adjusted from 47 to 55 cm To do so loosen the two allen...

Страница 7: ...40 cm You should then use a newly fitted seat cushion To adjust the seat depth undo the fastenings of the backrest slide it forward and tighten the screws again fig 07 Seat angle mechanical This description only applies if you have a configuration with a mechanically adjustable seat angle The default setting of the seat angle is 1 backwards The seat angle can be adjusted backward in five settings ...

Страница 8: ...e completely taken off to be able to get in and out of the chair from the side In addition the height of the armrests can be adjusted They can also be adjusted sideways by adjusting the side parts see side parts Removing the armrests To remove the armrest loosen the wing bolt and pull out the armrest to the top fig 11 When installing the armrest make sure it is inserted all the way and fastened ag...

Страница 9: ...active lighting system of your wheelchair when darkness falls or when travelling through dark areas such as tunnels This will make you more visible to other traffic fig 16 14 15 16 Warning indicators Press this button to switch on the warning indicators in emergency situations such as inability to move the wheelchair All four indicator lights will flash and signal other traffic that your wheelchai...

Страница 10: ...eed The speed is controlled by movement of the joystick fig 22 Horn Press this button to sound the horn fig 23 Immobiliser To protect your wheelchair from unauthorised use or theft store it in a locked room or activate the immobiliser Press and hold the On Off button until you hear a beep and release it Move the joystick in the direction of travel and then to the neutral position It will beep in e...

Страница 11: ...e joystick up and down 4 3 Description of functions of R Net control system 27 28 26 Display panel of the adjustment functions Illuminated LEDs of the respective adjustment function left footrest right footrest seat back indicate which adjustment function is currently active 29 Adjustment functions Use this button fig 30 to activate the electronic adjustment functions Move the joystick to the left...

Страница 12: ...lock it by setting the parking brakes Now slide onto the seat by turning your body around Then move the arm rest and leg rests to the original position 4 5 Driving the wheelchair Before moving check that the solenoid brake is correctly locked Commissioning Sit in the seat of your B B wheelchair and place your legs of the footrests Make sure that you are sitting as far back in the seat as possible ...

Страница 13: ... rest in the swung out position can be completely removed fig 32 When you want to replace the leg rest proceed in reverse order Move the leg rest to the forward position until you hear it lock into place Electronic leg rests In order to make getting in and out as easy as possible you can fold the foot plates upwards and pivot the calf rests outwards You can also swing out or raise the footrests Fi...

Страница 14: ... circle 120 cm Equipment Frame powder coated steel frame Brake automatic braking system conforms to the German Road Traffic Licensing Regulations StVZO Operating forces Joystick approx 1 N Buttons on the control panel approx 1 N Disconnecting the drive mechanisms 60 N 6 Care instructions for the user 6 1 Cleaning and disinfection Make sure that the wheelchair is switched off before starting to cle...

Страница 15: ...ssure is adequate If the pressure is too low the tyres must be pumped up Check the tyre tread depth at least once a month It should be at least 1 mm Defective or worn tyres must be replaced by the dealer 6 3 Batteries The wheelchair is equipped with maintenance free gel batteries whose fluid level does not need to be checked If you do not use your wheelchair for an extended period the batteries sh...

Страница 16: ...5 36 First remove the battery cover Loosen the screws on the right and left Now the belts that hold the battery can be released Disconnect the battery cable First the red terminal and then the black terminal Make sure you use insulated tools and do not contact metal frame parts while disconnecting the cables Lift the batteries carefully out by the handles Install the new batteries in their correct...

Страница 17: ... are tested in accordance with ISO 7176 19 The tests in accordance with ISO 7176 19 were performed using restraint systems from AMF Bruns The correct mounting of the restraint system is a prerequisite for the safe transportation of the products in a vehicle for transporting disabled people and the basis for the approval The restraint systems from AMF Bruns provide the ideal points for the provisio...

Страница 18: ...al of B B will generally lead to forfeiture of warranty and product liability claims Our products come with a statutory guarantee of 2 years Batteries replacement units and repairs are covered by a 1 year warranty Warranty Certificate Please note our general business terms and conditions Model Triplex Serial Number to be filled in by authorized dealer Dealer Date and Stamp The serial number is loc...

Страница 19: ...Bischoff Bischoff GmbH Becker Göring Straße 13 D 76307 Karlsbad www bischoff bischoff com ...

Отзывы: