background image

7

Owner’s manual

EN

SAFETY INSTRUCTIONS

•  Read this instruction manual carefully before first use and keep it for future reference. The 

producer  is  not  responsible  for  damages  caused  by  inappropriate  use  and  handling  of  the 

device.

•  Before connecting the device to power supply socket, make sure the voltage indicated on the 

appliance corresponds to the voltage in the power supply socket.

•  DO NOT plug / unplug this device from mains supply with wet hands.

•  When you disconnecting the power cord of the device, grasp and pull the plug, never the cord 

/ cable.

•  Keep the device and its cord/cable away from heat, water, moisture, sharp edges and any 

other factor which may damage the appliance or its cord.

•  Avoid placing the unit in areas of extremely high humidity and temperature. The appliance 

should not be under direct sun, in high temperature or wet environment.

•  Disconnect the device from power supply before cleaning. Clean the unit’s exterior periodically 

with  a  soft,  slightly  damp  cloth.  Never  use  thinner,  benzine,  or  other  solvents  which  may 

damage the unit.

•  Please turn off the appliance, disconnect it from power supply/remove batteries if it is not going 

to be used for a longer period of time.

•  Do not dismantle the housing, as it may pose the risk of  electric shock. Do not attempt to repair 

the product yourself. In case of damage, contact with an authorized service point for check-up 

/ repair.

•  This  appliance  may  be  used  by  children  who  are  above  8  years  old  and  by  persons  with 

reduced physical, sensory or mental capabilities, or lack of experience and knowledge, if they 

are supervised and guided by a person who is responsible for their safety in a cautious manner, 

and all the safety precautions are understood and followed. Children should not play with this 

device. Children should not perform cleaning and servicing of the device unsupervised.

•  Use only authorized accessories. Producer does not guarantee compability with every external 

device/accessory.

PRODUCT DESCRIPTION

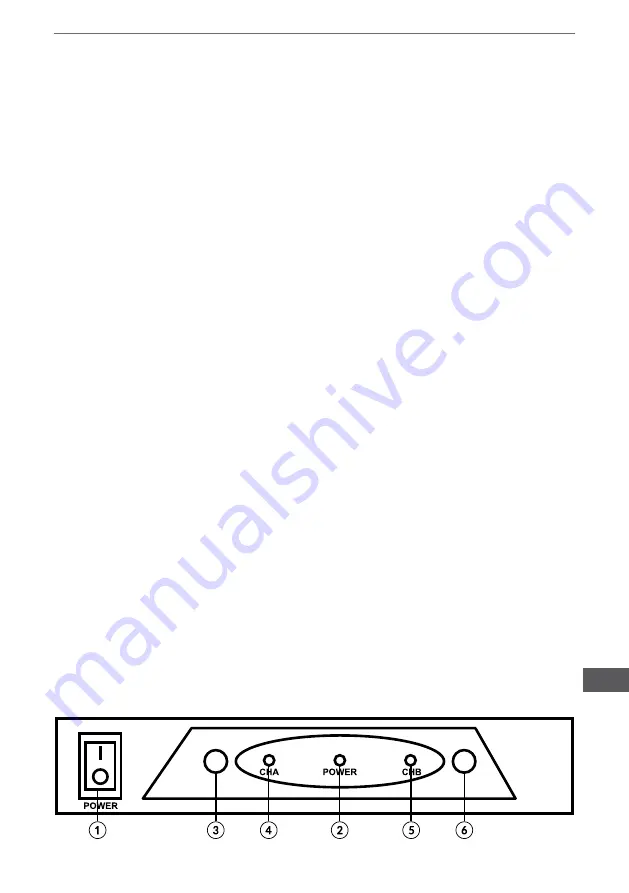
RECEIVER (front)

1.  Power switch

2.  Power signal indicator

3.  CHA volume control

4.  CHA signal indicator

5.  CHB signal indicator

6.  CHB volume control

Содержание MIK0110

Страница 1: ...PL DE RO Bedienungsanleitung Instrukcja obs ugi Manual de utilizare EN User s manual 2 channel wireless VHF microphone system MIK0110...

Страница 2: ......

Страница 3: ...eicht angefeuchteten Tuch Verwenden Sie niemals Verd nner Benzin oder andere L sungsmittel die das Ger t besch digen k nnten Schalten Sie das Ger t bitte aus trennen Sie es von der Stromversorgung und...

Страница 4: ...tschaft ST das Mikrofon ist eingeschaltet doch ohne Ton bertragung AUS OFF 15 Batteriefach 16 Schraubdeckel Mikrofon Sender Batterie ersetzen Handmikrofon Drehen Sie den Schraubdeckel gegen den Uhrzei...

Страница 5: ...fset Mikrofon regeln Sie die Mikrofon Verst rkung Sensibilit t HINWEISE Das Ger t unterst tzt nur bis zu 2 Mikrofone gleichzeitig Obwohl das Set 2 Handmikrofone und 2 Funksender f r Clip Kopfset Mikro...

Страница 6: ...rwertung von stofflichen Ressourcen zu f rdern Private Nutzer sollten den H ndler bei dem das Produkt gekauft wurde oder die zust ndigen Beh rden kontaktieren um in Erfahrung zu bringen wie sie das Ge...

Страница 7: ...ft slightly damp cloth Never use thinner benzine or other solvents which may damage the unit Please turn off the appliance disconnect it from power supply remove batteries if it is not going to be use...

Страница 8: ...ophone power switch ON Standby the microphone is ON but without audible sound OFF 15 Battery compartment 16 Screw top Microphone transmitter battery replacement Handheld microphone Twist the screw top...

Страница 9: ...iver and in case of clip on headset microphone adjust gain knob NOTES the device supports only up to 2 microphones simultaneously Although the set includes 2 handheld microphones and 2 wireless transm...

Страница 10: ...inable reuse of material resources Household users should contact either the retailer where they purchased this product or their local government office for details of where and how they can take this...

Страница 11: ...dk w czyszcz cych Nale y wy czy urz dzenie i od czy je od zasilania wyj z niego baterie je li nie b dzie u ywane przez d u szy czas Zabrania si samodzielnego demonta u urz dzenia Zabrania si w asnor c...

Страница 12: ...zony ale nie przesy a d wi ku OFF wy 15 Pojemnik na bateri 16 Nakr tka pojemnika na bateri wymiana BATERII mikrofonu nadajnika Mikrofon do r ki Nale y odkr ci nakr tk pojemnika na bateri odwrotnie do...

Страница 13: ...g o no ci dla ka dego kana u a w przypadku nadajnika bezprzewodowego do mikrofonu na g ow na klip ustawi poziom czu o ci mikrofonu gain adjust UWAGA Urz dzenie obs uguje jednocze nie nie wi cej ni 2 m...

Страница 14: ...ktyki W celu uzyskania informacji na temat miejsca i sposobu bezpiecznego dla rodowiska recyklingu tego produktu u ytkownicy w gospodarstwach domowych powinni skontaktowa si z punktem sprzeda y detali...

Страница 15: ...carpa moale u or umeda Niciodata nu folositi diluant benzen sau alti solventi care pot deteriora unitatea Deconectati aparatul de la priza si indepartati bateriile daca nu este folosit pentru o perioa...

Страница 16: ...artiment pentru baterie 16 Capac cu filet Inlocuire baterie transmitator microfon Microfon portabil Rasuciti capacul cu filet in sens anti orar pentru acces la compartimentul bateriei Introduceti bate...

Страница 17: ...atorul de volum al semnalului de la microfon iar in cazul in care aveti microfon clip on microfon cu casti reglati butonul pentru castig NOTE Acest dispozitiv suporta doar 2 microfoane simultan fiecar...

Страница 18: ...a promova refolosirea resurselor materiale Utilizatorii casnici sunt rugati s ia legatura fie cu distribuitorul de la care au achizitionat acest produs fie cu autoritatile locale pentru a primi inform...

Страница 19: ......

Страница 20: ...www azusa pl...

Отзывы: