background image

User Manual 

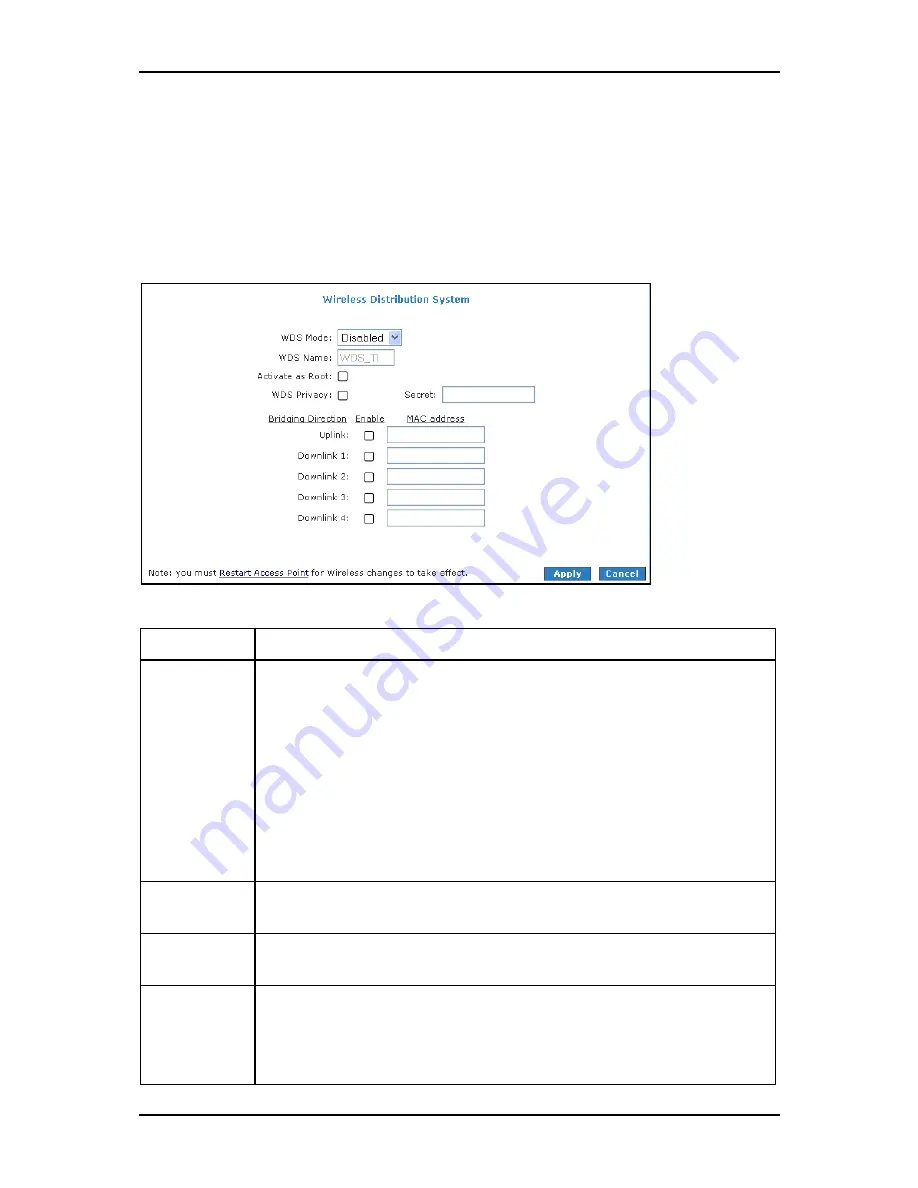
Wireless Distribution System 

Wireless distribution system (WDS) is a system that interconnects BSS to build a premise 

wide network. WDS network allows users of mobile equipment to roam and stay 

connected to the available network resources. 


Wireless Distribution System 

Field 

Description 

WDS Mode 

The following WDS mode are available: 

Bridge: In Bridge mode, the Access Point basic service set (BSS) service is enabled. 

Repeater: In Repeater mode, the Access Point BSS is disabled when connection to 
the upper layer Access Point is established 

Crude: In Crude mode, the Access Point BSS is always enabled; however the links 
between Router are configured statically and are not maintained. 

Disabled (Default): WDS inactive. 

In both Bridge and Repeater modes, WDS uses management protocol to establish 
and maintain links between Router. 

WDS Name 

The WDS name is used to identify WDS network. The field takes up to eight 
characters. Two or more WDS networks may exist in the same area. 

Activate as Root  This field must be checked for the root device in WDS hierarchy. Only one WDS root 

device may exist in WDS network. This field is not applicable for Crude mode. 

WDS Privacy 

Checking this field commands WDS manager to use a secured connection between 
Router in the WDS network. Security settings must be the same in all Router in the 
WDS network. 

Note: WDS privacy is not supported in Crude mode. 

Page 59


of 118 

Содержание DSL605EW

Страница 1: ...Ethernet Wireless Router User Manual VERSION 0 1...

Страница 2: ...part of this document may be reproduced republished or retransmitted in any form or by any means whatsoever whether electronically or mechanically including but not limited to by way of photocopying r...

Страница 3: ...Panel 9 Back Panel 10 Planning Your Network 11 Installing the Router 12 Connecting with the POTS Splitter 12 Connecting with the Computer 13 Connecting Other Ethernet Devices 14 Connecting Wireless De...

Страница 4: ...Account 33 Changing the System Password 33 Changing the Timeout Settings 33 Network Setup 34 WAN Setup 34 LAN Setup 43 Wireless Setup 50 Wireless Configuration 51 Multiple SSID 52 Wireless Security 53...

Страница 5: ...iguration 99 Routing 102 Static Routing 102 Dynamic Routing 103 Routing Table 104 Diagnostics 105 Viewing Status and Product Information 105 Connection Status 106 System Log 107 Remote Log 108 Network...

Страница 6: ...instructions of the router and the web interface Target Audience This manual is designed and developed for users who are required to install and maintain the router It assumes the user of this manual...

Страница 7: ...t and other network appliances into a single network either through wired or wireless connection Requirements Your computer must meet the following minimum requirements Software Operating System Any o...

Страница 8: ...User Manual Package Contents For any missing items please contact your dealer immediately Product contents vary for different models Package Contents Page 8 of 118...

Страница 9: ...Label Action Description POWER Off No power is supplied to the device Steady light Connected to an AC power supply ETHERNET Off No Ethernet connection Steady light Connected to an Ethernet port Blinki...

Страница 10: ...Transmitting Receiving data Back Panel The back panel provides ports to power up and connect the router into the network Back Panel Label Used for DSL Connecting the telephone cable ETHERNET 1 4 Conne...

Страница 11: ...the devices and plan out how to connect these devices The illustration below is an example of a network diagram Sample network diagram To create a network diagram For wireless devices identify the wir...

Страница 12: ...nstalling a Plain Old Telephone Service POTS splitter separates the two signals and eliminates the noise Note Consult your service provider what type of POTS Splitter should be used The POTS Splitter...

Страница 13: ...ting the router with the computer To connect with the computer 1 Plug one end of the Ethernet cable from the router s ETHERNET port and then plug the other end into the Ethernet port in your computer...

Страница 14: ...nnect these devices into available Ethernet ports on the router Connecting other devices To the connect with other devices 1 Plug one end of the Ethernet cable from computer s Ethernet port and then p...

Страница 15: ...et connection from your router Your router allows you to connect with several wireless devices To the connect with wireless devices 1 Turn on your wireless device 2 Open the software you use to detect...

Страница 16: ...Clicking Apply will not implement the changes when the router is restarted Cancel Click to revert to the last saved configuration Commands Save Setting Click to permanently apply configuration change...

Страница 17: ...User Manual Wireless Menu Security Menu Status Menu Help Menu Setup Menu The Setup menu is used to complete the initial device configuration Setup Menu Page 17 of 118...

Страница 18: ...User Manual Basic Menu The Basic Menu provides the Home Quick Start LAN Configuration and Diagnostics links Basic Menu Page 18 of 118...

Страница 19: ...uration settings for existing connections At least one WAN connection must be configured before implementing advanced WAN configuration features At least one LAN group must be defined before implement...

Страница 20: ...User Manual Wireless Menu Wireless Menu allows you to configure the wireless settings Page 20 of 118...

Страница 21: ...User Manual Security Menu Security Menu allows you to configure security tools like IP Filters and LAN Isolation Security Menu Page 21 of 118...

Страница 22: ...User Manual Status Menu The Status Menu provides the status for different connections or interfaces Status Menu Page 22 of 118...

Страница 23: ...User Manual Help Menu The Help Menu provides documentation about various router features Help Menu Page 23 of 118...

Страница 24: ...ings Internet properties Temporary Internet files Internet Sharing Proxy and Security Applications Internet sharing proxy software and firewall applications may interfere with the router installation...

Страница 25: ...x 4 Select Internet Protocol TCP IP and then click Properties This opens the Internet Protocol TCP IP dialog box 5 Select Obtain an IP address automatically 6 Click OK to close the Internet Protocol T...

Страница 26: ...s the Run dialog box 2 Enter control and then click OK This opens the Control Panel 3 Double click Internet Options This opens the Internet Options dialog box 4 In the Temporary Internet Files pane cl...

Страница 27: ...devices you need to configure the router settings via the web interface To open the web interface 1 Open your browser 2 Enter 192 168 1 1 in the address field and then press Enter This opens the Setu...

Страница 28: ...nternet Login Account Setting page Internet Login Account Setting page 4 Enter the User ID Password Protocol VP1 and VCI for your account These are the account information from your service provider 5...

Страница 29: ...SSID Country Standard and Wireless Channel 7 Select Yes or No to specify if you want to hide your wireless network name or not 8 Click Next This opens the Wireless LAN Security page Wireless LAN Secu...

Страница 30: ...r an Encryption Key or click Generate to allow the router to create an alphanumeric encryption key for you The Encryption key will be used to establish the wireless network connection of wireless devi...

Страница 31: ...ystem Password page System Password page 12 Select Enable Authentication 13 Enter User Name Password and Confirm Password 14 Enter the number of minutes for Idle Timeout 15 Click Next This opens the S...

Страница 32: ...only runs on Windows operating systems Notes Microsoft Windows 2000 users may be asked to confirm the installation To confirm click Yes Microsoft Windows XP users may be asked to confirm the installa...

Страница 33: ...ord in the Confirm Password text box 6 To temporarily implement the settings click Apply 7 To make changes permanent click Save Settings Note Remember your account information If you forget the User N...

Страница 34: ...all the computers in the Local Area Network LAN However if you are familiar with your network setup you can manually configure the LAN settings WAN Setup Wide Area Network refers to the configurations...

Страница 35: ...apsulating PPP frames in Ethernet frames and is described in RFC 2516 PPPoE provides the ability to connect to a network of hosts over a simple bridging access device to a remote access concentrator W...

Страница 36: ...a method of establishing a network connection session between network hosts It usually provides a mechanism of authenticating users Logical link control LLC and virtual circuit VC are two different m...

Страница 37: ...rmation such as the subnet mask and the default gateway must also be specified Up to three domain name server DNS addresses can be identified These servers resolve the name of the computer to the IP a...

Страница 38: ...n DHCP allows the router to automatically obtain the IP address from the server This option is commonly used in when the IP is dynamically assigned and is not known prior to assignment New DHCP Connec...

Страница 39: ...oes not assign any IP address to the WAN interface NAT and firewall rules are not enabled This connection method makes the router act as a bridge for passing packets between the WAN interface and the...

Страница 40: ...etup page CLIP provides the ability to transmit IP packets over an ATM network CLIP support encapsulates an IP datagram in an AAL5 PDU frame using RFC 2225 and it uses an ATM aware version of the addr...

Страница 41: ...on allows you to select any combination of DSL training modes Leave the default value if you are unsure or the service provider did not provide this information In most cases this screen should not be...

Страница 42: ...ttings provided by the service provider Before the router can begin scanning the connection the telephone line has to be plugged into the router Connection Scan To perform connections scan 1 Select th...

Страница 43: ...llows the router to support 254 users If you want to support more users you need to edit the subnet mask but remember that the DHCP server is defaulted to only give out 255 IP addresses If you change...

Страница 44: ...sent to the ETHERNET interface because it does not belong to any LAN group 4 Select ETHERNET from Interfaces and then click Add under LAN group 2 Just like in LAN group 1 Configure will appear in LAN...

Страница 45: ...sabled LAN Group Configuration Category Field Description Unmanaged Unmanaged is a state when the LAN group is not configured and no IP address has been assigned to the bridge Obtain an IP address aut...

Страница 46: ...ed in conjunction with the host name to uniquely identify the router To access the web pages of the router you can type 192 168 1 1 the IP address or mygateway1 ar7 Host Name Domain Enable DHCP Server...

Страница 47: ...allowed to maintain a network connection to the router using the current dynamic IP address At the end of the Lease Time the lease is either renewed or the DHCP server issues a new IP The amount of ti...

Страница 48: ...om the WAN This can be configured by enabling disabling Assign ISP DNS SNTP on the LAN Group Configuration page Note ISP DNS SNTP only applies when the DHCP server is enabled on the LAN Group Configur...

Страница 49: ...ents page 3 Select a LAN Connection and enter IP Address Hostname and MAC Address 4 Click Apply 5 You can convert the dynamic into a static entry by clicking Reserve and then click Apply 6 To temporar...

Страница 50: ...eless client needs this name to establish wireless connection The wireless setup allows the user to enable or disable the Access Point AP Disabling Access Point will prevent the wireless router from e...

Страница 51: ...want to explore the advanced features you can click on the Advanced button The options listed can be changed to cater for advance users Wireless Configuration To access Wireless Setup 1 Select the Wir...

Страница 52: ...a primary and a secondary SSID The SSID field takes up to 32 alphanumeric characters Change the VLAN ID to a number different from zero between 1 to 4095 Multiple SSID To access Wireless Setup 1 Selec...

Страница 53: ...sing your router By default None is selected Wireless Security WEP WEP is a security protocol for WLAN WEP provides security by encrypting the data that is sent over the WLAN You can configure up to 4...

Страница 54: ...se the same key Wireless Security WEP To configure WEP 1 Select the Wireless Menu 2 Select Security This opens the Wireless Security page 3 Select WEP 4 Select Enable WEP Wireless Security 5 Enter an...

Страница 55: ...messages from the authenticator to the authentication server typically use the remote authentication dial in user service RADIUS protocol Wireless Security 802 1x To configure 802 1z 1 Select the Wire...

Страница 56: ...n Access Point Protocols including 802 1X EAP and RADIUS are used for strong authentication Like WEP keys can still be entered manually pre shared keys however using a RADIUS authentication server pro...

Страница 57: ...ature permits you to permit or ban wireless clients by using the MAC address Wireless Management Access List To permit or ban a client through the Access List page 1 Select the Wireless Menu 2 Select...

Страница 58: ...permit or ban a client through the Access List page 1 Select the Wireless Menu 2 Select Wireless Management This opens the Wireless Management page 3 Select Associated Stations 4 Select Allow or Ban...

Страница 59: ...nabled however the links between Router are configured statically and are not maintained Disabled Default WDS inactive In both Bridge and Repeater modes WDS uses management protocol to establish and m...

Страница 60: ...Configuration Auto configuration is not supported in the current version Uplink Connection The BSS ID of the upper device in the WDS hierarchy This uplink cannot be configured if root is enabled Downl...

Страница 61: ...iew the rules associated with a predefined filter and add the available rules for a given category You can also create edit or delete your own IP filter rules IP Filters To configure IP Filters 1 Sele...

Страница 62: ...ory You can view or delete the rules you create 6 Continue to add rules as they apply from each category using the Add button 7 To temporarily implement the changes click Apply 8 To make the change pe...

Страница 63: ...s by examining its URL a text string describing a unique location on the Internet If the URL contains a blocked keyword then access to that website will be denied To apply URL filters 1 Select the Sec...

Страница 64: ...ge provides documentation for various topics like Firewall Bridge Filters LAN Clients LAN Group Configuration PPP Configuration UPnP IP QoS and Routing Information Protocol To access Help select the H...

Страница 65: ...versal Plug and Play UPnP Simple Network Timing Protocol SNTP Simple Network Management Protocol Internet Group Management Protocol IGMP Proxy TR 068 WAN Access TR 069 NAT Services DNS Proxy Dynamic D...

Страница 66: ...should support this feature In the presence of multiple WAN connections select a connection on which the incoming traffic is present for example the default WAN connection UPnP To configure UPnP 1 Sel...

Страница 67: ...Primary SNTP Server The IP address or the host name of the primary SNTP server This can be provided by ISP or defined by user Secondary SNTP Server The IP address or the host name of the secondary SNT...

Страница 68: ...nnect to an SNTP server before it tries to connect to the next server in line Time Zone The time zone in which the router resides Day Light Select this option to enable disable daylight saving time DS...

Страница 69: ...agent is a separate station that can request data from an SNMP agent in each of the different system in the network The agent uses MIBs as dictionaries of manageable objects Each SNMP managed device...

Страница 70: ...roups or a multicast router sending multicast packets to multicast groups on the WAN side IGMP Proxy Multicasting is a form of limited broadcast UDP is used to send datagram s to all hosts that belong...

Страница 71: ...WAN and LAN connections You can configure the WAN or LAN interface as one of the following Upstream The interface that IGMP requests from hosts are sent to the multicast router Downstream The interfa...

Страница 72: ...s logged in if the session remains inactive for more than 20 minutes the user will be logged out and the account expires Enable WAN Access Update To create a temporary user account for remote access 1...

Страница 73: ...CPE and Auto Configuration Server ACS The CPE WAN Management Protocol defines a mechanism that encompasses secure auto configuration of a CPE and also incorporates other CPE management functions into...

Страница 74: ...abled and Periodic Inform Interval 6 To temporarily apply the settings click Apply 7 To make changes permanent click Save Settings NAT Services If the user has more than one public IP address assigned...

Страница 75: ...ed DNS Proxy To select the DNS Server Priority 1 Select Advanced 2 Select Application DNS Proxy 3 Select the DNS Server Priority Only Auto Discovered DNS Servers Only User Configured DNS Servers Auto...

Страница 76: ...r IP address It can be useful in web hosting and FTP services Dynamic DNS Client Note The User Name Password entered should be similar to the User Name Password you have specified during the registrat...

Страница 77: ...d TCP IP setting on user s computer can surf web via the router without the need to change the IP address Auto DNS Any DNS IP address set at user s computer irregardless whether the address is valid o...

Страница 78: ...e Auto NetBIOS still allow computer to surf the web with a condition that the router gateway MUST be in Private IP Ranges To access Easy Connect 1 Select Advanced Menu 2 Select Application Easy Connec...

Страница 79: ...eb hosting for people on the Internet or play Internet games Port forwarding is configurable per LAN group Port Forwarding A database of predefined port forwarding rules allows you to apply one or mor...

Страница 80: ...pply from each category 7 Click Apply to temporarily activate the settings 8 To make changes permanent click Save Settings DMZ Settings Setting a host on your local network as demilitarized zone DMZ f...

Страница 81: ...efined filter rule in sequence When a match is found the appropriate filtering action allow or deny is performed Up to 20 filter rules are supported with bridge filtering Bridge Filters To configure B...

Страница 82: ...l page allows you to access the router via the web from a remote location like your home or office Web Access Control To configure Web Access 1 Select Advanced Menu 2 Select Application Web Access Con...

Страница 83: ...control allows you to access the router remotely via SSH from the WAN side SSH Access Control To configure SSH Access Control 1 Select Advanced Menu 2 Select Application SSH Access Control This opens...

Страница 84: ...ther How can you make sure the priority from one network is carried over to another network Class of service CoS is introduced as the common language for the QoS mappings When QoS is enabled the route...

Страница 85: ...f QoS is not enabled on your router all traffic will be treated as best effort There are some additional terms you should get familiarize with Ingress Packets arriving into the router from a WAN LAN i...

Страница 86: ...erse CoS and domain mapping is configured using the Egress To access Egress select the Advanced Menu and then select QoS Egress There are three Egress modes No Egress mode Layer 2 Layer 3 No Egress Mo...

Страница 87: ...the WAN side only Unclassified Packet Some locally generated packets might not have been classified and thus do not have a CoS value such as PPP control packet and ARP packet You can define the CoS f...

Страница 88: ...e only Default Non IP Locally generated packets such as ARP packets do not have a CoS marking You can define the CoS for all unclassified outgoing packets on layer 3 using this field The selections ar...

Страница 89: ...oS the common language so that the priority marking is carried over There are four Ingress modes Untrusted mode Layer 2 Layer 3 Static Untrusted Mode Untrusted is the default Ingress page setting for...

Страница 90: ...e Select the WAN interface here to configure the CoS for incoming traffic Only WAN interface can be selected as VLAN is currently supported only on the WAN side Class of Service The selections are in...

Страница 91: ...has a priority bit of 1 is mapped to CoS2 which is the second highest priority This is given to the high priority packets such as video 8 Click Apply to temporarily activate the settings 9 Repeat ste...

Страница 92: ...layer 3 WAN LAN packets to one of the following CoS in the order of descending priority CoS1 CoS2 CoS3 CoS4 CoS5 and CoS6 ToS The Type of Service field takes values from 0 to 255 Default Non IP A sta...

Страница 93: ...o CoS1 the highest priority 7 Click Apply to temporarily activate the settings 8 Repeat step 5 7 to add more rules to LAN Group 1 Up to 255 rules can be configured for each interface 9 To make changes...

Страница 94: ...ace You are configuring QoS on this interface only Any WAN LAN interface that is not configured has the default Untrusted mode 6 Select CoS1 in Class of Service All incoming traffic from the ETHERNET...

Страница 95: ...eature This field needs to be selected before shaper configuration Max Rate This field is applicable for the HTB Queue Discipline and Low Latency Queue Discipline both are rate based shaping algorithm...

Страница 96: ...queues have the highest priority and are not controlled by the WRR algorithm Of the three shaping algorithms available on the Shaper Configuration page only one can be enabled at a time An example of...

Страница 97: ...not rate controlled hence the field is disabled CoS2 takes 100 Kbps when there is no CoS1 packets CoS6 has 300 Kbps when there is no CoS1 or CoS2 packets This is similar to the HTB queue discipline a...

Страница 98: ...eld has been disabled Only percentage can be assigned to the CoS2 CoS6 CoS1 is not rate controlled hence the field is not displayed When there is no CoS1 packets CoS2 CoS3 CoS4 each has 10 percent and...

Страница 99: ...interfaces for a Policy Routing rule Selections include LAN Interfaces and WAN interfaces DiffServ Code Point The diffServ code point DSCP field value ranges from 1 to 255 This field cannot be configu...

Страница 100: ...ing the protocol first Source MAC The MAC address of the traffic source Local Routing MAC This field is enabled only when Locally Generated is selected in the Ingress Interface field The mark for DNS...

Страница 101: ...ollowing fields can be configured for Policy Routing Destination IP address mask Source IP address mask Source MAC address Protocol TCP UDP ICMP etc Source port Destination port Incoming interface DSC...

Страница 102: ...LAN network or host to which you want to assign a static route Enter the IP address of the host for which you wish to create a static route here For a standard Class C IP domain the network address is...

Страница 103: ...lecting In means that the router will only incorporate received RIP information Selecting Out means that the router will only send out RIP information Selecting both means that the router will incorpo...

Страница 104: ...al Routing Table Routing Table displays the information used by routers when making packet forwarding decisions Packets are routed according to the packet s destination IP address Routing Table Page 1...

Страница 105: ...ing product information Viewing Status and Product Information Your router allows you to view the following status and product information Connection Status System Log Remote Log Network Statistics DD...

Страница 106: ...Status displays the type of protocol the WAN IP address the connection state and the duration of your Internet connection To view the Connection Status select the Status Menu and then click Connection...

Страница 107: ...ys the router log Depending on the severity level the information log will generate log reports to a remote host if remote logging is enabled To view the System Log select the Status Menu and then cli...

Страница 108: ...at are rated at that level or higher are sent to the log server and can be viewed using the server log application which can be downloaded from the web Remote Log Settings To enable remote logging 1 S...

Страница 109: ...sentative 3 Enter the IP Address where the log will be sent to and then click Add 4 Click Apply The IP address will appear in the Select a logging destination drop down menu 5 To make changes permanen...

Страница 110: ...istics The Ethernet and DSL line statuses are displayed in this page To view the Network Statistics select the Status Menu and then click Network Statistics Network Statistics Ethernet Network Statist...

Страница 111: ...displays the WAN connection status By default DDNS is disabled When the DDNS is enabled the DDNS client updates every time the router gets a new IP address To view the DDNS Update Status select the St...

Страница 112: ...er Manual DHCP Clients DHCP Clients displays the MAC address IP address host name and lease time To view the DHCP Clients select the Status Menu and then click DHCP Clients DHCP Clients Page 112 of 11...

Страница 113: ...User Manual QoS Status This page displays the Quality of Service and the packet statistics To view the QoS Status select the Status Menu and then click QoS Status QoS Status Page 113 of 118...

Страница 114: ...tatus select the Status Menu and then click Modem Status Modem Status Product Information This page displays the product information and software versions To view the Product Information select the St...

Страница 115: ...page displays the following WDS related wireless activities WDS configuration and states WDS management statistics WDS database To view the WDS Report select the Status Menu and then click WDS Report...

Страница 116: ...ic test 1 Select the Basic Menu and then click Diagnostics This opens the Diagnostics page 2 Click Test The test status will appear after running the diagnostic test If a test failed click Help to get...

Страница 117: ...cted to the network To perform a Full Modem test 1 Select the Basic Menu and then click Diagnostics 2 Click Full Modem Test This opens the Modem Test page 3 Select your connection and then click Test...

Страница 118: ...f during the update process Restoring the Default Settings To reset to the default factory settings press RESET for 10 seconds This can be found at the router s back panel When you reset all the softw...

Отзывы: