background image

150-CFP-19T(-)  

12 

Display image is not 
properly sized 


Press the “

Select

” button to Auto Adjust the display. 

 
Adjust the Vertical and Horizontal size controls via the OSD  
(reference 

OSD Adjustments

). 

 
Ensure that a supported mode is selected on the display card 
or system being used. Consult the display card or system 
manual for proper video.


Image will not adjust   


Video timing outside of range.  
 
Use the on-screen menu to adjust the Clock Setting.   
 
Make sure timing is within VESA standard.


Slight distortion in text or 
graphics


Not working in native resolution. 


Display is present but 
“bars” appear or roll across 
screen 


Ground loop problem between computer and display. 
 
Interference from adjacent equipment. 


Vertical shaded bars on 
screen image   


Horizontal size is not properly adjusted. Adjust horizontal 
size. 


Image is not stable


Monitor has incorrect or bad sync signals. 


Check for proper video cable installation. 
 
Replace suspected faulty cable. 


Check to ensure that the video source is within the display’s 
operating range. 


Содержание CAMBRIDGE CFP19 Series

Страница 1: ...150 CFP 19T CAMBRIDGE USERS MANUAL CFP19 Tabletop Series 19 Plastic Tabletop LCD Monitor User Guide...

Страница 2: ...en Set up 9 Introduction to Touch Screens 9 Section 5 Mounting Instructions 10 Section 6 Touble Shooting Tips 11 Section 7 Cleaning and Maintenance 13 Section 8 Appendices 14 Appendix A VGA Pin Assign...

Страница 3: ...liquid crystal display to provide superior display performance A maximum resolution of SXGA 1280 x 1024 is ideal for displaying complex graphics and high definition images Other outstanding designs t...

Страница 4: ...ists o Power cord or plug is damaged or frayed o Liquid is spilled into the display or the display is exposed to rain or water o The display does not operate normally when the operating instructions a...

Страница 5: ...rce may be putting out a signal that is incompatible with the LCD monitor If this happens you will need to adjust the computer to output a compatible video signal see Appendix G Below are the most com...

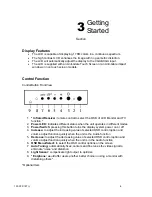
Страница 6: ...erates in different modes 3 Power Switch pressing this button turns the display system power on or off 4 Increase to adjust the increasing value of selected OSD control option and volume adjust functi...

Страница 7: ...he S Connector Video out of any video resource 5 Audio 1 can be connected to the RCA connector audio out of any sound resource 6 Line In can be connected to the stereo audio out of any sound resource...

Страница 8: ...HARPNESS adjusts the clarity and focus of the screen images COLOR TEMPERATURE adjusts color temperatures for users LANGUAGE allows you to choose among five languages English Spanish German French and...

Страница 9: ...ens and Special Drivers Software drivers for touch screen systems are provided in the Aydin Displays Inc accessory kit It is always good to download the latest drivers from the respective web sites Re...

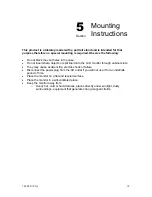
Страница 10: ...the LCD monitor through cabinet slots They may cause accident fire electric shock or failure Disconnect the power plug from the AC outlet if you will not use if for an indefinite period of time Place...

Страница 11: ...ghost of an image remains on the screen after the screen image has been changed Unlike a CRT monitor an LCD monitor s image persistence is not permanent To erase an image ghost turn the monitor off fo...

Страница 12: ...enu to adjust the Clock Setting Make sure timing is within VESA standard Slight distortion in text or graphics Not working in native resolution Display is present but bars appear or roll across screen...

Страница 13: ...th this removes dust and other particles that can scratch the screen Do not apply pressure to the screen surface when wiping it clean Do not pour or spray any liquid directly onto the screen or case o...

Страница 14: ...Horizontal Sync Pin 6 Red Video Ground Pin 14 Vertical Sync Pin 7 Green Video Ground Pin 15 Data Clock SCL Pin 8 Blue Video Ground Appendix B RS 232 Pin Assignments Pin assignment for the 9 Pin Optio...

Страница 15: ...ta 1 Pin 11 TMDS Data 1 3 Shield Pin 12 TMDS Data 3 NC Pin 13 TMDS Data 3 NC Pin 14 5 V Pin 15 Ground Pin 16 Hot Plug Detect Pin 17 TMDS Data 0 Pin 18 TMDS Data 0 Pin 19 TMDS Data 0 5 Shield Pin 20 TM...

Страница 16: ...e SXGA View Angle L R 80 80 View Angle Up Dn 80 80 Input Voltage 90 to 264VAC auto switching Current Draw 42 120VAC Input Power 50W typical Bezel Finish Black Textured Auto Adjust Yes On Power Up Manu...

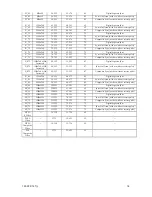
Страница 17: ...arate Sync V_60 640x480 25 175 31 469 60 Sync On Green with or without serrate pulse V_60 640x480 25 175 31 469 60 Composite Sync with or without serrate pulse V_67 640x480 31 500 37 500 67 Digital Se...

Страница 18: ...lse X_87I 1024x768 43Hz Interaced 44 900 35 522 87 Digital Separate Sync X_87I 1024x768 43Hz Interaced 44 900 35 522 87 Sync On Green with or without serrate pulse X_87I 1024x768 43Hz Interaced 44 900...

Страница 19: ...150 CFP 19T 19 Appendix H Outline Dimensions CFP19P1 Height 450mm 17 72 Width 450mm 17 72 Depth 220mm 8 66 Weight 7 3KG 15 33lbs...

Отзывы: