


eBOX640-521-FL Series U
ser’s Manual
Hardware Installation
14
2.4
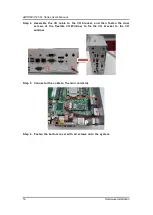
Installation of the 2.5" SATA Device
Step 1 Turn off the system, and unplug the power adaptor.
Step 2 Turn the system upside down to locate the two screws at the rear side,
and then loosen the two screws.
Step 3
Remove the bottom cover and locate the SSD/HDD within the red line marked.
Step 4 Please prepare the following items to assemble SSD/HDD and then
fasten two screws to fix SSD/HDD.
Step 5 Connect the SSD/HDD directly and make sure the insertion is complete.
Содержание eBOX640-521-FL Series
Страница 1: ...eBOX640 521 FL Series Embedded System User s Manual ...
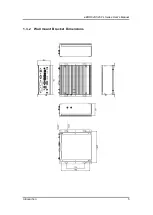
Страница 13: ...eBOX640 521 FL Series User s Manual Introduction 5 1 3 2 Wall mount Bracket Dimensions ...
Страница 38: ...eBOX640 521 FL Series User s Manual Jumper Connector Settings 30 This page is intentionally left blank ...
Страница 43: ...eBOX640 521 FL Series User s Manual BIOS Setup Utility 35 ...
Страница 50: ...eBOX640 521 FL Series User s Manual BIOS Setup Utility 42 PCH HW This screen shows ME Firmware information ...
Страница 62: ...eBOX640 521 FL Series User s Manual 54 Watchdog Timer This page is intentionally left blank ...
Страница 68: ...eBOX640 521 FL Series User s Manual 60 Digital I O Settings 4 Confirm the completion of encryption ...
Страница 71: ...eBOX640 521 FL Series User s Manual TPM Settings 63 ...
Страница 72: ...eBOX640 521 FL Series User s Manual 64 Digital I O Settings This page is intentionally left blank ...


