background image

Operation instructions |

SMART

Portal

14

2018-10-13 | Technical improvements, changes in design, printing- and other errors expected.

3.2.

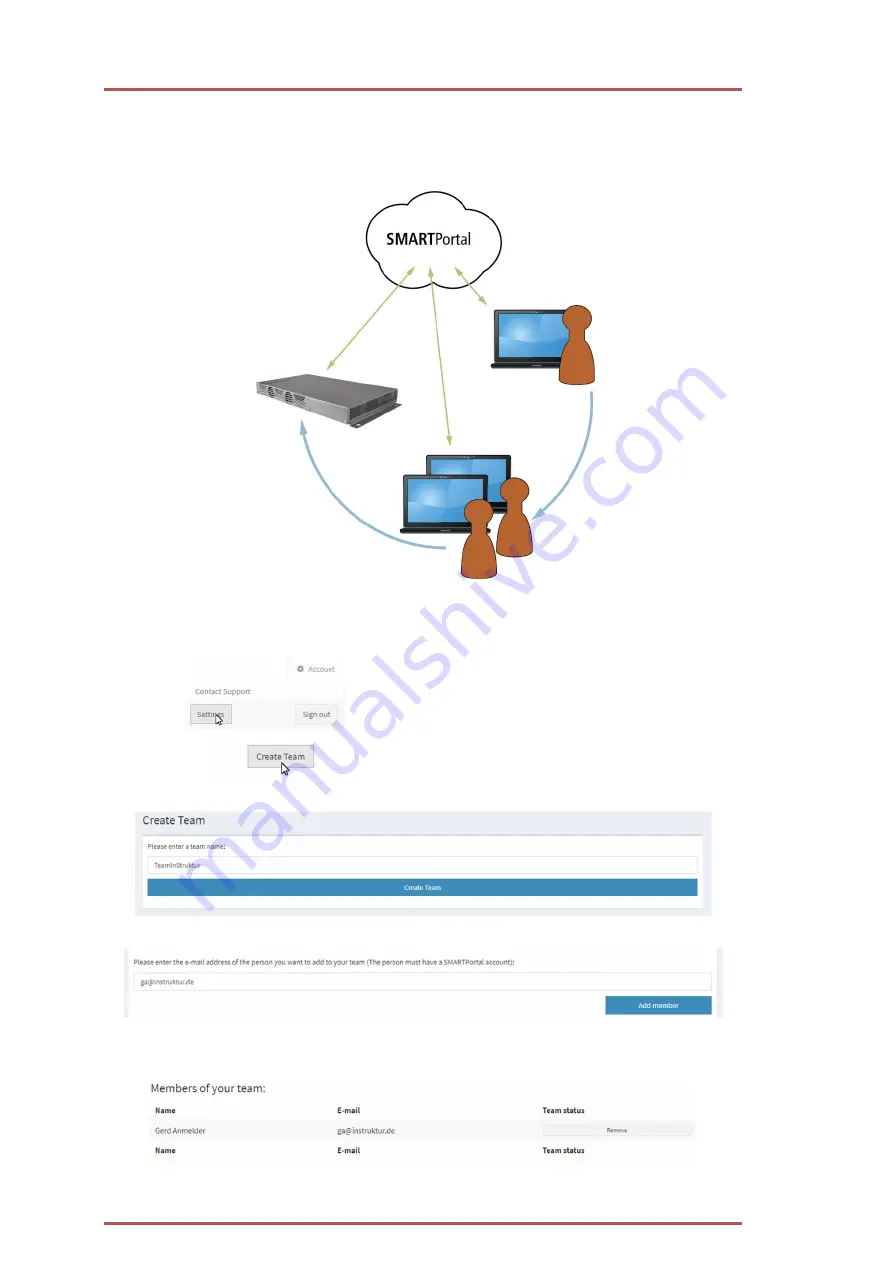
Create a team

For example, the owner may invite the employees of his company as team members. Then they have access to
all devices of the owner.

3.2.1.

How to create a team

Click

Settings

 in the

Account

 menu.

In the settings, click

Create Team

.

Enter a team name and click

Create Team

.

Enter the e-mail address of the team member and click

Add member

.

If the team member is already registered at the SMARTPortal, the team member will receive an e-mail

from the system "You are a new team member of the team ..."
The team member is added to the list of team members.

Owner

Builds a team

Team members

Get access to the
devices

Содержание SMARTPortal

Страница 1: ...SMARTPortal Weltweiter Zugriff auf Produkte von AXING www axing smartportal com Betriebsanleitung ...

Страница 2: ...n und diese konfigurieren 11 3 1 1 Timeout 11 3 1 2 Verbindung trennen 11 3 1 3 Log Dateien eines Gerätes aufrufen 11 3 1 4 Informationen per E Mail empfangen 12 3 1 5 Support Anfrage stellen 12 3 2 Team erstellen 13 3 2 1 So erstellen Sie ein Team 13 3 2 2 So entfernen Sie ein Mitglied aus einem Team 14 3 3 Gerät teilen 15 3 3 1 So teilen Sie ein Gerät 15 3 3 2 So entziehen Sie die Zugriffsrechte...

Страница 3: ...ranalyse durch den AXING Support möglich Sichere verschlüsselte Verbindung AXING Kopfstellen und die Middleware Server der IPTVSolutions stellen eine durchgehend sichere und verschlüsselte Verbindung zum SMARTPortal her Voraussetzungen vor Ort ist lediglich eine Internet Verbindung z B über LAN EoC EoC WLAN Bridge 3G LTE Router Es ist keine komplizierte Konfiguration eines Routers und keine zusätz...

Страница 4: ... Teammitglied muss von einem Eigentümer die Einladung zu einem Team erhalten um Zugriff auf die Geräte zu haben Ein Teammitglied meldet sich mit E Mailadresse und Passwort am SMARTPortal an erhält aber keinen eigenen Benutzerschlüssel Geteilter Nutzer Der geteilte Nutzer muss von einem Eigentümer die Einladung zu einem Gerät erhalten um Zugriff auf dieses Gerät zu haben Ein Geteilter Nutzer meldet...

Страница 5: ... sicheres Passwort mit Groß und Kleinbuchstaben Zahlen und Sonderzeichen Wenn Sie den Haken bei Ich möchte E Mails zu Produktupdates erhalten setzen dann informiert Sie AXING über wichtige Softwareupdates oder Neuerungen Den Haken bei Ich stimme den AGB zu setzen Zum Abschluss der Registrierung auf Registrieren klicken Registrierungs E Mail Sie erhalten vom SMARTPortal eine Registrierungs E Mail m...

Страница 6: ...ang aktiviert und die Zugangsdaten eingetragen Im Feld Status die Option Aktiviert auswählen Wenn gewünscht die Option AXING Support zulassen aktivieren Im Feld Standort eine Bezeichnung des Standorts der Kopfstelle eingeben Diese Bezeichnung erscheint später im SMARTPortal und hilft dabei die Kopfstelle zu identifizieren Im Feld E Mail Adresse die E Mail Adresse eingeben mit der Sie sich im SMART...

Страница 7: ...gen konfiguriert Dynamische IP Adresse Verwenden Sie dynamische IP Adresse um das Gerät in ein Netzwerk mit DHCP Server einzubinden Statische IP Adresse Verwenden Sie statische IP Adresse um das Gerät mit einer fest vergebenen IP Adresse in ein Netzwerk einzubinden Hier kann die IP Adresse Netzmaske und das Gateway geändert werden Zusätzlich können DNS Server 1 und DNS Server 2 eingetragen werden ...

Страница 8: ... Technische Verbesserungen Änderungen im Design Druckfehler und Irrtümer vorbehalten Direkte Verbindung über einen Ethernet Switch zu einem Router mit Internetverbindung Verbindung über Ethernet over Coax zu einem Router mit Internetverbindung ...

Страница 9: ...2018 10 13 Technische Verbesserungen Änderungen im Design Druckfehler und Irrtümer vorbehalten 9 Verbindung mit einem EoC 2 01 im Bridge Client Mode zu einem WLAN Router ...

Страница 10: ...tandort Gerätetyp und Seriennummer Status Grün Verbindung zum SMARTPortal hergestellt Gerät kann konfiguriert werden Rot Verbindung zum SMARTPortal unterbrochen Verbindung verloren Letzte Anfrage hinzugefügt Die Spalten zeigen an wie lange das jeweilige Ereignis zurückliegt Ansicht filtern Im Menü Übersicht die Option Kopfstellen wählen Es werden nur noch die Kopfstellen angezeigt Im Menü Übersich...

Страница 11: ...n 3 1 1 Timeout Sobald eine Verbindung zu einem Gerät hergestellt ist wird ein Timout von 30 Minuten gestartet Nach Ablauf dieser Zeit wird die Verbindung getrennt Auf Timeout klicken die Zeit wird wieder auf 30 Minuten hochgesetzt 3 1 2 Verbindung trennen Ggf mit Hilfe der Schaltfläche Verbindung trennen die Verbindung zum Gerät wieder trennen 3 1 3 Log Dateien eines Gerätes aufrufen Links neben ...

Страница 12: ...mich über dieses Gerät anklicken dann wird Ihnen bei bestimmten Meldungen eine E Mail zugeschickt In der E Mail werden Sie über folgende Dinge informiert Tuner unlocked Eingangspegel zu hoch Eingangspegel zu niedrig Signalqualität fehlerhaft CI keine Entschlüsselung Ausgangpegel zu niedig nur MK Kopstellen Prozzessortemperatur zu hoch Belüftungstemperatur zu hoch Betriebsspannung zu niedrig oder a...

Страница 13: ...iert ist siehe 2 3 1 auf Seite 6 dann kann der AXING Support zur Problemlösung direkt auf das Gerät zugreifen 3 2 Team erstellen Der Eigentümer kann zum Beispiel die Mitarbeiter seiner Firma als Teammitglieder einladen Diese haben dann Zugriff auf alle Geräte des Eigentümers 3 2 1 So erstellen Sie ein Team Im Menü Account auf Einstellungen klicken In den Einstellungen auf Erstelle Team klicken Eig...

Страница 14: ...mitglieder aufgenommen Hat das Teammitglied berenoch keinen Account dann erhalten Sie eine ensprechende Meldung Das neue Teammitglied erhält vom System eine E Mail mit der Mitteilung Registrieren Sie sich am SMARTPortal Nach der Registrierung erhält das Teammitglied vom System eine E Mail mit der Mitteilung Sie sind neues Teammitglied des Teams und wird in die Liste der Teammitglieder aufgenommen ...

Страница 15: ...n der die Konfiguration oder Wartung der Kopfstelle oder des Middleware Servers übenimmnt 3 3 1 So teilen Sie ein Gerät Links neben dem zu teilenden Gerät auf das Zeichen klicken Weitere Menüpunkte zum Gerät werden geöffnet Auf Teilen klicken Unter Geräte teilen die E Mailadresse des Geteilten Nutzers eingeben Auf E Mail versenden klicken Hat der Geteilte Nutzer bereits einen Account erhält vom Sy...

Страница 16: ...ind neuer Geteilter Nutzer des Geräts und wird in die Liste unter Bereits geteilt mit aufgenommen 3 3 2 So entziehen Sie die Zugriffsrechte Links neben dem zu geteilten Gerät auf das Zeichen klicken Auf Teilen klicken Unter Freigabestatus auf Entziehen klicken 3 4 Account verwalten Im Menü Account auf Einstellungen klicken In den Einstellungen Ihres Account finden Sie folgende Daten Möglichkeiten ...

Страница 17: ...ail Auf den Link in der E Mail klicken Oder Im Browser folgende URL eingeben https axing smartportal com Im Dialog Neuen Benutzer registrieren mindestens alle Pflichtfelder rot umrandet ausfüllen Hinweise Vergeben Sie ein sicheres Passwort mit Groß und Kleinbuchstaben Zahlen und Sonderzeichen Wenn Sie den Haken bei Ich möchte E Mails zu Produktupdates erhalten setzen dann informiert Sie AXING über...

Страница 18: ...Sei erhalten eine E Mail mit der Anleitung zum Passwortzurücksetzen 5 2 Benutzerkey für Kopfstellen und Server Im Menü Account auf Einstellungen klicken Dort steht unter anderem der Benutzerkey 5 3 So löschen Sie den Browser Cache Wenn Sie keinen Zugriff auf das SMARTPortal haben oder wenn einige Funktionen nicht verfügbar sind müssen Sie möglicherweise den Cache des Browsers löschen Drücken Sie d...

Страница 19: ...2018 10 13 Technische Verbesserungen Änderungen im Design Druckfehler und Irrtümer vorbehalten 19 ...

Страница 20: ...Betriebsanleitung SMARTPortal 20 2018 10 13 Technische Verbesserungen Änderungen im Design Druckfehler und Irrtümer vorbehalten ...

Страница 21: ...SMARTPortal Worldwide access on AXING products www axing smartportal com Operation instructions ...

Страница 22: ...s and configure them 11 3 1 1 Timeout 11 3 1 2 Disconnect 11 3 1 3 Open the log files of a device 11 3 1 4 Receive informations via email 12 3 1 5 Make a support request 12 3 1 6 Delete a device from the Overview 13 3 2 Create a team 14 3 2 1 How to create a team 14 3 2 2 How to remove a member from a team 15 3 3 Share device 16 3 3 1 How to share a device 16 3 3 2 How to revoke the access rights ...

Страница 23: ...XING can provide the necessary support Secure and encoded connection AXING headends and middleware servers of the IPTVSolutions ensure a continuous secure and encoded connection to the AXING SMARTPortal Only requirement on site is an internet connection e g via LAN EoC EoC WLAN Bridge 3G LTE Router There is no complicated configuration of a router and no additional software for the local computer ...

Страница 24: ...am member must be invited by an owner to get access to the devices A team member registers to the SMARTPortal in only entering his e mail address and password no individual user key will be received Shared user A shared user must be invited by an owner to get access to this device A shared user registers to the SMARTPortal in only entering his e mail address and password no individual user key wil...

Страница 25: ...strong password with uppercase and lowercase letters numbers and special characters If you check I agree to receive e mails about product updates then AXING will inform you about important software updates or new features Select the check mark I agree to the terms of services Click Register to complete the registration Registration e mail You will receive a registration e mail from the SMARTPortal...

Страница 26: ...l The access to the SMARTPortal will be activated in the headend software under MAINTENANCE ACCESS TO THE SMART PORTAL The access data and login details must be entered In the State field select Enabled If desired enable the option AXING support allowed In the Location field enter a name for the location of the headend This term will appear later in the SMARTPortal and helps to identify the headen...

Страница 27: ...k settings are configured in the headends under MAINTENANCE SYSTEM OPTIONS Dynamic IP address Use dynamic IP address to connect the device to a network with DHCP server Static IP address Use static IP address to connect the device to a network with a fixed IP address Here the IP address netmask and gateway can be changed In addition DNS server 1 and DNS server 2 can be entered Click Save Reboot Af...

Страница 28: ... 8 2018 10 13 Technical improvements changes in design printing and other errors expected Direct connection via an Ethernet switch to a router with Internet connection Connect via Ethernet over coax to a router with internet connection ...

Страница 29: ...2018 10 13 Technical improvements changes in design printing and other errors expected 9 Connecting to an EoC 2 01 in Bridge Client Mode to a wireless router ...

Страница 30: ...nance Device name Device Type and Serial Number Status Green connection to SMARTPortal established device can be configured Red connection to the SMARTPortal interrupted Connection Lost Last Request Added The columns indicate how long the respective event dates back Log File With the button Log File the logged events of the device are shown Filter view In the menu Overview select Headends Only the...

Страница 31: ...word and configure the device as usual Observe the timeout 3 1 1 Timeout Once connected to a device a 30 minute timeout will start After this time the connection is disconnected Click on Timeout the time will be reset to 30 minutes 3 1 2 Disconnect If necessary disconnect the connection to the device using the Disconnect button 3 1 3 Open the log files of a device At a device displayed in the SMAR...

Страница 32: ... via email If you click the option Keep me informed about this device within the view of a logfile then an e mail will be sent to you for certain messages In the e mail you will be informed about the following Tuner unlocked Input level too high Input level too low Signal quality fails CI no decryption Output level too low only MK headends Processor temperature too high Ventilation temperature too...

Страница 33: ...e device see 2 3 1 on page 6 then AXING support can access the device directly for problem resolution 3 1 6 Delete a device from the Overview After you have changed the access data of a headend or server e g for another owner or after the headend or server is physical disconected You can delete ist out of the table in My devices Click on the sign on the left side of the device Further menu items f...

Страница 34: ...ner 3 2 1 How to create a team Click Settings in the Account menu In the settings click Create Team Enter a team name and click Create Team Enter the e mail address of the team member and click Add member If the team member is already registered at the SMARTPortal the team member will receive an e mail from the system You are a new team member of the team The team member is added to the list of te...

Страница 35: ...e SMARTPortal After registering the team member will receive an e mail from the system with the message You are a new member of the team see section 4 on page 16 The team member is added to the list of team members The team s devices are displayed to team members in Team Devices Menu Overview Option Teams Team Name 3 2 2 How to remove a member from a team In the Account menu click Settings In the ...

Страница 36: ...Click on Share Under Share Devices enter the shared user s e mail address Click Send sharing e mail If the shared user is already registered at the SMARTPortal the shared user will receive an e mail from the system You are a new shared and is entered under Already shared with If the shared user is not yet registered on the SMARTPortal you will receive a corresponding message The new shared user re...

Страница 37: ...device Click on Share Under Sharing status click Unshare 3 4 Managing an account Click Settings in the Account menu In the settings of your account you will find the following data options Name last name e mail address and address data The user key Following settings can be carried out Manage your teams Change the password Approve to receive e mails about product updates ...

Страница 38: ...link in the e mail Or Enter the following URL in the browser https axing smartportal com In the dialog Register a new user fill in at least all mandatory fields fill in red Notes Assign a strong password with uppercase and lowercase letters numbers and special characters If you check I agree to receive e mails about product updates then AXING will inform you about important software updates or new...

Страница 39: ... You will receive an e mail with the password reset instructions 5 2 User key for the devices In the Account menu click Settings There you will find the user key 5 3 How to clear the browser cache If you do not have access to the SMARTPortal or if some features are not available then it may be necessary to delete the cache of the browser Press the key combination Ctrl Shift and Delete Depending on...

Страница 40: ...Operation instructions SMARTPortal 20 2018 10 13 Technical improvements changes in design printing and other errors expected ...

Отзывы: