MagIC X1000 DECT
Axalto – 2005
6
EN
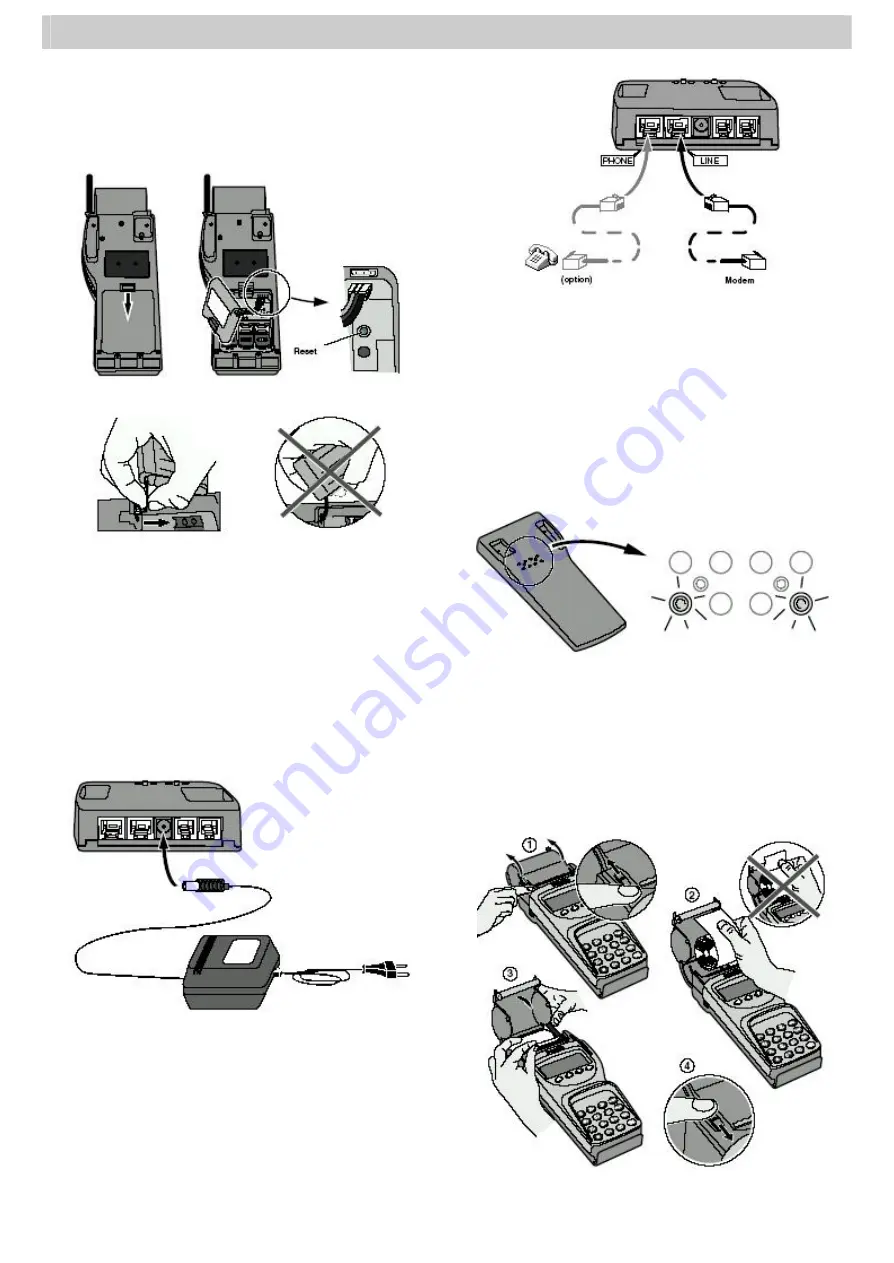
Connecting the battery
1 -
Remove the battery cover at the back of the hand-held unit.
2 -
Plug the battery cable to the connector on the upper right-hand
corner of the battery housing, taking care to the polarity.
3 -
Install the battery in its housing, then close the battery cover at
the back of the hand-held unit.
If you need to disconnect the battery, proceed as show on the
illustration below.
CAUTION:
For a safe operation, the terminal must not be used
without the battery cover.
Connecting the power supply
1
- Insert the small plug of the power supply cable in the power
connector at the back of the docking station.
2
- Plug the power supply into a standard wall socket with the 2
(or 3)-pin plug located at the other end of the cable.
3
- Place the hand-held unit on the docking station and wait at
least 3H for battery charging before first use.
Note:
The MagIC X1000 DECT has no On / Off switch. This
function can be performed by connecting / disconnecting the
transformer from the power source.
It is recommended to place the hand-held unit on the
docking station when it is not used.
Connecting the modem
1
- Insert one end of the phone line cable into the connector
labeled LINE at the back of the docking station.
2
- Connect the other end of the cable to a phone outlet.
§
To connect a telephone to your MagIC X1000 DECT (if the
option is available), insert the additional phone cable in the
connector labeled PHONE at the back of the docking station.
The telephone should then be able to operate through the
terminal.
Note:
It is not recommended to use another system in parallel on
the same telephone since this may cause terminal transmission
errors during the processing centre call.
Meaning of LEDs
There are two leds on the docking station.
They indicate the status of docking station.
Left LED:
- LED off: docking station is not OK or not supply.
- LED on: docking station is OK.
- LED flashing: docking station is OK and at least one hand-held
unit is detected.
Right LED:
(Meaningful if docking station is OK and after 10 seconds)
- LED off: no telephone line.
- LED on: telephone line OK.
- LED flashing: telephone line is engaged.
Installing the printer paper
1 -
Unlock the printer cover, and then rotate the cover to open it.
2 -
Place a roll of paper in its housing. Position the paper as
shown on picture 2.
Note:
Use only the paper type recommended by the
manufacturer.
3 -
Hold the extremity of the paper roll as shown on picture 3,
keeping a few centimeters of paper out of the printer cover. The
paper being in its proper place, close the printer cover.
4 -
Lock the printer cover.
Note: The tickets will not be printed if the printer cover is not
correctly closed.


