background image

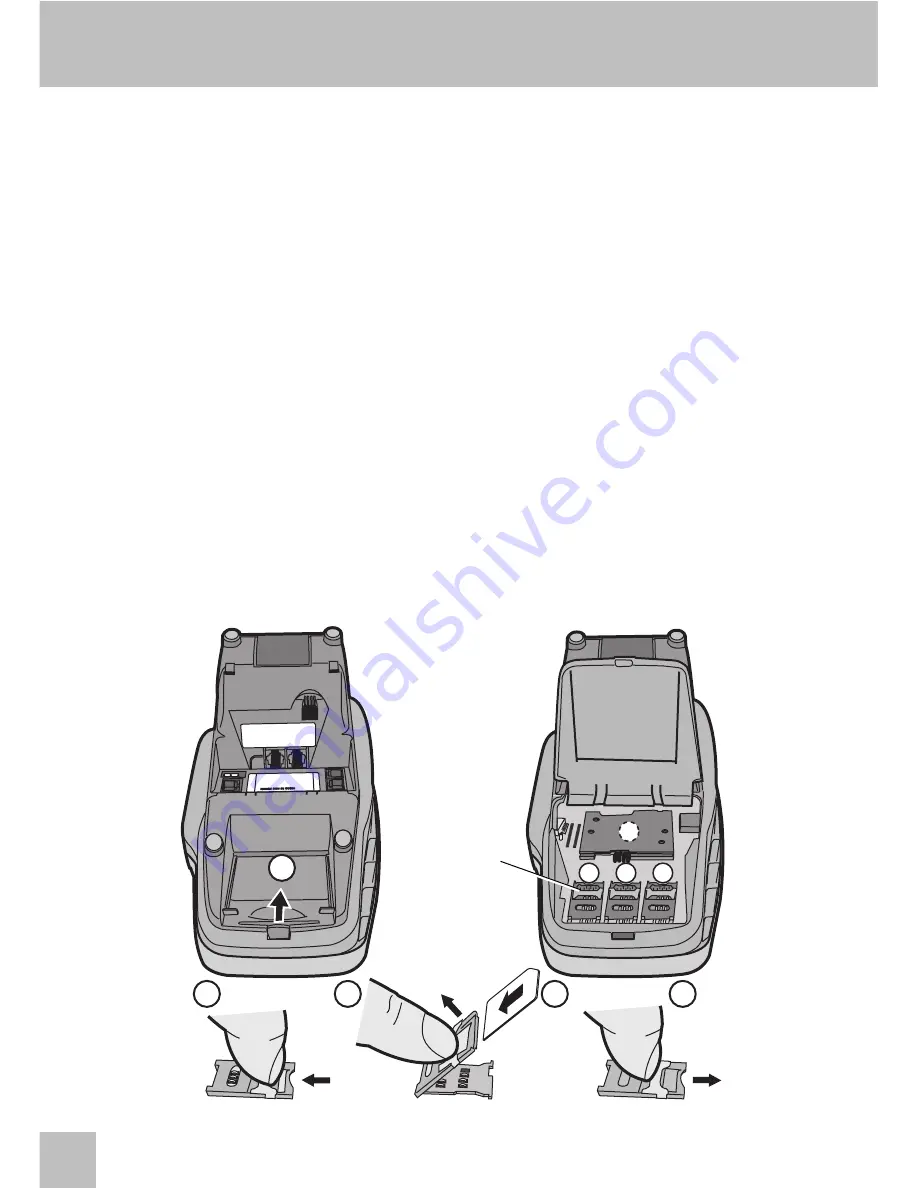
Installing the SIM sized SAM cards

Notes:

Do not use tools for installing SAM cards.

If a full sized ICC card has been introduced through the terminal back
cover, remove it.

The SIM connectors must be filled following a specific order: use first
the connector on the left (A), then if several cards are needed, insert
the second one in connector B and the third one in connector C.
Depending on configuration, another SIM sized connector (D),
replacing the full sized one, may be equipped with a fourth SIM card.

1 - 

Disconnect the power supply from the wall socket and open the terminal back
cover.

2 - 

Unlock the SIM sized connector.

3 - 

Open the connector.

4 - 

Insert the SAM card in the connector.

5 - 

Lock the connector.

6 - 

Close the terminal back cover and connect the power supply to the wall socket.

12

© Axalto 2004

Installation

PHONE

LINE

2

1

4

0165

PHONE

LINE

2

1

4

A

B

C

D

2

3

4

5

1

SIM sized
connectors

Unlock

Lock

Содержание MagIC 6100

Страница 1: ...MagIC 6100 Installation Manual TD06014B Point of Sales Terminals...

Страница 2: ......

Страница 3: ...necting the modem 8 Connecting the PIN Pad optional 8 Installing the printer paper 10 Fitting the plastic foot 11 Battery 11 Installing the SIM sized SAM cards 12 EMV Level 1 approval 15 Network compa...

Страница 4: ...2 Axalto 2004...

Страница 5: ...structions given in this manual Presentation of the MagIC 6100 terminal Your MagIC 6100 is a stand alone point of sales terminal able to read both Magnetic Stripe Cards and Smart Cards The terminal ho...

Страница 6: ...der optional Communication ports Asynchronous synchronous mode TCP IP enabled fast modem V32 V32bis 9600 14400 bps Serial ports connections 2 simple RS232 4 signals multiplexed 1 full RS232 7 signals...

Страница 7: ...aper roll a plastic foot If you have ordered a PIN Pad it is delivered in a separate box Unpack carefully all these elements then place your MagIC 6100 on a stable horizontal surface next to a wall so...

Страница 8: ...el Cl ear Ent er MagIC6100 MagIC6100 Sp 1 Q Z 2 A B C 3 Menu 9 W Y X 6 M N O 5 J K L 4 G I H 8 T U V 0 00 7 P S R D E F Cancel Clear Enter Sp MagIC 1000 TM The design of this equipment depends on the...

Страница 9: ...front or back of the terminal do not expose the terminal to rain or moisture call a qualified technician for servicing the terminal does not contain any user serviceable part This terminal is not equi...

Страница 10: ...he power supply is connected the display lights up Connecting the modem 1 Insert one end of the phone line cable into the connector labelled LINE at the rear of the terminal 2 Connect the other end of...

Страница 11: ...1 4 1 Q Z 2 A B C 3 Menu 9 W Y X 6 M N O 5 J K L 4 G I H 8 T U V 0 00 7 P S R D E F Cancel Clear Enter Sp MagIC 1000 TM The design of this equipment depends on the country standard Supply cable Phone...

Страница 12: ...er 3 Hold the extremity of the paper roll as shown on picture 3 keeping a few centimetres of paper out of the printer cover The paper being in its proper place close the printer cover until flush with...

Страница 13: ...nance operator Replacing the battery may be dangerous The non respect of this rule would invalidate the terminal warranty Dispose of batteries according to the environmental protection rules and the l...

Страница 14: ...third one in connector C Depending on configuration another SIM sized connector D replacing the full sized one may be equipped with a fourth SIM card 1 Disconnect the power supply from the wall socke...

Страница 15: ...ons Customer smart card Insert the card in the smart card reader at the top of the terminal the card chip facing the display ICC SAM card full sized smart card Insert the card at the bottom of the ter...

Страница 16: ...f the phone cable is well connected to the wall phone plug and to the terminal Verify that the phone line is not out of order Verify that the terminal parameters correspond to your telephone equipment...

Страница 17: ...PSTN network In the event of problem contact your supplier Declaration following JOCE L216 8 Annex III This declaration must be completed for products within the scope of CTR21 WE Axalto 50 avenue Je...

Страница 18: ...nd used in the application for which it was made with the manufacturer s instructions is in conformity with the following standards EN 55022 08 1994 EN 55024 01 1999 EN 60950 06 2000 and the CTR21 ATA...

Страница 19: ......

Страница 20: ...information refer to http www axalto com Copyright 2004 Axalto All rights reserved Neither this document nor portion of this document may be reproduced in any way form or fashion whether mechanical or...

Отзывы: