


Nr
Possible assignment
Key Code
Description
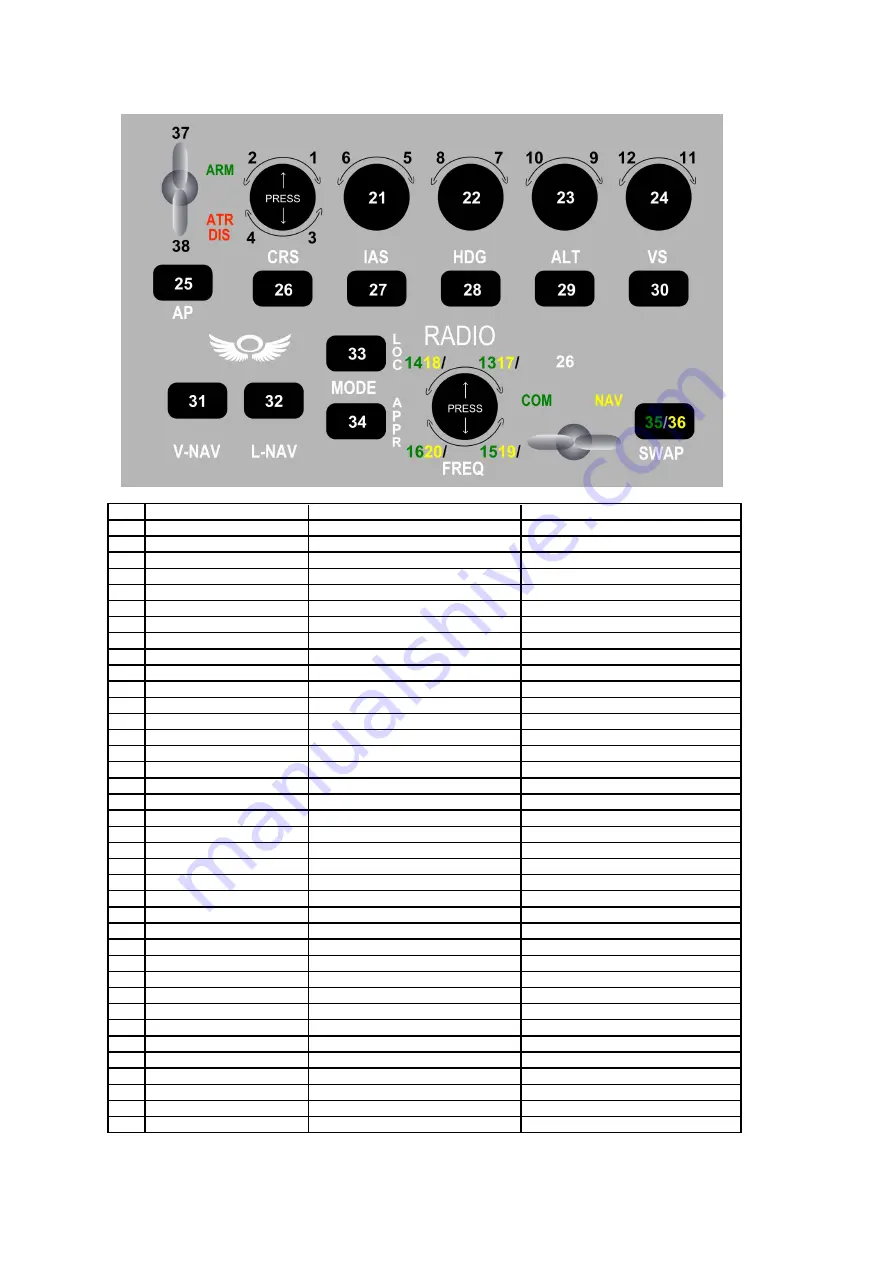
1
OBS 1 +
KEY_SEMICOLON
Increase VOR1 OBS
2
OBS 1 -
KEY_GRAVE
Decrease Vor1 OBS
3
OBS 2 +
KEY_COMMA
4
OBS 2 -
KEY_BACKSLASH
5
IAS+
KEY_BRACKET_LEFT
Increase autopilot reference airspeed
6
IAS-
KEY_BRACKET_RIGHT
Decrease autopilot reference airspeed
7
HDG+
KEY_APOSTROPHE
Increase heading bug
8
HDG-
KEY_CAPS_LOCK
Decrease heading bug
9
ALT+
L_ALT+KEY_SEMICOLON
Increase autopilot reference altitude
10
ALT-
L_ALT+KEY_GRAVE
Decrease autopilot reference altitude
11
VS+
L_ALT+KEY_COMMA
Increase autopilot reference vs
12
VS-
L_ALT+KEY_BACKSLASH
Decrease autopilot reference vs
13
COM-FREQ1+ Mhz
R_ALT+KEY_BRACKET_LEFT
14
COM-FREQ1- Mhz
R_ALT+KEY_BRACKET_RIGHT
15
COM-FREQ2+ Khz
R_ALT+KEY_APOSTROPHE
16
COM-FREQ2- Khz
R_ALT+KEY_CAPS_LOCK
17
NAV-FREQ1+ Mhz
R_ALT+KEY_SEMICOLON
Increase Nav1 Frequency
18
NAV-FREQ1- Mhz
R_ALT+KEY_GRAVE
Decrease Nav1 Frequency
19
NAV-FREQ2+ Khz
R_ALT+KEY_COMMA
20
NAV-FREQ2- Khz
R_ALT+KEY_BACKSLASH
21
IAS
L_ALT+KEY_BRACKET_LEFT
Select airspeed bug
22
HDG
L_ALT+KEY_BRACKET_RIGHT
Select heading bug
23
ALT
L_ALT+KEY_APOSTROPHE
Select altitude bug
24
VS
L_ALT+KEY_CAPS_LOCK
25
AP TOGGLE
KEY_SEMICOLON
Toggle autopilot master
26
KEY_GRAVE
VOR OBS
27
IAS HOLD
KEY_COMMA
Autopilot Airspeed Hold
28
HDG HOLD
KEY_BACKSLASH
Heading HOLD
29
ALT HOLD
KEY_BRACKET_LEFT
Altitude HOLD
30
VS HOLD
KEY_BRACKET_RIGHT
Vertical Speed HOLD
31
V-NAV / FD
KEY_APOSTROPHE
Toggle Flight director
32
L-NAV / NAV1
KEY_CAPS_LOCK
Autopilot Nav1 Hold
33
LOC
R_ALT+KEY_SEMICOLON
Toggle autopilot localizer hold
34
APPR
R_ALT+KEY_GRAVE
Toggle autopilot approach hold
35
SWAP-COM
R_ALT+KEY_COMMA
Com1 Swap
36
SWAP-NAV
R_ALT+KEY_BACKSLASH
Nav1 Swap
37
AUTOTHROTTLE ARM
R_ALT+KEY_BRACKET_LEFT
Arm Auto Throttle
38
AUTOTHROTTLE DISC
R_ALT+KEY_BRACKET_RIGHT
Auto Throttle Disconnect
REFERENCE TABLE “A”
Содержание MIAP
Страница 1: ......


