background image

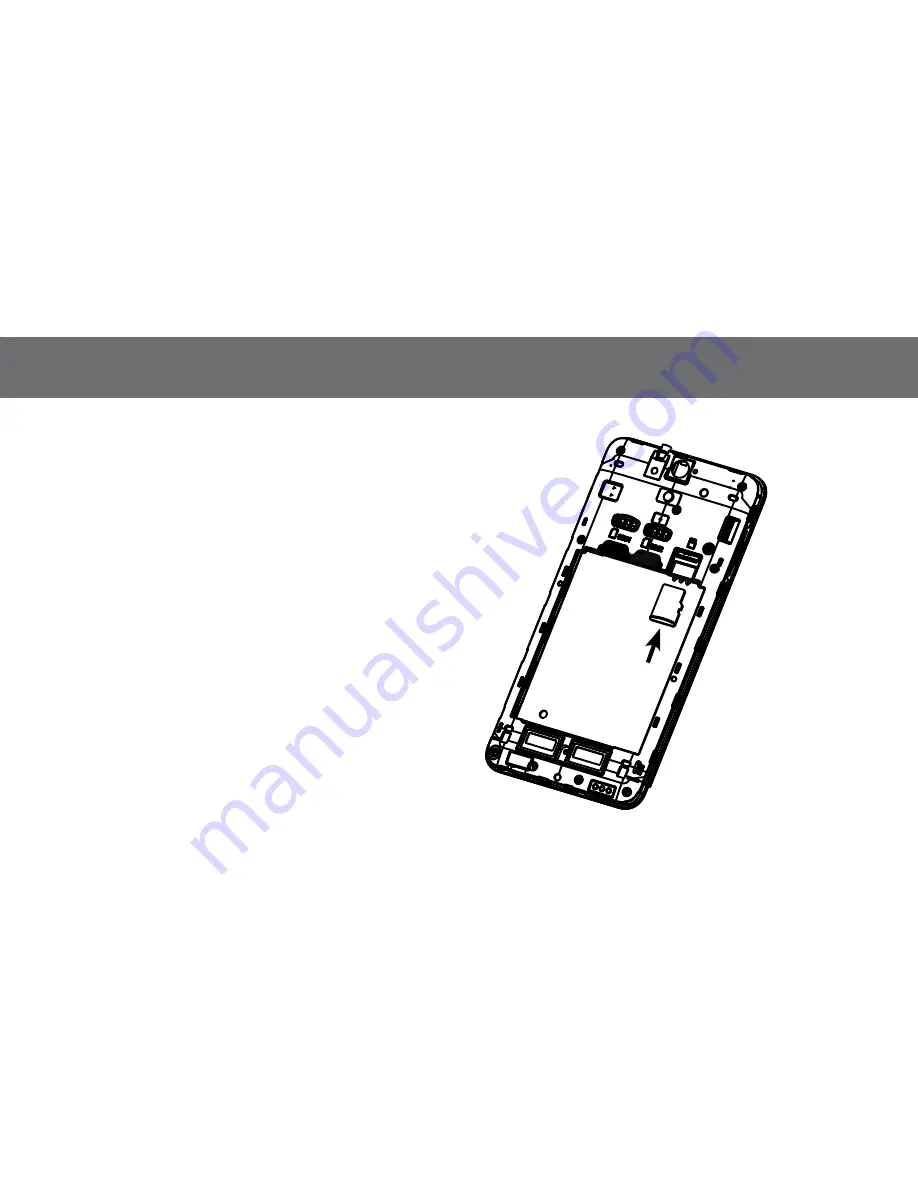
if extra storage capacity is required, you can install a 
memory card. this device uses microSD memory card.

1.   Slide the microSD card cover towards the direction  
 

of arrow. 

2.   Remove the memory card: Please slide the memory 
 

card in the opposite direction. 

3.  

Please note: 

if the memory card is not identified  


by your mobile phone, please ensure, if the memory 


card is in the right position and not damaged.

46

inStall/REMOVE thE MEMORy caRD

icon

Содержание A 84

Страница 1: ...A 84 Octa CORE SMARTPHONE ANDROID OS 4 4 BEDIENUNGSANLEITUNG INSTRUCTION MANUAL ...

Страница 2: ...Ausschalten des Mobiltelefons 14 7 Display und Statussymbole 15 7 1 Startbildschirm 15 7 2 Displaysymbole 16 8 Tasten und Displaybeschreibung 17 9 Funktionsbeschreibung Tasten und Display 18 9 1 Verwendung des Touchscreens 19 9 2 Ent Sperren des Touchscreens 20 10 Telefonieren 21 10 1 Anruf tätigen 21 10 2 Anruf annehmen 22 11 Anrufliste 23 12 Telefonbuch 24 13 SMS MMS 25 14 E Mail 26 ...

Страница 3: ...15 5 Videos 29 15 6 FM Radio 29 15 7 Downloads 30 15 8 Dateimanager 30 16 Extras 31 16 1 Uhr und Wecker 31 16 2 Kalender 31 16 3 Aufgaben 32 16 4 Rechner 32 17 Google Play 32 18 Einstellungen 33 18 1 Drahtlos Netzwerke 33 18 2 Gerät 34 18 3 Nutzer 34 Verweis auf EG Konformitätserklärung 71 inhalt ...

Страница 4: ...Allgemeine Hinweise zum Mobiltelefon 1 Bitte verwenden Sie nur Original Zubehör oder Zubehör das vom Hersteller genehmigt wurde Andere Zubehörteile können Ihr Telefon beschädigen die Leistung negativ beeinflussen oder sogar gefährdend für Ihren Körper werden und dadurch verletzen Sie die örtlichen Vorschriften für Telekom Endgeräte 2 Achten Sie darauf dass das Mobiltelefon nicht in Berührung mit W...

Страница 5: ...lung kann die im Gerät befindliche Platine zerstören 9 Versuchen Sie nicht das Handy oder die Batterie zu zerlegen 10 Bewahren Sie das Telefon nicht mit brennbaren oder explosiven Substanzen Gegenständen auf 11 Versuchen Sie nicht das Handy ohne Akku zu laden Hinweise zur Akku Nutzung 1 Akku nicht kurzschließen dies kann zu Überhitzen oder Entzünden des Akkus führen 2 Bewahren SieAkkus nicht in he...

Страница 6: ...tung Wenn die Batterie beschädigt ist nicht benutzen Wenn Flüssigkeit in Kontakt mit den Augen oder der Haut kommt gründlich mit klarem Wasser spülen und sofort einen Arzt aufsuchen Vorsichtsmaßnahmen für elektronische Geräte Einige elektronische Geräte sind anfällig für elektromagnetische Störungen die durch das Handy verursacht werden wenn sie unzurei chend abgeschirmt sind wie die elektronische...

Страница 7: ...ls vorhanden 3 Bleiben Sie stehen oder parken Sie bevor Sie einen Anruf tätigen wenn die Bedingungen es erfordern Sicherheit im Flugzeug 1 Bitte schalten Sie Ihr Mobiltelefon aus bevor das Flugzeug abhebt Um Kommunikationssysteme vor Störungen zu schützen ist es verboten das Handy während des Fluges zu verwenden Sicherheitsvorschriften verlangen dass Sie die Erlaubnis eines Besatzungs mitgliedes e...

Страница 8: ...eschirmt Hochfrequenz Energie ist 4 Achten Sie bitte auf die Beschränkung der Verwendung von Mobiltelefonen in Krankenhäusern oder anderen medizinischen Einrich tungen Schalten Sie Ihr Telefon falls erforderlich aus Vorsichtsmaßnahmen für explosionsgefährdete Bereiche 1 Schalten Sie das Telefon vor dem Betreten eines explosionsgefährdeten Bereiches wie z B Tankstellen oder Orten wo Chemikalien gel...

Страница 9: ...pezielle zufällige oder Folgeschäden die aus oder im Zusammenhang mit der Verwendung dieses Produktes entstehen haftend gemacht werden Weitere Garantie und Service Informationen finden Sie auf der beigefügten Garantiekarte bzw auf der AVUS Webseite www avus cc 9 sicherheitshinweise 1 ...

Страница 10: ...egen Die SIM Karte in Pfeilrichtung mit der Kontaktfläche Gold nach unten in die Hal terung einschieben 3 SIM Karte entfernen Die SIM Karte in die entge gengesetzte Richtung schieben 4 Hinweis Wenn die SIM Karte nicht vom Handy erkannt wird überprüfen Sie bitte ob die SIM Karte in die richtige Position gebracht wurde und nicht defekt ist 10 2 einlegen entfernen der sim karte Symbolfoto ...

Страница 11: ...ätabstecken VerwendenSienur Akkus die für diesen Telefontyp freigegeben bzw geeignet sind 2 Akku einlegen Setzen Sie den Akku in das Akkufach ein Achten Sie darauf dass sich die drei Kontaktstellen des Akkus mit den Anschlusskontakten des Telefons verbinden 3 Akku entfernen Den Akku leicht anheben und aus dem Akkufach hinaus nehmen ...

Страница 12: ... Pfeilrichtung mit der Kontaktfläche Gold nach unten in die Halterung einschieben 2 Speicherkarte entfernen Die microSD Speicher karte in die entgegengesetzte Richtung schieben 3 Hinweis Wenn die Speicherkarte nicht vom Handy erkannt wird überprüfen Sie bitte ob die microSD Speicherkarte in die richtige Position ge bracht wurde und nicht defekt ist 12 4 Einlegen Entfernen der Speicherkarte Symbolf...

Страница 13: ... auf dem Standby Bild schirm ein animiertes Symbol das den Ladevorgang abbildet Wenn die Batterie vollständig geladen ist stoppt die Animation Während dem Ladevorgang kann die Batterie warm werden Das ist normal Die Leistung der Batterie hängt von mehreren Faktoren ab wie zum Beispiel von den Netzwerkeinstellungen der Signalstärke der Temperatur während der Verwendung den verwendeten Funktionen so...

Страница 14: ...t den PIN Code einzugeben Diesen erhalten Sie gemeinsam mit der SIM Karte von Ihrem Netzbetreiber Achtung Wenn Sie den PIN Code dreimal falsch eingeben wird die SIM Karte gesperrt Bitte kontaktieren Sie Ihren Netzbetreiber um die SIM Karte wieder zu entsperren 14 6 Ein Ausschalten des Mobiltelefons Taste lange drücken um das Mobiltelefon einzuschalten ...

Страница 15: ... Wochentag Datum Applikationen individuell anpassbar Verbindungen Dienste Energiesteuerung Telefon Kontakte Apps Menü SMS MMS Browser Uhrzeit Batteriestatus Signalstärke display und statussymbole 7 Bluetooth WLAN Verbindung ...

Страница 16: ...atussymbole Akkuanzeige Signalstärke Bluetooth Verbindung WLAN Verbindung GPS Ortung Datensynchronisierung Auto Helligkeit Vibrations Profil aktiv Lautlos Profil aktiv Neue E Mails Neue SMS MMS Versäumte Anrufe Kopfhörer angeschlossen Wecker aktiviert Flugmodus aktiviert USB Verbindung aktiv A ...

Страница 17: ...17 Optionen Zurück Kamera Annäherungssensoren Blitz Lautsprecher Startbildschirm Tasten und displaybeschreibung 8 Front Kamera Kopfhöreranschluss Lautstärke regulierer Funktionstaste Micro USB Anschluss ...

Страница 18: ...Lautlos Vibration Laut Lautstärkeregulierer Obere Taste Lautstärke lauter drehen Untere Taste Lautstärke leiser drehen Vibrations bzw Lautlos Profil aktivieren Optionen Lister aller verfügbaren Optionen Startbildschirm Zurückkehren zum Startbildschirm Zurück Ein Schritt zurück 18 9 funktionsbeschreibung Tasten und display ...

Страница 19: ...Den Bildschirmhintergrund können Sie zum Beispiel ändern indem Sie den Hintergrund berühren und halten bis sich das notwendige Menü öffnet Berühren Sie eine freie Stelle am Bildschirm und schieben den Finger in eine bestimmte Richtung um beispielsweise bei einer geöffneten Internetseite zu scrollen Wischen Sie über den Bildschirm um zum Beispiel zwischen den Menüseiten zu wechseln Wenn Sie den Bil...

Страница 20: ... indem Sie die Funktionstaste drücken 2 Auf dem Bildschirm erscheint das AVUS Logo 3 Berühren Sie das Icon und schieben Sie es außerhalb des Kreises 4 Drücken Sie die Funktionstaste um den Touchscreen wieder zu sperren 20 9 funktionsbeschreibung Tasten und display ...

Страница 21: ...ffern entfernt 4 Berühren Sie das Hörer Symbol in der roten Leiste um einen Anruf zu beenden Notruf Wenn Sie einen Notruf machen möchten stellen Sie bitte sicher dass Ihr Mobiltelefon eingeschaltet ist und Empfang hat Danach wählen Sie eine Notrufnummer zum Bei spiel 112 und drücken das Hörer Symbol um den Notruf zu tätigen Hinweis Es muss eine gültige SIM Karte eingelegt sein Auch wenn Sie eine g...

Страница 22: ...ie den Anruf annehmen möchten ziehen Sie das Hörer Icon nach rechts 3 Wenn Sie den Anruf ablehnen möchten ziehen Sie das Hörer Icon nach links 4 Wenn Sie einen Anruf erhalten und in diesem Moment verhindert sind können Sie dem Anrufer eine Kurznachricht senden Ziehen Sie das Hörer Symbol zum Sprechblasen Icon ...

Страница 23: ...as linke untere Icon um alle Anrufe anzeigen zu lassen 2 Zwischen folgenden Anzeigen des Anrufprotokolls können Sie wählen Alle eingegangene ausgegangene und versäumte Anrufe 3 Drücken Sie das Options Symbol um die Anrufliste zu löschen ...

Страница 24: ...e Symbol unten im Bildschirm um einen neuen Kontakt hinzuzufügen 2 Kontakt suchen Berühren Sie die Lupe links unten im Bildschirm um einen Kontakt zu suchen 3 Wenn Sie jemanden aus dem Telefonbuch anrufen möchten wählen Sie einen Kontakt und in weiterer Folge die Rufnummer die angerufen werden soll aus ...

Страница 25: ...nzu und verfassen Sie die Nachricht Des Weiteren können Sie auch Multimedia Inhalte hinzufügen wie zum Beispiel Fotos 3 Um die Nachricht zu senden berühren Sie das Sende Symbol Hinweis Um eine MMS senden zu können muss der Datendienst aktiv sein Achtung Das Versenden einer MMS kann zu zusätzlichen Kosten führen Informieren Sie sich vorab bei Ihrem Netzbetreiber über mögliche Entgelte ...

Страница 26: ...vor Sie die E Mail App nutzen können müssen Sie Ihr Konto einrichten Ein Assistent begleitet Sie bei der Einrichtung des Kontos Wenn Sie Fragen zu den erforderlichen Daten haben kontaktieren Sie bitte den Provider Ihrer E Mail Adresse Hinweis Um eine E Mail senden zu können muss entweder der Datendienst oder eine WLAN Verbindung aktiv sein Achtung Das Versenden einer E Mail kann zu zusätzlichen Ko...

Страница 27: ...olgende Aktionen durchzuführen Telefon umbenennen Sichtbarkeit ein aus Gekoppelte Geräte Geräte suchen 15 2 Browser 1 Wählen Sie das Browser Symbol aus um im Internet zu surfen 2 In der oberen Leiste können sie entweder nach einem Begriff bzw einer Phrase über die Google Suchmaschine suchen oder Sie geben einen Link an um auf eine bestimmte Seite weitergeleitet zu werden Hinweis Um eine Webseite ö...

Страница 28: ... Sie folgende Einstellungen vornehmen Automatisch einschalten ausschalten 5 Unter Optionen können Sie unterschiedliche Einstellungen vornehmen wie zum Beispiel Belichtung Farbeffekte Szenen modus etc Ebenfalls können Sie die Gesichtserkennung und den Selbstauslöser de aktivieren 6 Sie haben auch die Möglichkeit ein Video aufzunehmen Um die Videoaufnahme zu starten drücken Sie folgendes Symbol Wenn...

Страница 29: ...zu versenden berühren Sie kurz das Foto Im oberen rechten Eck erscheint folgendes Symbol Berühren Sie dieses um auszuwählen über welchen Kommunikationsweg beispielsweise Bluetooth MMS oder E Mail Sie das Foto versenden möchten 15 5 Videos Öffnen Sie die App Videos um beispielsweise selbst aufgenommene Videos abzuspielen Sie haben auch bei einem Video die Möglichkeit dieses zu versenden Berühren Si...

Страница 30: ... können zum Beispiel Anhänge wie Fotos von empfangenen E Mails sein In dieser App können Sie Ihre Downloads verwalten teilen oder löschen 15 8 Dateimanager In der App Dateimanager können Sie Ihre Dateien verwalten Ebenfalls können Sie nachsehen wie viel Speicherkapazität vom Mobiltelefon bzw von der Speicherkarte belegt ist ...

Страница 31: ...ie die jeweiligen Städte 5 Um die allgemeinen Einstellungen dieser App zu bearbeiten wählen Sie das Symbol aus 16 2 Kalender 1 Öffnen Sie die App Kalender 2 Berühren Sie einen bestimmten Tag an dem ein Termin eingetragen werden soll Indem Sie zweimal auf die Zeile mit der Anfangszeit des zu erstellenden Termins tippen öffnet sich das Fenster um einen neuen Eintrag zu erstellen 3 Wählen Sie das Opt...

Страница 32: ...diese App haben Sie Zugang zu weiteren Apps Spielen Musik und Büchern 16 3 Aufgaben Wählen Sie das Symbol um einen neuen Eintrag hinzuzufügen 16 4 Rechner 1 Öffnen Sie die App namens Rechner 2 Wenn Sie über das Tastenfeld nach rechts wischen werden Ihnen weitere Funktionen angezeigt ...

Страница 33: ...g im Standby Modus d h Sie sind unter beiden Rufnummern erreichbar Bitte beachten Sie jedoch dass Sie eine Datenverbindung nur auf einer der zwei SIM Karten aktivieren können In diesem Menü können Sie ebenfalls die Roaming Einstellungen vornehmen Achtung Wenn Sie verreisen überprüfen Sie Ihre Roaming Einstellungen und informieren Sie sich bei Ihrem Netzbetreiber über mögliche Entgelte Im Menü Mobi...

Страница 34: ...ent des Akkus verbraucht wurden Im Menü Apps finden Sie die Liste aller von Ihnen heruntergeladenen Applikationen 18 3 Nutzer Im Menü Standort können Sie die GPS Einstellungen vornehmen Wenn Sie zum Beispiel eine Navigations App nutzen möchten ist es notwendig GPS zu aktivieren damit Ihre aktuelle Position geortet werden kann Im Menü Sicherheit haben Sie die Möglichkeit den PIN Code einer SIM Kart...

Страница 35: ... the Mobile Phone 48 7 Display and Status Symbols 49 7 1 Home Screen 49 7 2 Display Symbols 50 8 Description of the Keys and Display 51 9 Function Description of the Keys and Display 52 9 1 Usage of the touch screen 53 9 2 Un Lock the touch screen 54 10 Phone 55 10 1 Make a phone call 55 10 2 Answer a call 56 11 Call Log 57 12 People 58 13 Messages 59 14 E Mail 60 content ...

Страница 36: ...15 5 Videos 63 15 6 FM Radio 63 15 7 Downloads 64 15 8 File Manager 64 16 Extras 65 16 1 Time and Alarm 65 16 2 Calender 65 16 3 To Do 66 16 4 Calculator 66 17 Google Play 66 18 Settings 67 18 1 Wireless Networks 67 18 2 Device 68 18 3 Personal 68 Reference to Declaration of Conformity 71 content ...

Страница 37: ...e General Information 1 Please use the original accessories or other ones approved by the cell phone s manufacturer Use of any accessories other than the approved ones may result in poor performance damage of the cell phone or even harm to your body and impede relevant local calibration of telecommunication terminals 2 Please take care that your mobile phone does not come into touch with water or ...

Страница 38: ... span 8 Do not drop knock or throw the phone with great force Any rough actions may cause break of the internal circuit board 9 Do not try to dismantle the cell phone or its battery 10 Do not put the cell phone together with any flammable or explosive materials 11 Do not charge the cell phone without battery on Battery Safety 1 Avoid battery short circuit because short circuit will lead to overhea...

Страница 39: ...he approved ones may result in poor performance or explosion of your cell phone Warning Do not charge the battery if it has been damaged Should any battery liquid leak to your eyes or skin please make a thorough cleansing with clean water and see the doctor immediately Warning for Electronic Equipment Some electronic equipment may produce electromagnetic interference or shield to the cell phone si...

Страница 40: ...ention to traffic safety 2 If possible please use the hands free function 3 If conditions permit please stop the car to make answer calls Aviation Safety 1 To protect the aircraft s communications systems from being interfered please turn off cell phone before the plane taking off and never use it during the flight According to the safety regulations you may use the cell phone again upon the permi...

Страница 41: ... these devices can screen the surrounding RF signal 3 In some places with special requirements such as hospitals or health care places please note restrictions on the use of cell phone and turn off the cell phone when required Note for Risk of Potentially Explosion 1 Please turn off cell phone before entering any areas with risk of potential explosion such as gas fuel stations or any places storin...

Страница 42: ...evant indirect special incidental or inevitable injuries caused by the use of this product including injuries which have been considered or unconsidered but likely to happen by AVUS For more information please refer to the affixed warranty card 43 Safety Precaution 1 ...

Страница 43: ...e it circuit side down and align the notch on the card with the notch on the receptacle 3 For removing the SIM card please slide the SIM card in the opposite direction 4 Please note If your mobile phone does not iden tify the SIM card please check if the SIM card is in the right position and not damaged 44 2 Install Remove the SIM Card Icon ...

Страница 44: ...he battery please turn off your mobile phone and unplug the charger Use only qualified batteries 2 Put the battery in the battery slot with its 3 metal contacts pointing to the metal bolts of your mobile phone 3 For removing the battery lift the battery and take it out ...

Страница 45: ... microSD card cover towards the direction of arrow 2 Remove the memory card Please slide the memory card in the opposite direction 3 Please note If the memory card is not identified by your mobile phone please ensure if the memory card is in the right position and not damaged 46 4 Install Remove the Memory Card Icon ...

Страница 46: ...attery capacity icon on the screen will show animation If fully charged the animation will stop When charging battery may become very warm it is normal Battery performance is influenced by many factors including your carrier network configuration signal strength the temperature while using the device the functions you choose and use accessories and voice data or other application mode Please note ...

Страница 47: ...will display Enter PIN You get the PIN code together with the SIM card from the network operator Warning If you input the wrong PIN code three times the SIM card will be blocked please contact the network operator for help deco ding 48 6 Turn on off the Mobile Phone Long press the key for 2 3 seconds to switch on off the phone ...

Страница 48: ...een Weekday Date Apps individually adjustable Connections and Services Energy Control Phone Contacts Apps Menu SMS MMS Browser Bluetooth Time Battery Status Display and Status Symbols 7 Signal strength WLAN connection ...

Страница 49: ...een 50 7 Display and Status Symbols Battery status Signal strength Bluetooth connection WLAN connection GPS locating Data synchronization Auto brightness Vibration Silent New e mails New SMS MMS Missed calls Headset plugged Alarm Flight mode USB connection A ...

Страница 50: ...51 Options Back Camera Flashlight Loudspeaker Home screen Description of the Keys and Display 8 Headphone Jack Function Key Micro USB Cable Proximity Sensor Front Camera Volume Control ...

Страница 51: ...ect a profile silent vibration loud Volume control Upper key louder Lower key less noisy De activate the vibration and silent profile Options List of all options which are available at the moment Home screen Go back to the home screen Back One step back 52 9 Function Description of the Keys and Display ...

Страница 52: ...n on the home screen in the next line You can change the background image by touching the background and after some seconds the menu will appear If you want to scroll for example touch a point on the screen and push your finger in a specific direction If you want to change between the menu pages you have to wipe over the screen If you touch the screen with both fingers and contract or stretch them...

Страница 53: ...e the standby if you press the function key 2 The AVUS logo will appear on the screen 3 Touch this icon and remove it from the circle 4 Press the function key again if you want to lock the screen 54 9 Function Description of the Keys and Display ...

Страница 54: ...gits 4 Touch the handset s icon in the red line if you want to abort a phone call Emergency call If you want to make an emergency call please ensure that the mobile phone is turned on and the connection to the cellular network is active Then insert a SOS number for example 112 and press the handset s icon to make the emergency call Please note You have inserted a valid SIM card Even if you have in...

Страница 55: ...l 2 If you want to answer the call pull the symbol to the right 3 If you want to abort the call pull the symbol to the left 4 If you receive a phone call and if you are busy at the moment you can send the calling party a short message Pull the symbol to the icon of the speech bubble ...

Страница 56: ...the icon on the left in the lower field of the on screen keyboard All calls will be shown 2 You can choose between following displays all received dialed and missed calls 3 Touch the options icon for deleting the list of calls ...

Страница 57: ...touch the icon in the middle of the screen to add a new contact 2 Search a contact Touch the loupe to enter the name of the contact you are searching for 3 If you want to call someone touch the line of the contact and choose the number which shall be called ...

Страница 58: ...d write the message You can add multimedia data too for example pictures 3 If you want to send the message touch the icon for sending Please note If you want to write and send a MMS you have to activate the data service Warning Texting a MMS could bear to additional costs Please contact your network operator and inform yourself about potential charges ...

Страница 59: ...note Before using the e mail app you have to configure an account An assistant helps you with the settings If you have any questions regarding the required data please contact the provider of your e mail address Please note If you want to write and send an e mail you have to activate the data service Warning Texting an e mail could bear to additional costs Please contact your network operator and ...

Страница 60: ...nto this menu to run following actions Rename the mobile phone Visibility Paired devices Search devices 15 2 Browser 1 Choose the icon Browser to surf on the internet 2 In the upper line you can search for a word or phrase on Google You can also enter a hyperlink to open a specific web page Please note For using the browser you have to activate the data services or WLAN connection Warning Using th...

Страница 61: ... You can configure the flash light s settings automatic turn on off 5 Touch the symbol Option to configure the settings scene mode white balance colour effect etc You can also de activate the face detection or self timer 6 You have the possibility to make a video If you want to start the video recording touch following icon If you want to abort the video recording touch this symbol again 7 If you ...

Страница 62: ...o open this menu 5 If you want to share a picture touch the icon in the right corner You can choose between different communication channels like Bluetooth MMS or e mail 15 5 Videos Touch the icon Videos for playing videos which you have taken by yourself You have also the possibility to share this video by touching following symbol 15 6 FM Radio 1 If you like to use the radio function you have to...

Страница 63: ...will find all data which you have downloaded for example attachments which you have received via e mail You can govern share or delete the data 15 8 File Manager If you open the app File Manager you can govern your data You can also peek how many memory space is left ...

Страница 64: ...nt to see the current times from different cities touch the icon and choose the particular places 5 To configure the general settings touch the icon 16 2 Calender 1 Open the app Calendar 2 Touch a certain day to add an appointment If you touch the line with the starting time twice a pop up will appear and you can add a new entry 3 Choose the symbol Option to define which calendars should be shown ...

Страница 65: ...app Google Play is the virtual market place You can download apps games music or books 16 3 To Do Choose the symbol to add a new entry 16 4 Calculator 1 Touch the icon Calculator 2 If you wipe to the right more functions will be shown ...

Страница 66: ... both numbers are reachable Please note that the data service can only be active on one SIM card In this menu you can also configure the roaming settings Warning If you are abroad please contact your network operator and inform yourself about potential charges In the menu Mobile networks you can define the access point names APN This data has to be correct and are necessary to get a successful mob...

Страница 67: ...battery status In the menu Apps you find a list with all apps which you have downloaded 18 3 Personal You can configure the GPS settings in the menu Location If you want to use a navigation app for example it is necessary to activate GPS In the menu Security you can de activate the PIN code from your SIM card You can also configure other security settings like the screen lock ...

Страница 68: ...sential requirements and the other relevant provisions of the Directive 1999 5 EG Die vollständige EG Konformitätserklärung steht zum Download zur Verfügung The complete Declaration of Conformity is available for download on www avus cc 0700 Verweis auf EG konformitätserklärung gemäSS Richtlinie 1999 5 EG R TTE 71 reference to Declaration of Conformity in accordance with the Directive 1999 5 EC R ...

Страница 69: ...ENT VORZUNEHMEN ODER DAS DO KUMENT ZURÜCKZUZIEHEN TO THE MAXIMUM EXTENT PERMITTED BY APPLICABLE LAW UN DER NO CIRCUMSTANCES SHALL AVUS OR ANY OF ITS LICENSORS BE RESPONSIBLE FOR ANY LOSS OF DATA OR INCOME OR ANY SPECIAL INCIDENTAL CONSEQUENTIAL OR INDIRECT DAMAGES HOWSOEVER CAUSED THE CONTENTS OF THIS DOCUMENT ARE PROVIDED AS IS EXCEPT AS REQUIRED BY APPLICABLE LAW NO WARRANTIES OF ANY KIND EITHER...

Отзывы: