4
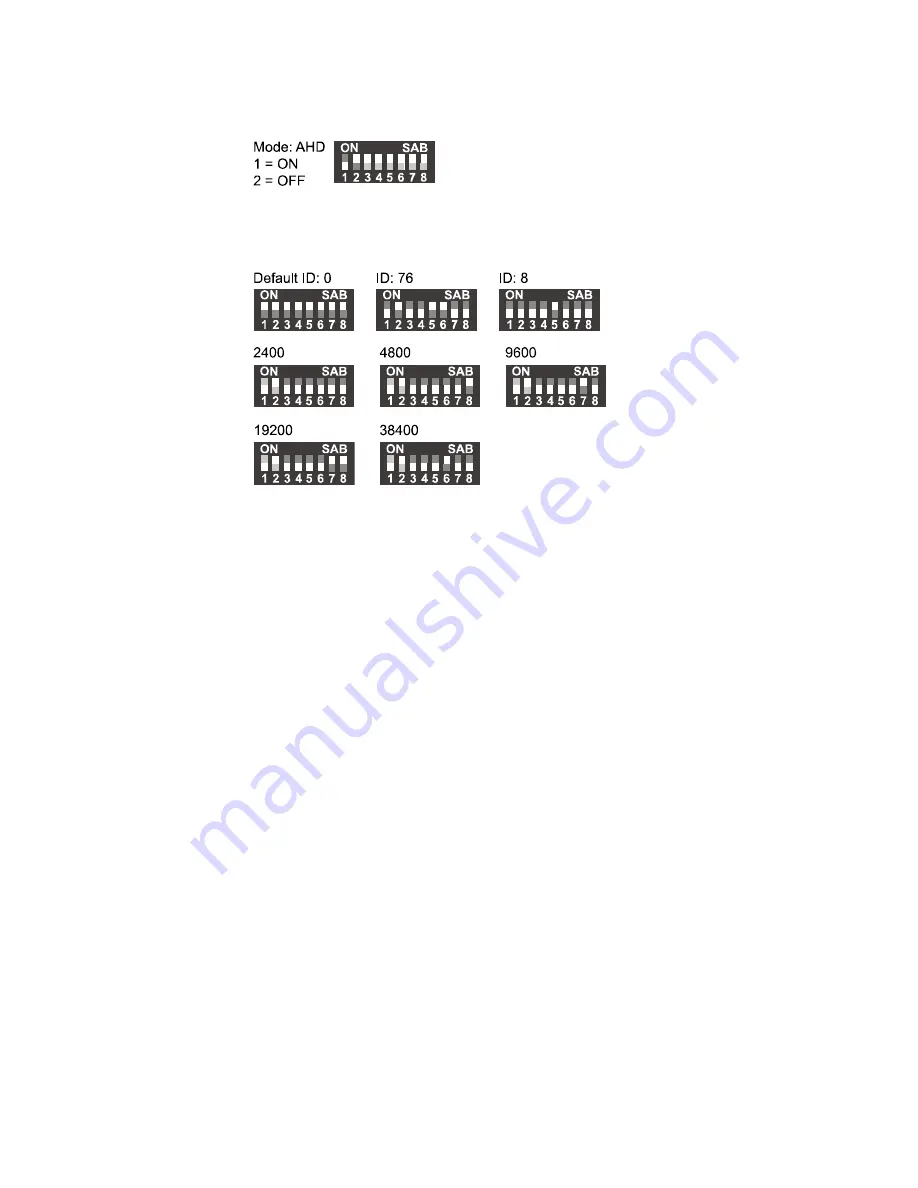
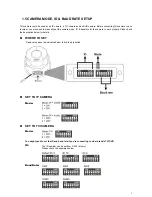
SET TO AHD CAMERA
Mode:
You might need to set the ID and baud rate if you’re connecting to other brand’s AHD DVR:
ID:
The ID number can be set from 0~255 (binary). Please check the examples below.
Baud Rate:
Страница 1: ...figuration Guide Compatible with TVI AHD and IP systems The product image shown above may differ from the actual product Please use this camera with a DVR which supports HD video recording Please read...
Страница 2: ...nded to alert the user to the presence of important operating and maintenance servicing instructions in the literature accompanying the appliance ROHS Announcement All lead free products offered by th...
Страница 3: ...PAN SETUP 11 3 2 CRUISE SETUP 12 3 3 SEQUENCE SETUP 13 3 4 CAMERA GUARD 15 3 5 HOME SETUP 16 3 6 AUTO TRACKING SETUP 17 4 CAMERA CONFIGURATIONS IP CAMERA 18 4 1 DIGITAL PTZ DPTZ OPERATIONS 18 4 2 EVE...
Страница 4: ...56 preset points four sequence groups programmable for multiple points monitoring and auto pan External alarm I O device connection ONVIF standard supported to simplify system integration MicroSD card...
Страница 5: ...like a siren 3 GND Ground wire 4 RS485A Used for PTZ camera or other device connection 5 RS485B Used for PTZ camera or other device connection RJ45 network cable Connect to an NVR with a RJ45 network...
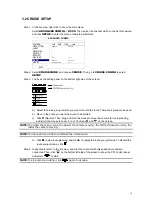
Страница 6: ...era mode ID baudrate for the camera to work properly Plase check the description below for details WHERE TO SET Remove the panel as indicated below to find the dip switch SET TO IP CAMERA Mode SET TO...
Страница 7: ...SET TO AHD CAMERA Mode You might need to set the ID and baud rate if you re connecting to other brand s AHD DVR ID The ID number can be set from 0 255 binary Please check the examples below Baud Rate...
Страница 8: ...oom in out the image Focus near far Click to adjust the focus of the image Auto mode Click to activate the auto function Before using it you need to assign a specific function that will be enabled whe...
Страница 9: ...and enter the security code from the image below if any Then click LOGIN Step3 The wizard is then started To skip the wizard and directly access the camera live view click Close To directly access th...
Страница 10: ...king function For setting details please go to Config For details please refer to the user manual Auto Mode Click to activate the auto function Before using it you need to assign a specific function t...
Страница 11: ...ree PC program CMS Lite simply plug this joystick to your PC or laptop switch to the channel which connects this camera and you re ready to control via the joystick NOTE CMS Lite could be downloaded f...
Страница 12: ...when the is selected in the PTZ mode There are three options AUTO PAN SEQUENCE and CRUISE AUTO PAN Pan within the range specified in CRUISE CONFIG SEQUENCE Patrol based on the sequence group specifie...
Страница 13: ...HIGH OFF FIXED SHUTTER Shutter Speed is a function that can adjust the duration of the electronic shutter to produce optimum image quality Select the shutter speed suitable for your environment EFLIP...
Страница 14: ...eft side of the screen Icon Function Description Left limit Move the slider to where you want to set as the most left side of the surveillance area and click to set Right limit Move the slider to wher...
Страница 15: ...ute There are 4 groups to be used b Move to the scene you want the cruise to be started c Click Record Then drag and hold the mouse to move the camera for route planning and scroll the mouse to zoom i...
Страница 16: ...sappearing on the DVR status bar NOTE Up to 256 preset points could be configured Step4 Repeat Step3 until you ve added all the points you need or click to return to the Goto panel Step5 In the Goto p...
Страница 17: ...ect how long the area patrolling lasts in minute The options are 2 3 and 5 DWELL TIME Select the time in second after which to move to the next point The time ranges from 3 to 60 PAN SPEED Select how...
Страница 18: ...en select the channel which connects this camera and click SETUP to enter the menu of camera parameters ADVANCED CONFIG CAMERA CH1 CH2 CH3 CH4 DETECTION MENU SETUP ALERT NETWORK DISPLAY RECORD DEVICES...
Страница 19: ...f camera parameters Step2 Select HOME and enable this function HOME FUNCTION ON IDLE TIME MINUTES 1 TYPE CRUISE PRESET GROUP 1 PRESET NUMBER 5 IDLE TIME MINUTES Configure the idle time from 1 to 120 a...
Страница 20: ...ht limit Move the slider to where you want to set as the most right side of the surveillance area and click to set Tilt angle Move the slider to select the tilt range of the surveillance area Zoom rat...
Страница 21: ...as the selected resolution Fit to screen The selected resolution is resized to fit into the current live view size This icon doesn t work when the selected resolution is VGA or QVGA Scale Click and h...
Страница 22: ...X speed forward eventually Fast Rewind Increase the speed for fast rewind Click to get 2X 4X 8X 16X speed rewind eventually Play Click to play the current video clip Pause Click to pause the video pla...
Страница 23: ...for video data transmission when you re using multimedia other than web browsers and Video Viewer for remote access SNMP Configure SNMP to remotely manage network devices IEEE 802 1X The settings here...
Страница 24: ...y event Snapshot Schedule the camera to take snapshots periodically or at a specific time and send to E Mail FTP and or Network Share for backup Time lapse recording could also be configured here Gene...
Страница 25: ...is the ability to control the data flow for real time streaming This function is important if your network bandwidth is insufficient and you have other devices to share the network bandwidth Check Qo...
Страница 26: ...er server with which users are familiar Sync Period Select Daily to synchronize the camera time with the network time every day or None to turn off this function Sync Click and the camera will synchro...
Страница 27: ...ID from the mobile messaging company such as Clickatell and EVERY8D For details please refer to API ID APPLICATION FOR SMS MESSAGING at page 48 Enter the detailed information needed for text messagin...
Страница 28: ...ill be locked Error Lock Time Set the lock time in minutes when the maximum count of error login for an IP address is reached Echo Request Select Non Block to allow other users to use the ping command...
Страница 29: ...me set in Friendly name for Windows based PC or finder or Bookmark with the identification name set in Device Name for Mac based PC Double click it to quickly open the web browser for camera access Po...
Страница 30: ...and port for video transmission Set a specific address and port for multicast of profile 1 4 The range of the address is limited between 224 0 0 1 239 255 255 255 The port for multicast must be an ev...
Страница 31: ...and the camera will start the authentication later Network Share This function is used to assign a location in the LAN environment to save the snapshot of events Note This function is available only f...
Страница 32: ...s shown depend on the model you have Preset Note Before using this function make sure the DPTZ function is enabled You can set new preset points up to 16 or check existing points here How to set a new...
Страница 33: ...Before using this function make sure you have finished setting several preset points Here defines how the auto mode of the camera is going to work when is selected Sequence Auto Pan or Cruise Cruise...
Страница 34: ...atrolling each preset point defined in Sequence Step1 Click Add to choose a preset point from the drop down list and select the duration to stay at this point from 1 60 minutes Then click Save to conf...
Страница 35: ...amera returns to the point it originally monitors after the preset tracking timeout By clicking and dragging the slider set the right end of the surveillance area from 0 360 Time When the locked targe...
Страница 36: ...camera view Color Adjust the color performance from Brightness Contract Hue and Saturation Click and drag the slider to preview the color change on the right side of ths page and adjust the image col...
Страница 37: ...ecrease the noise shown in the dark environment IR Control Select Auto to automatically enable IR LEDs at night or in the dark environment On to always enable IR LEDs or OFF to disable this function I...
Страница 38: ...will be in the night mode Digital Input N O Normally stay in the day mode and switch to the night mode when the alarm is triggered Digital Input N C Normally stay in the night mode and switch to the...
Страница 39: ...ull Enable or disable the audio record function Select the video resolution for event recording Note The higher resolution you choose the more accuracy and higher image quality the recording will be b...
Страница 40: ...Note The recorded data will be removed also when you reset or reboot this camera You can only record a limited number of recordings Note To save more recorded data it s recommended to use this camera...
Страница 41: ...notifications when it occurs Then click the title E Mail in blue to configure the media type or profile file format AVC AVI and record time 1 5 seconds for the event video clip If you don t want even...
Страница 42: ...to create time lapse recording by combining snapshots together Note To use this function make sure Network Share is configured well in Network Network Share For details please go to Network Share at...
Страница 43: ...select 5 MIN 15 MIN or 30 MIN from the drop down list of Auto Lock Time or select NEVER to disable this function Note When the camera access is locked after the specified time to resume camera access...
Страница 44: ...e s and click Reload to start searching To clear all system event logs click Clear All Online You can check the current online user s with respective online information To refresh the list click Reloa...
Страница 45: ...e password again to confirm User Level Set the security level of an account to give the permission to control different functions There are four user levels SUPERVISOR POWER USER NORMAL USER and GUEST...
Страница 46: ...is denied Please follow the instructions below when you re denied Step1 Click Sign up for a Google Maps key to enter the application page Step2 Check the terms and conditions and enter the IP address...
Страница 47: ...l configurations will be restored to default values after upgrade Note It takes a few minutes to finish the upgrade process Do not disconnect the power during firmware upgrade or the upgrade may be fa...
Страница 48: ...ame Rate 30 fps Multiple Video Streaming 4 H 264 MJPEG Bitrate Control SVBR control VBR Max bitrate General Image Sensor 1 2 8 Sony CMOS image sensor Min Illumination 0 1 Lux F1 6 Wide F3 5 Tele 0 Lux...
Страница 49: ...oints Auto Tracking YES Others Mobile Surveillance iOS Android Event Notification FTP Email SMS Digital Pan Tilt Zoom YES Reset Default YES Motion Detection YES RTC real time clock YES Minimum Web Bro...
Страница 50: ...6 4GB Class 2 Apacer 2GB 4GB Class 4 4GB Class 4 4GB Class 6 SanDisk 2GB 8GB Class 6 4GB Class 4 16GB Class 10 8GB Class 4 Kingston 2GB 16GB Class 4 4GB Class 4 32GB Class 4 8GB Class 4 Verico 2GB 32...
Страница 51: ...l Note The SMS messaging may not be totally free Please check the charge policy of the messaging service you use Note The instructions below are for reference only and may vary when Clickatell s offic...
Страница 52: ...obile phone number Select SEND ACTIVATION CODE The system will send an activation code to that number for verification Check if you receive a text message from Clickatell and enter the activation code...
Страница 53: ...Center and select Change adapter settings Step2 Right click on Local Area Connection and select Properties Note If your local area connection is not enabled please also enable it Step3 In the Network...
Страница 54: ...work Share to use or user could use the existing administrator account Note The instructions below are taking Windows 7 and 8 for an example Step1 Go to User Accounts Manage Accounts and select Create...
Страница 55: ...are Folder Note The instructions below are taking Windows 7 and 8 for an example Step1 Right click the folder you want to use to save snapshots for Network Share and choose Properties Step2 In Share P...
Страница 56: ...53 Step3 Choose the account you want to share with and click Share to save...