Avtech AVP321Z Скачать руководство пользователя страница 18

MAIN MENU – TOOLS 

-14- 

6. MAIN MENU – TOOLS 

Note:

 The following description assumes that users are using our brand’s keyboard controller to control the speed 

dome camera.   
For details about using the DVR or other brand’s keyboard controller to control the speed dome camera, 
please refer to “APPENDIX 2 CAMERA CONTROL VIA OUR DVR” at page 27, or “APPENDIX 3 CAMERA 
CONTROL VIA OTHER KEYBOARD CONTROLLER” at page 28. 
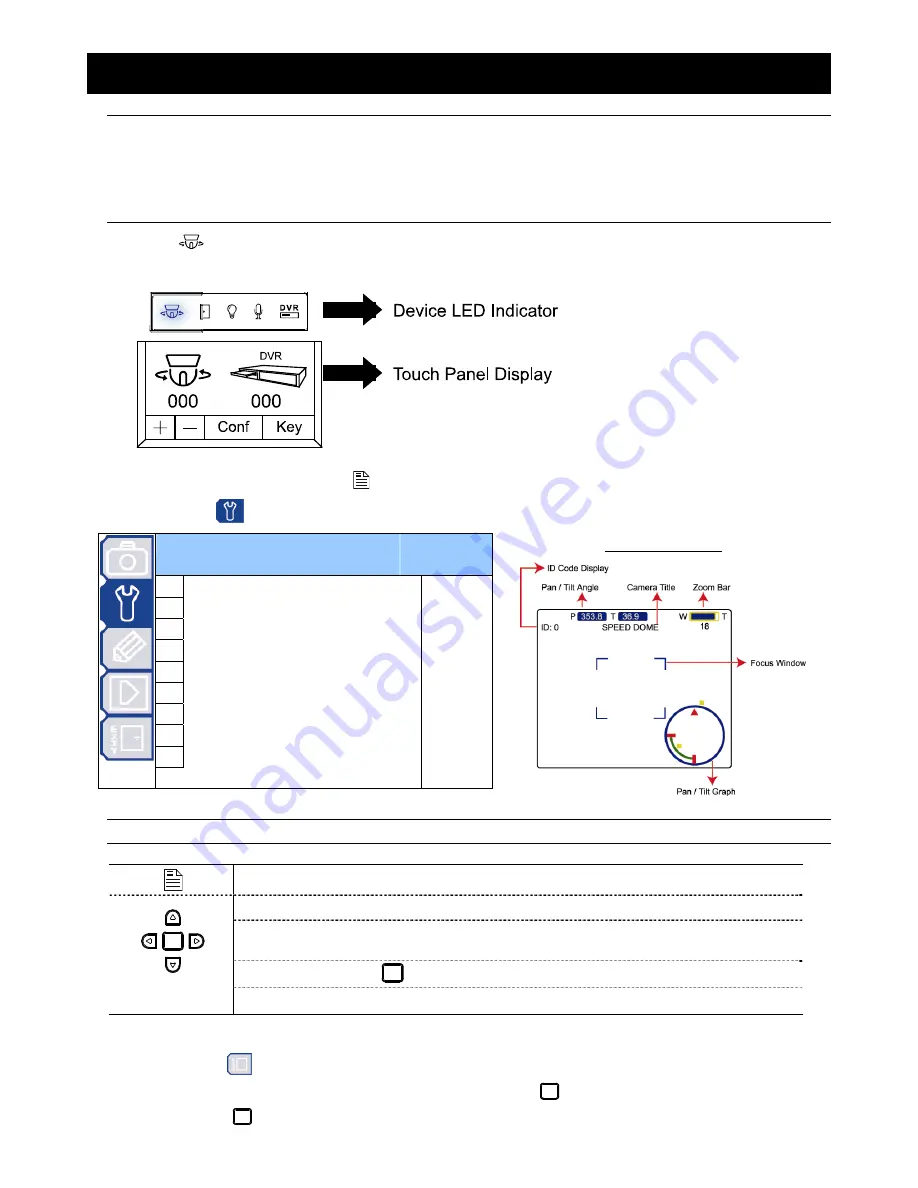
Press 

  on the keyboard controller to enter the camera control mode, or use the stylus to click the speed dome 

camera icon on the touch panel of the controller to enter the camera control mode, as shown in the picture below. 


In the camera control mode, press 

  on the controller to access the main menu of the speed dome camera. 

Move to TOOLS “

”, and you will see the following window: 


T

T

O

O

O

O

L

L

S

S


1 Title 

Name 

Set 

2 Title 

Position 

Up 

3 Pan 

Tilt 

Angle 

On 

Pan / Tilt Graph 

On 

5 Zoom 

Bar 

On 

6 Focus 

Window 

On 

ID Code No. 

ID Code Display 

On 

9 Baud 

Rate 

2400 


Graphical Display


Note: 

The current settings will be shown on the right hand side of this menu page.


Press to access the main menu of the speed dome camera. 

Press the up or down key to make the selection. 

Press the right key to enter the sub-menu. 
Press the left key to go the upper layer of the menu. 


Press the enter key “

” to confirm the setting / enter the sub-menu 

 / 


Press 

 / 

  to modify the ID code number. 

‧ 

Exit and Save the Settings / Exit without Saving the Settings: 

Move to EXIT “

”, and press the right key to enter the sub-menu. Select “SAVING” to save the changes and exit, 

or “WITHOUT SAVING” to exit without saving the changes, and press 

. Then you’ll see a pop-up message “Are 

your sure ?”. Press 

  again to confirm and exit the menu.


Содержание AVP321Z

Страница 1: ...5_P325A_Manual_V1 3 U Us se er r M Ma an nu ua al l Please read instructions thoroughly before operation and retain it for future reference The image shown above may differ from the actual product app...

Страница 2: ...of the possibility of such damages About this document We reserve the right to revise or remove any content in this manual at any time We do not warrant or assume any legal liability or responsibility...

Страница 3: ...MENU CAMERA 11 5 1 White Balance 12 5 1 1 Auto 12 5 1 2 Indoor 1 Indoor 2 Sun Cloudy 12 5 2 Shutter Speed 12 5 2 1 Shutter Speed Options 12 5 3 Gain Gain Control 12 5 3 1 On Low Medium High Off 12 5...

Страница 4: ...Menu 21 8 4 Tracking Setup 22 8 4 1 Set the Pre defined Surveillance Area LIMIT 22 8 4 2 Set the Pre defined Tracking Timeout TIME 22 8 4 3 Select the Auto Tracking Mode Mode 22 8 5 Home Position 23...

Страница 5: ...illance can be easily achieved 1 2 Features Advanced Auto Tracking Accuracy To follow the moving object Rigid High Speed Pan Tilt Mechanism with Two Million Rotation Test Passed for longer operating l...

Страница 6: ...all the preset points will follow the order of the minimal panning route Auto Tracking Yes LENS Focal Length f3 9 mm f85 9 mm F number F1 6 Wide 3 7 Tele Viewing Angle 4 60 Auto Electronic Shutter 1...

Страница 7: ...INSTALLATION AND SETUP 3 2 INSTALLATION AND SETUP For the installation and connection of this speed dome camera please check with qualified service personnel or installer 2 1 Installation...

Страница 8: ...INSTALLATION AND SETUP 4...

Страница 9: ...ot supplied in the sales package STEP 1 Get a RJ11 cable with the proper length to your connection Different RJ11 connector may have different wire layout so the connection might be different If you c...

Страница 10: ...n DVR user manual RJ11 cable RS 485 Port RS485 A Red wire RS485 A PIN 2 RS485 B Green wire RS485 B PIN 3 The RJ11 cable is not supplied in the sales package Example of RS485 port on the DVR rear panel...

Страница 11: ...d and RS485 B green wires of the RJ11 cable to the corresponding pins on the solder side of the 15 PIN or 25 PIN D Sub connector as shown in the picture above To protect the naked wires use the insula...

Страница 12: ...Mode and select Track For details please refer to 8 9 Auto Mode at page 24 M MO OD DE E 1 Reset Default LIMIT 2 Pan Tilt Speed 60 3 Preset Setup TIME 4 Tracking Setup 5 s 5 Home Position Mode 6 Auto F...

Страница 13: ...ff IRIS BLC On Off CAMERA Sharpness Auto Low Medium High Title Name Modify New Title Position Up Down Off Pan Tilt Angle On Off Pan Tilt Graph On Off Zoom Bar On Off Focus Window On Off ID Code No 1 I...

Страница 14: ...nfirm the setting enter the sub menu F1 F2 F3 F4 HOME Go to the home position GOTO Go to the preset point SEQ Start sequence function Press STOP to exit the sequence mode AUTO PAN Start the pan functi...

Страница 15: ...be unable to control the camera you want In the camera control mode press on the controller to access the main menu of the speed dome camera Move to CAMERA and you will see the following window C CA A...

Страница 16: ...250 1 500 1 1000 1 2000 1 4000 1 10000 The camera has eight numerical shutter speed options The higher the number the faster the electronic shutter Increasing the shutter speed will lower the amount o...

Страница 17: ...e function to adjust the image to compensate for an area that is overpowered by brightness because of excessive light The image will be properly exposed for clearness C CA AM ME ER RA A 1 White Balanc...

Страница 18: ...TOOLS and you will see the following window T TO OO OL LS S 1 Title Name Set 2 Title Position Up 3 Pan Tilt Angle On 4 Pan Tilt Graph On 5 Zoom Bar On 6 Focus Window On 7 ID Code No 0 8 ID Code Displa...

Страница 19: ...lt Graph 5 Zoom Bar 6 Focus Window 7 ID Code No 8 ID Code Display 9 Baud Rate 6 2 1 Up Down Off Select to display the camera title name on the top of Up at the bottom Down of the monitor or choose not...

Страница 20: ...Off Select whether to show the focus window on the monitor or not 6 7 ID Code No The camera ID code number is a series of digits that indicate the location of the camera T TO OO OL LS S 1 Title Settin...

Страница 21: ...ilt Graph 2400 5 Zoom Bar 6 Focus Window 7 ID Code No 8 ID Code Display 9 Baud Rate 6 9 1 Baud Rate Options unit bits s The baud rate of the camera must be the same as the connected control device suc...

Страница 22: ...page 28 Press on the keyboard controller to enter the camera control mode or use the stylus to click the speed dome camera icon on the touch panel of the controller to enter the camera control mode a...

Страница 23: ...ODE and you will see the following window M MO OD DE E 1 Reset Default Set 2 Pan Tilt Speed Fast 3 Preset Setup Group_1 4 Tracking Setup 60 5s 5 Home Position Set 6 Auto Focus PTZ 7 Calibration Start...

Страница 24: ...de 8 3 Preset Setup The preset point setting is used to specify the camera position pan and tilt and the lens zoom setting You can set up to 256 preset points 8 groups each group has 32 preset points...

Страница 25: ...n Turn the joystick counter clockwise to zoom out 8 3 4 Set Duration Time of the Preset Points Move to and use the up down key to select the duration second For example set the duration second as 7 an...

Страница 26: ...the surveillance area will be the area starting from the center of the focus 30 to the left and 30 to the right You can also customize the surveillance area by selecting Manual Move to Manual and pres...

Страница 27: ...pending on your need M MO OD DE E 1 Reset Default Always 2 Pan Tilt Speed PTZ 3 Preset Setup Z Only 4 Tracking Setup 5 Home Position 6 Auto Focus 7 Calibration 8 Auto Scan 9 Auto Mode 8 6 1 Select the...

Страница 28: ...p down right left to set the right and left limit M MO OD DE E 1 Reset Default Set 2 Pan Tilt Speed 3 Preset Setup 4 Tracking Setup 5 Home Position 6 Auto Focus 7 Calibration 8 Auto Scan 9 Auto Mode 8...

Страница 29: ...stylus to click the speed dome camera icon on the touch panel of the controller to enter the camera control mode as shown in the picture below In the camera control mode press on the controller to ac...

Страница 30: ...t Factory Default Preset Points The first preset position is Pan 120 Tilt 15 The second preset position is Pan 240 Tilt 15 The default pre defined surveillance area is 60 Tracking Setup The default pr...

Страница 31: ...Zoom out Zoom Max ZOOM Zoom Min ZOOM Focus near SLOW Focus far SLOW ZOOM Move up S Move down T Move left W Move right X Activate the Auto mode PLAY From IR Remote Controller If You Want To Press Ente...

Страница 32: ...otocol of Pelco P or Pelco D If You Want To Press Enter camera s menu goto 95 Confirm your selection enter the submenu goto 91 Zoom in Left turn joystick Zoom out Right turn joystick Focus near Focus...

Страница 33: ...rk cable DC 12V AUDIO LAN EXTERNAL I O DVR P T Z STEP 3 Change the IP address of the PC or laptop to 192 168 1 xx xx should be 1 255 except 90 because the default IP address of the controller is 192 1...

Отзывы: