background image

VIDEO VIEWER BASIC OPERATION 

-8- 

3. VIDEO VIEWER BASIC OPERATION 

3.1 The Live View Page 

After setting up the network information, login user name and password, double-click “

” on the PC desktop to 

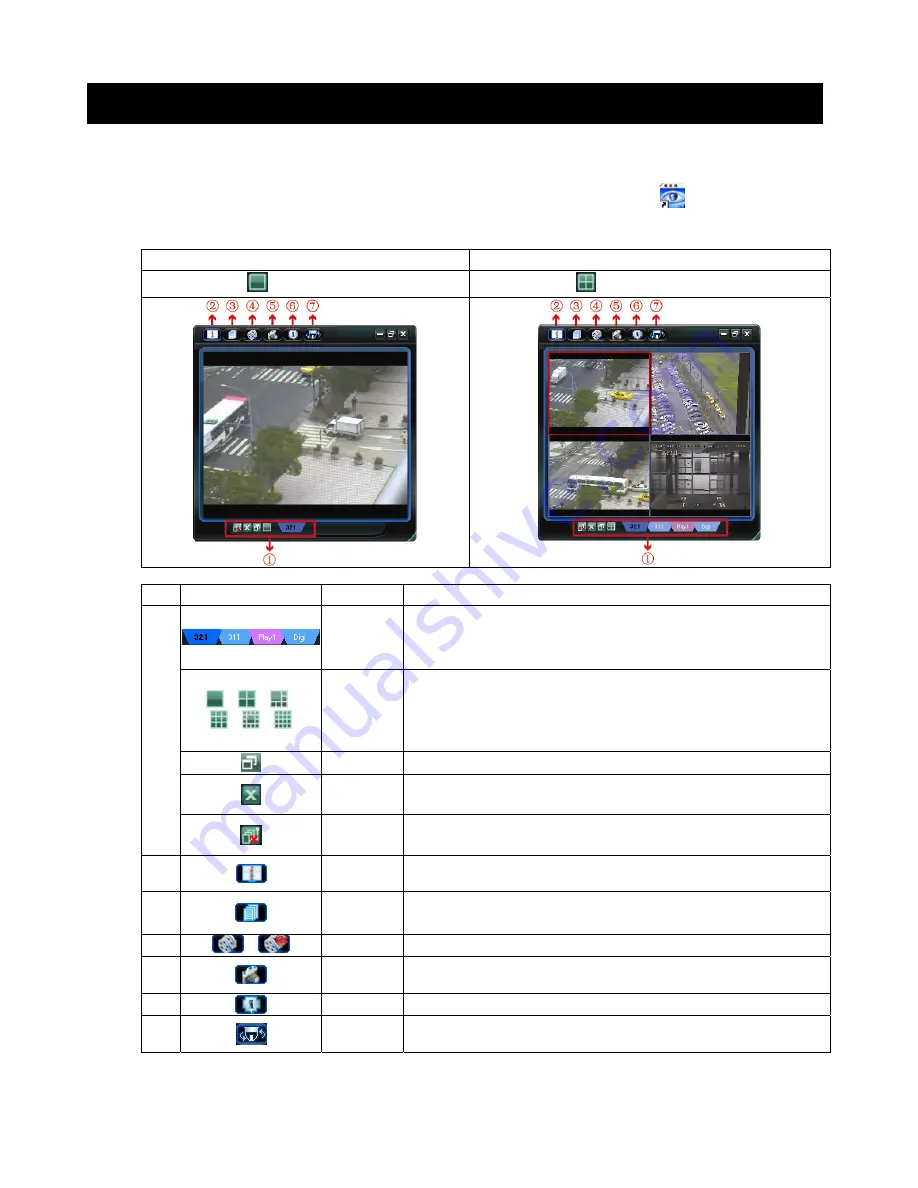
open and log into the Video Viewer control panel. You will see a screen similar to the following with 6 major sections: 

‧ 

Connect to only one network camera 

‧ 

Connect to multiple network cameras (ex. 4 cameras) 

‧ 

1-cut display 


‧ 

4-cut display 


NO. Button  Function 

Description 

1


  Image Display

To switch to another camera view if two or more network cameras are 
connected, click the corresponding blue tab. The camera title shown in the blue 
tab can be customized (For example, “321”, “311”, “Play1” and “Digi”). The 
default camera title is “Camera1”.   


 / 

 / 

 /  

 / 

 / 


Expand All 

Views 

To see all views in the image display area if you have many views and do not 
want to switch each view by clicking the blue tab described above, click to 
choose a proper split view (1-cut / 4-cut / 6-cut / 9-cut / 13-cut / 16-cut) which best 
suits your needs. 
The selected view will be indicated with a red frame around it. 


Original Size

Click to return to original size of the monitoring view. 


Close 

Click to close the current image display view. 
If the image display view is closed, you will be logged out automatically. 


Close All 

Click to close all the current image display view. 
If the image display view is closed, you will be logged out automatically. 

2


Address Book

Click to show the predefined IP address(es). You can add, remove or search the 
IP address to login the network camera remotely. 

3


Miscellaneous 

Control 

Click to show the main operation functions: audio volume control, color setting, 
backup, record setting, server setting, upgrade, and find status log list. 

4


 / 


Record 

Click to start / stop the manual recording.   

5


Snapshot 

Click to take a snapshot of the current view. The snapshot will be saved in the 
path you specified in Record Setting. 

6


Information 

Click to show the current network connection details. 

7


PTZ 

Click to show the PTZ control functions: auto tracking, auto move, auto pan, 
zoom in, zoom out, focus near and focus far …etc. 


Содержание AVI311

Страница 1: ...stances cited in the directive The crossed out wheeled bin mark symbolizes that within the European Union the product must be collected separately at the product end of life This applies to your produ...

Страница 2: ...plugs x 4 Cap x 1 Bracket screw x 1 M6 Nylok screws short x 2 M6 Nylok screws long x 3 M4 screw x 1 Mounting base screw x 2 Spirit level x 1 Hex screw nuts x 3 AVI311 Network camera Screw 3 Quick Sta...

Страница 3: ...io Input Connector Support the connection to an audio device such as a microphone for voice transmission of the local side The audio function is currently not available RJ11 Connector Get a RJ11 line...

Страница 4: ...supplied with the bracket sales package including 1 Wall mounting screws x 4 2 Wall plugs x 4 3 Cap x 1 4 Bracket screw x 1 5 M6 Nylok screws short x 2 6 M6 Nylok screws long x 3 7 M4 screw x 1 8 Mou...

Страница 5: ...ed the following items before installation The accessory package which includes 1 Wall mounting screws 2 Wall plugs 3 Decoration covers Power Drill or screwdriver STEP 1 Mount the camera to the ceilin...

Страница 6: ...the supplied CD into your CD ROM or DVD ROM drive The program will be automatically run b Click Licensed Software AP to install Video Viewer or click Download Latest Version under Licensed Software A...

Страница 7: ...address in the address book for login Note For detailed network settings under different network types Static IP PPPOE DHCP please refer to your user manual Add the IP address and other network settin...

Страница 8: ...9 cut 13 cut 16 cut which best suits your needs The selected view will be indicated with a red frame around it Original Size Click to return to original size of the monitoring view Close Click to clos...

Страница 9: ...IP address twice You can also create new IP address information or modify or remove the current IP address information Button Function Description Add Click to directly add one IP address for login Ke...

Страница 10: ...pe and assign the file saving location Click Miscellaneous Control Record Setting to go to the Record Setting page Check the record type s Manual and assign the location to save the recordings by doub...

Страница 11: ...lso sort out the logs you want to speed up the search time For details please refer to your user manual To immediately play a recording file select a log from the list and click Play or double click t...

Отзывы: