background image

USER INTERFACE 

3. USER INTERFACE 

3.1 Local 


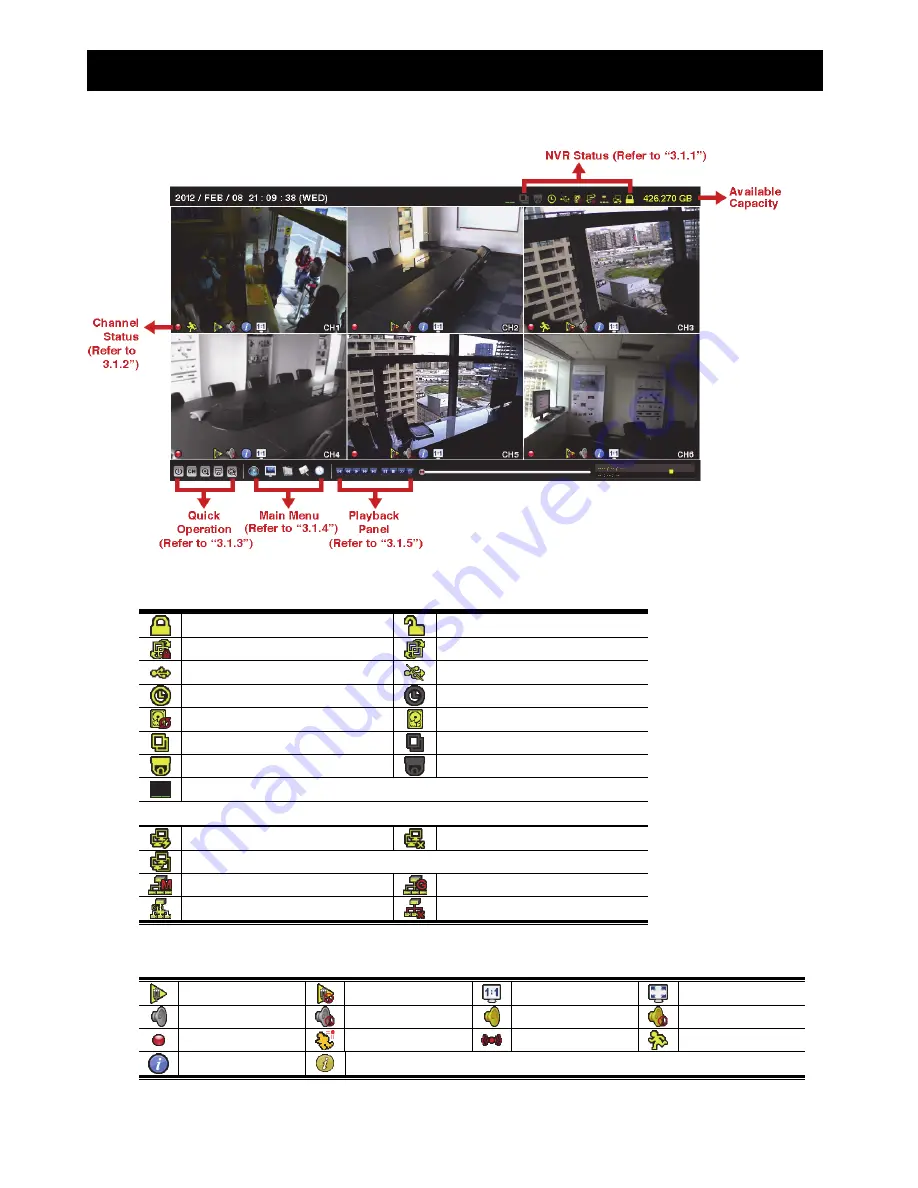
3.1.1 NVR Status 

  Key lock 

  Key unlock 

  Channel lock 

  Channel unlock 

  USB flash drive / device connected 

  No USB device connected 

  Timer record on 

  Timer record off 

  Overwrite on 


Overwrite off 


Sequence mode on 


Sequence mode off 

  PTZ mode on 

  PTZ mode off 

  CPU loading 


Network Status: 

  (WAN) Internet connected 

  (WAN) Internet disconnected 

  (WAN) Local connection 


  (LAN) Auto mode –Mbit/s 

(LAN) Auto mode – Gbit/s 

  (LAN) DHCP / Static IP mode 

  (LAN) Camera disconnected 

3.1.2 Channel Status 

  Auto search on 

  Auto search off 

Original size 

Fit to screen 


Live audio on 

Audio off 


Audio playback on 

Audio playback off 


Recording 

Human detection event

Alarm event 

Motion event 

  Live information 

  Playback 

information 


Содержание AVH306

Страница 1: ..._network_V1 3 NETWORK VIDEO RECORDER SERIES Quick Start Please read instructions thoroughly before operation and retain it for future reference Online manual download www surveillance download com user h306 swf ...

Страница 2: ......

Страница 3: ...s operated in a commercial environment This equipment generates uses and can radiate radio frequency energy and if not installed and used in accordance with the instruction manual may cause harmful interference to radio communications Operation of this equipment in a residential area is likely to cause harmful interference in which case the user will be required to correct the interference at his ...

Страница 4: ...NSING MAY BE OBTAINED FROM MPEG LA LLC SEE HTTP WWW MPEGLA COM GPL Licensing This product contains codes which are developed by Third Party Companies and which are subject to the GNU General Public License GPL or the GNU Lesser Public License LGPL The GPL Code used in this product is released without warranty and is subject to the copyright of the corresponding author Further source codes which ar...

Страница 5: ...ration 8 3 1 4 Main Menu 8 3 1 5 Playback Panel 8 3 2 Remote 9 4 NETWORK CONFIGURATIONS 11 4 1 Understand How Your Laptop Computer Connect to Internet 11 4 2 Router Modem 11 4 3 Modem Hub Modem 13 APPENDIX 1 MOBILE SURVEILLANCE VIA EAGLEEYES 15 A2 1 Prerequisites 15 A2 2 Where to download 15 APPENDIX 2 COMPATIBLE USB FLASH DRIVE LIST 16 APPENDIX 3 COMPATIBLE HARD DISK LIST 17 APPENDIX 4 HARD DISK ...

Страница 6: ......

Страница 7: ...B FLASH DRIVE LIST at page 16 3 Mouse port Insert a mouse for function operation 1 2 Rear Panel 1 AUDIO OUT Connect to a speaker 2 WAN This port is used to connect your NVR to Internet via a RJ45 network cable 3 Video output This port is used to connect the monitor which supports high definition video output interface Note Direct connection to the monitor which supports VGA or composite interface ...

Страница 8: ...HARDWARE OVERVIEW 2 ...

Страница 9: ...k is installed in the NVR for evidentiary recording To know how to install a hark disk please refer to APPENDIX 4 HARD DISK INSTALLATION at page 18 2 1 1 AUTO Mode The connection mode of the LAN port is AUTO by default This mode is suitable when the LAN port of the NVR is connected to a hub Note SETTING Path ADVANCED CONFIG NETWORK LAN MODE ...

Страница 10: ...elect on the bottom of the screen you ll see the list of every connected IP camera with its connection status to this NVR and MAC address b Select the IP address which is not used and select SETUP IP SEARCH IP PORT MAC STATUS 10 1 1 12 88 00 0e 53 e5 9a f1 CONNECTED TO CH1 10 1 1 13 88 00 0e 53 a6 91 18 CONNECTED TO CH2 10 1 2 14 88 00 0e 53 a5 9f a2 UNUSED 10 1 1 15 88 00 0e 53 e1 4e k5 CONNECTED...

Страница 11: ... your router For example the IP address of your router of 192 168 0 1 and the network segment of your router will be 192 168 0 xx xx is ranged from 2 254 You can assign the IP address of the connected IP camera s by yourself Choose DHCP when your router supports the DHCP function and you do not know the network segment of your router The IP address of the connected IP camera s will be assigned by ...

Страница 12: ...CONNECTION 6 2 2 Advanced Setup ...

Страница 13: ...ode off PTZ mode on PTZ mode off CPU loading Network Status WAN Internet connected WAN Internet disconnected WAN Local connection LAN Auto mode Mbit s LAN Auto mode Gbit s LAN DHCP Static IP mode LAN Camera disconnected 3 1 2 Channel Status Auto search on Auto search off Original size Fit to screen Live audio on Audio off Audio playback on Audio playback off Recording Human detection event Alarm e...

Страница 14: ...r the event search menu ADVANCED CONFIG Click to set CONNECTION CAMERA DETECTION ALERT NETWORK DISPLAY RECORD and NOTIFY SCHEDULE SETTING Click to set record timer and event timer 3 1 5 Playback Panel Fast Forward Increase the speed for fast forward Fast Rewind Increase the speed for fast rewind Play Pause Click to play the latest recorded video clip immediately and click again to pause In the pau...

Страница 15: ...USER INTERFACE 9 3 2 Remote ...

Страница 16: ...USER INTERFACE 10 ...

Страница 17: ...a network cable and power it on If you re using Router modem please refer to 4 2 Router Modem Modem or modem hub please refer to 4 3 Modem Hub Modem 4 2 Router Modem Before configuring make sure Your laptop PC is connected to the same router as the NVR is intended to connect to You know the IP address user name and password to access your router The DHCP function of your router is on Note For deta...

Страница 18: ...M NAME Note down the whole address under CURRENT HOST ADDRESS such as MAC000E5318B3F0 ddns dvrtw com tw This will be the address used to access your NVR remotely ADVANCED CONFIG CONNECTION WAN LAN E MAIL DDNS CAMERA DDNS ON DETECTION SYSTEM NAME eagleeyes ALERT HOST NAME MAC000E5318B3F0 NETWORK E MAIL EMPTY DISPLAY RECORD NOTIFY CURRENT HOST ADDRESS EXIT MAC000E5318B3F0 ddns dvrtw com tw Then sele...

Страница 19: ...et the user name and password from your ISP Internet Service Provider Step1 Connect your NVR to the hub or modem with a RJ45 network cable similar as follows Step2 From your NVR select ADVANCED CONFIG and select Network WAN ADVANCED CONFIG CONNECTION WAN LAN E MAIL DDNS CAMERA NETWORK TYPE PPPOE DETECTION IP 192 168 1 112 ALERT GATEWAY 192 168 1 254 NETWORK NETMASK 255 255 255 0 DISPLAY PRIMARY DN...

Страница 20: ...gleeyes ALERT HOST NAME MAC000E5318B3F0 NETWORK E MAIL EMPTY DISPLAY RECORD NOTIFY CURRENT HOST ADDRESS EXIT MAC000E5318B3F0 ddns dvrtw com tw Then select EXIT to return to the live view and finish network configurations Check your connection Step1 Open your web browser e g Internet Explorer Step2 Enter the IP address STATIC or host address PPPOE DHCP and the port number in the URL address box of ...

Страница 21: ...ith your local network operator or service provider You have noted down the IP address port number user name and password used to access your network camera from Internet A2 2 Where to download Connect to www eagleeyescctv com from your mobile phone and sign in Note Please DO NOT try to download EagleEyes from your computer Then select Software and the mobile platform of your phone to download Eag...

Страница 22: ...at the USB flash drive as FAT32 Note You can backup up to 2GB video data for one time USB backup To backup more data please set the time channel s you want and start USB backup again MANUFACTURER MODEL CAPACITY Transcend JFV35 4GB JFV30 8GB Kingston DataTraveler 1GB PQI U172P 4GB Apacer AH320 2GB AH320A 8GB AH220 1GB AH320 4GB A data RB 18 1GB Sandisk Cruzer Micro 2GB Cruzer Micro 4GB Cruzer4 pk 2...

Страница 23: ...33500320AS 500GB 7200 rpm ST3500410SV 500GB 7200 rpm ST3750330AS 750GB 7200 rpm ST31000525SV 1000GB 7200 rpm Seagate ST31000340AS 1000GB 7200 rpm WD3200AAKS 320GB 7200 rpm WD5000AACS 500GB 7200 rpm WD6400AAKS 640GB 7200 rpm WD7500AAKS 750GB 7200 rpm WD10EADS 1TB 7200 rpm WD15EADS 1 5TB 7200 rpm WD WD20EADS 2TB 7200 rpm STM3500320AS 500GB 7200 rpm Maxtor STM3750330AS 750GB 7200 rpm HDT725032VLA360 ...

Страница 24: ...d data connector Step4 Fasten the hark disk with the supplied screws two for each side Step5 To install another hard disk find the supplied hard disk brackets in the package and fix them onto the NVR base Step6 With the PCB side facing up connect the hard disk to the power connector and data connector Step7 Then put the hard disk in the bracket and fasten it with the supplied screws two for each s...

Страница 25: ... battery CR2032 is a non chargeable battery and should be purchased separately Please replace only with the same or equivalent type battery in case of danger Step1 Stop all recording immediately to prevent the disorder of the recorded data Then back up the recorded data if necessary Step2 Power off the device and disconnect the power Step3 Remove the device cover and find the battery on the mainbo...

Отзывы: