AVProEdge AC-MX-42X Скачать руководство пользователя страница 16

16

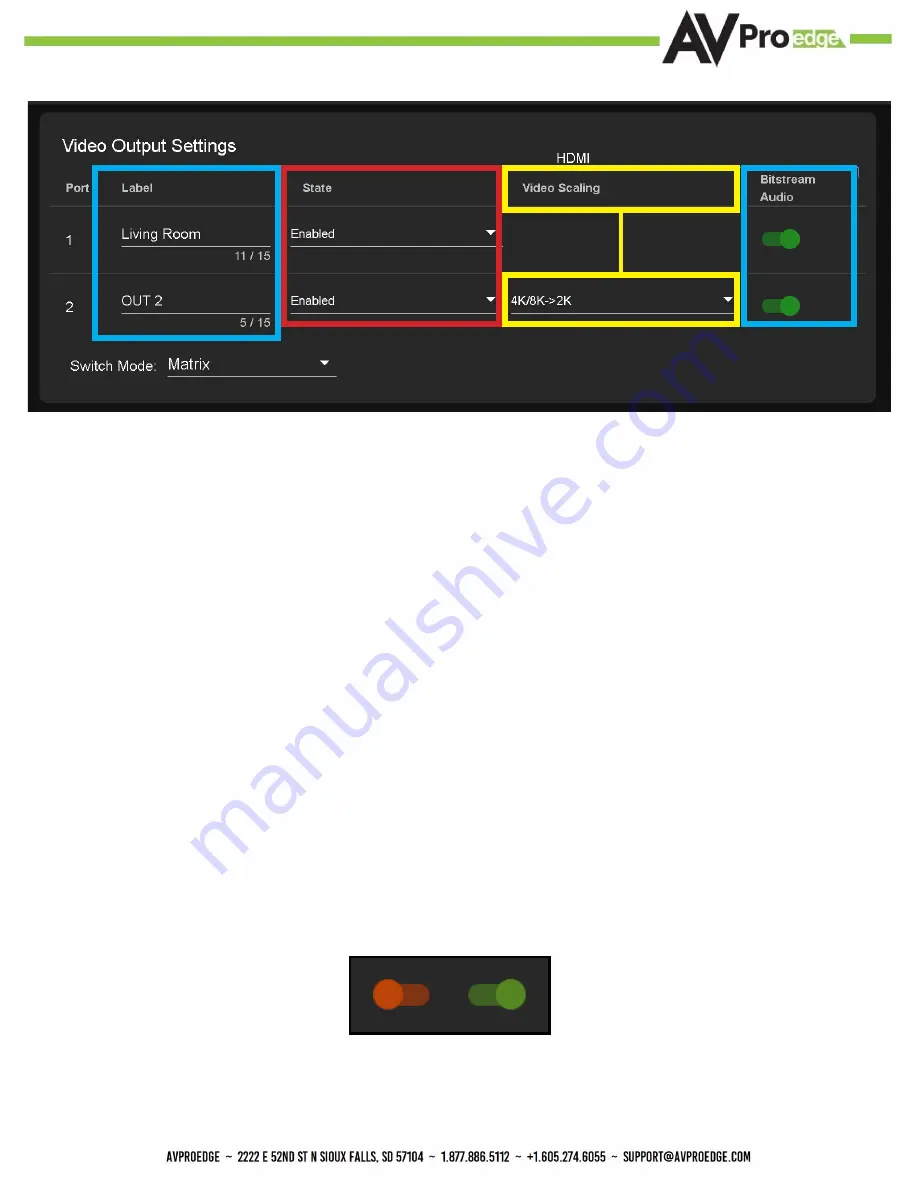
Output Settings Label

 - Use this to give an name/alias to your outputs (Living Room, Den, Kitchen, etc).  

Note:  There is a 15 character limit to this field, the name will replace the default “OUT #” throughout the 

rest of the WebUI (for instance the Video Matrix tab).

Output Settings State - 

This is an enable/disable dropdown.  By default this will be Enabled.  To change 

the setting click on the box and then select Disabled.  Set to Disabled, that OUTPUT will not produce a 

signal. 

Output Settings Video Scaling - 

HDMI OUT2 has two options for scaling


·4K/8K -> 2K  - This option will take and downscale any 4K resolution or 8K resolution and downscale 

it to 2K.


·8K -> 4K  - This option will take any 8K signal and downscale it to 4K.

Output Settings Bitstream Audio - 

This is an enable/disable switch.  By default this will be Enabled/

Green.  To change the setting simply click to switch.  Disabled/Red there will be no AudThis is an enable/

disable switch.  By default this will be Enabled/Green.  To change the setting simply click to switch.  

Disabled/Red there will be no Audio passed on that HDMI output. 

NOTE: This setting has no affect on the Extracted Audio outputs.

WebUI: I/O Config - Output Settings

Off

Disabled

On

Enabled

Содержание AC-MX-42X

Страница 1: ...User Manual AC MX 42X 1...

Страница 2: ...TPUT SETTINGS 16 WEBUI I O CONFIG OUTPUT SETTINGS CONT 17 WEBUI SYSTEM IP SETTINGS 18 WEBUI SYSTEM TELNET SETTINGS 19 WEBUI SYSTEM ADMIN WEB INTERFACE 19 WEBUI SYSTEM USER WEB INTERFACE 20 WEBUI SYSTE...

Страница 3: ...PANEL CONTROL EDID MANAGEMENT 29 IR CONTROL IR REMOTE 31 RS 232 AND TCP IP CONTROL 32 COMMAND LIST 33 COMMAND LIST CONTINUED 34 TROUBLESHOOTING 35 BANDWIDTH CHART 36 BANDWIDTH CHART CONTINUED 37 MAIN...

Страница 4: ...tem From built in scaling to complete EDID control and configuring you can customize every aspect of this device to work perfectly for your system Features HDMI 2 1 FRL 5 HDCP 2 3 40Gbps Bandwidth Sup...

Страница 5: ...Specifications 5...

Страница 6: ...erview Front Panel Display OUT1 Input Select Button OUT2 Input Select Button Output Mode Button OUT2 Scaler Button Micro USB Port IR Receiving Eye LAN Connection Extracted Audio Power Port RS 232 Port...

Страница 7: ...TCP IP using the LAN connection For initial setup it is recommended to connect the matrix to a local area network LAN and use a computer on the same network in conjunction with the built in WebUI Afte...

Страница 8: ...enabled under the Hardware section click the Update Firmware button to check for new Firmware OTA over the air This will compare the firmware versions currently loaded on the AC MX 42X and compare to...

Страница 9: ...ate will be skipped automatically Click the UPLOAD button to start 13 Once the progress bar hits 100 click the CLOSE button the firmware upgrade process is complete 14 With the Firmware up to date it...

Страница 10: ...ction Green means HDMI source is detected red means that the source is not detected If red verify that the input is powered on and that the HDMI cable is properly connected to the source and to the ba...

Страница 11: ...nd output to copy from You can select any of the 4 HDMI outputs then click the COPY button This will save that outputs EDID to the USER1 slot 3 Next use the drop down to select NO 3D or 3D depending o...

Страница 12: ...HDMI outputs 3 State Here you can Enable or Disable either HDMI Output 1 or HDMI Output 2 4 Video Scaling HDMI OUT1 Video Scaling has two options a No Scaling Default scaling on HDMI OUT1 is turned o...

Страница 13: ...ange is mirrored on both HDMI Outputs This means if you change OUT1 from INPUT2 to INPUT3 OUT2 will also change to INPUT3 Any change includes using the front panel buttons WebUI or RS 232 TCP IP comma...

Страница 14: ...S Click on the INPUT number to select example below shows IN 1 With the INPUT selected simply click on the OUTPUT you want to send that source to it will highlight green after selected Note If you ren...

Страница 15: ...080P_3D_2CH_HDR 20 1080P_3D_6CH_HDR 21 1080P_3D_8CH_HDR 22 4K30HZ_3D_2CH_HDR 23 4K30HZ_3D_6CH_HDR 24 4K30HZ_3D_8CH_HDR 25 4K60HzY420_3D_2CH_HDR 26 4K60HzY420_3D_6CH_HDR 27 4K60HzY420_3D_8CH_HDR 28 4K6...

Страница 16: ...ng HDMI OUT2 has two options for scaling 4K 8K 2K This option will take and downscale any 4K resolution or 8K resolution and downscale it to 2K 8K 4K This option will take any 8K signal and downscale...

Страница 17: ...ont Audio Settings Enable Disable Switch Use this switch to Enable Disable the Extracted Audio Ports Audio Source With Audio Settings switch Enabled you can use this dropdown to select which output yo...

Страница 18: ...drop down has two options 1 Manual 2 Automatic DHCP Default out of the box will be set to Automatic DHCP the IP Address Subnet Mask Gateway Primary DNS and Secondary DNS will be assigned by your netwo...

Страница 19: ...e Up Down arrow buttons to increase decrease the number WebUI System Admin Web Interface This switch has two options Red Disabled Default and Green Enabled When enabled green there will be three field...

Страница 20: ...change Default Username user Default Password user123 Once the desired Username and Password has been entered click the green APPLY button to set Note The webpage will reload to the Log In page With b...

Страница 21: ...use the System tab to check for new Firmware OTA over the air This will check the firmware versions currently loaded on the AC MX 42X and compare to the latest available If it is up to date you will s...

Страница 22: ...or simply leave all files options selected If the version currently installed not newer then that update will be skipped automatically Once the progress bar hits 100 click the CLOSE button the firmwar...

Страница 23: ...e these four drop downs to select your preferred EDID The available combinations are as follows Off Disabled On Enabled 1 1080P_2CH 2 1080P_6CH 3 1080P_8CH 4 1080P_3D_2CH 5 1080P_3D_6CH 6 1080P_3D_8CH...

Страница 24: ...will see a canned 1080P No 3D SDR 2CH EDID applied to IN 1 Any EDID change once applied will display here Signal Info shows the connected source s current output information This includes Timing Colo...

Страница 25: ...Reset Connected Device EDID shows the connected sync s preferred EDID information and current state This includes Manufacturer Monitor Name Sink Device Type Preferred Timing Supported Audio Formats 3d...

Страница 26: ...ox and type a GET STA Click the green arrow or hit ENTER RETURN on your keyboard The the command response will show in the field below CLEAR CONSOLE Button This button will clear the current console s...

Страница 27: ...ns front panel LAN RS 232 IR etc Note In DA MODE the FUNCTIONAL MODE led will be on Front Panel Control Matrix Mode Switching The AC MX 42X can switch the two OUTPUTS independently from the front pane...

Страница 28: ...You can extract audio from toslink or balance 2CH Audio Audio outputs are an un decoded output This means that what goes in is what goes out 1 2CH Analog Port Supports 2CH PCM audio only which is ide...

Страница 29: ...s All LED flash one time You are now in EDID management state 2 In the EDID management state press the Out 1 button to toggle to the input you want to set the EDID for 1 IN1 2 IN2 3 IN3 4 IN4 3 Press...

Страница 30: ...30...

Страница 31: ...remote supplied with the product battery not included requires CR2025 The labels on the right are the OUTPUT numbers The left arrow button decrements to the next input port and the right arrow increm...

Страница 32: ...to use for sending commands to the machine For TCP IP control commands use Telnet Port 23 For RS 232 use a null modem serial cable adapter and set the serial communications to 57600 n 8 1 baud 57600 n...

Страница 33: ...33 Command List Baudrate 57600 Checksum None Bit Num 8 Stop Bit 1...

Страница 34: ...34 Command List Continued...

Страница 35: ...ate Page s 22 23 Use the Diagnostics section of the WebUI to verify the HDMI Input Output status and EDID settings Page s 24 26 Diagnostics page indicates everything is good but still not getting a pi...

Страница 36: ...Bandwidth Chart 36...

Страница 37: ...37 Bandwidth Chart Continued...

Страница 38: ...ently Repair of the equipment should only be carried out by qualified professionals as these products contain sensitive components that may be damaged by any mistreatment Only use this product in a dr...

Страница 39: ...behind We really wanted to take all the red tape out of a warranty and just make is simple Our 10 YEAR NO BS warranty hinges on 3 elements 1 If you are having trouble call us We will attempt to troubl...

Страница 40: ...ssories IR Cables RS 232 Power Supplies etc are not included in the warranty We will make acceptable effort to source and supply replacements for defective accessories at a discounted rate as needed O...

Страница 41: ...nality issues product redevelopment is not an option Discontinued or out of production items will be credited at fair market value towards a current product of equal or comparable capabilities and cos...

Страница 42: ...42...

Страница 43: ...43...

Страница 44: ...4 Thank you for choosing AVProEdge Please contact us with any questions we are happily at your service AVProEdge 2222 E 52nd St N Sioux Falls SD 57104 1 877 886 5112 605 274 6055 support avproedge com...

Отзывы: