background image

User’s Manual 


3.3.2


Other Image Options 


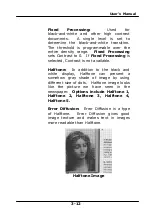
Binarization  This  is the process of converting a 

grayscale or color image to a bi-tonal 
image. There are several different 

methods of performing this conversion.  
Options:  Dynamic Threshold, Fixed 

Processing, Halftone 1~5, Error 
Diffusion

Dynamic 

Threshold:  Selecting 

Dynamic Threshold allows the scanner 

to dynamically evaluate each document 
to determine the optimal threshold value 

to produce the highest quality image.  

This is used to scan mixed document 

containing faint text, shaded background, 
or color background with a single setting.  

If Dynamic Threshold is selected, 
Threshold, Brightness, and Contrast are 

not available. 
 

Sensitivity of Dynamic Threshold 
Occasionally your scanned image may 

contain small dots or speckles. To remove 
these spots, increase the sensitivity value 

by moving the bar to the right. The value 
ranges from 1 to 30.    The default is 20. 


3-11 

Содержание BS-1306S

Страница 1: ...Color Image Scanner User s Manual Regulatory model BS 1306S manual en 250 0856 E FB510 v100 Avision Inc ...

Страница 2: ...eval system or translated into any language or computer language in any form or by any means electronic mechanical magnetic optical chemical manual or otherwise without the prior written permission of Avision Inc Material scanned by this product may be protected by government laws and other regulations such as copyright laws the customer is solely responsible for complying with all such laws and r...

Страница 3: ...ce of this product is valid if powered with the correct CE marked AC adapter provide by Avision This product satisfies the Class B limits of EN55022 EN55024 safety requirements of EN 60950 and ROHS requirements of EN50581 This machine is certified as Class 1 LED product This means that this machine does not produce hazardous laser radiation As an ENERGY STAR Partner Avision Inc has determined that...

Страница 4: ... human health and the environment Fore more information about where you can drop off your waste equipment for recycling please contact your local city office your household waste disposal service or the shop where you purchased the product System Requirements CPU Intel Core 2 Duo or higher Memory 32 bit 1 GB 64 bit 2 GB Optical Drive DVD ROM Drive USB Port USB port 2 0 compatible with USB 1 1 Comp...

Страница 5: ... 1 Buttons on the Scanner Properties Dialog Box 3 2 3 2 Showing or Hiding Tabs 3 4 3 3 The Image Tab 3 6 3 3 1 The Image Selection Box 3 7 3 3 2 Other Image Options 3 11 3 3 3 Scanning color images 3 23 3 3 4 Scanning grayscale images 3 23 3 3 5 Scanning B W images 3 23 3 3 6 Editing Profiles 3 24 3 4 The Compression Tab 3 27 3 5 The Color Dropout Tab 3 29 3 5 1 Color Dropout Selection 3 29 3 5 2 ...

Страница 6: ...e Separation Tab 3 68 3 12 The Setting Tab 3 72 3 13 The Imprinter Tab 3 75 3 14 The Information Tab 3 79 4 Maintaining Your Scanner 4 1 4 1 Cleaning the Glass 4 1 4 2 Frequently Asked Questions 4 2 4 3 Technical Service 4 3 5 Specifications 5 1 Index a ...

Страница 7: ...en flat surface Tilted or uneven surfaces may cause mechanical problems 1 2 Checking the Package Contents Gently open your box and check the package contents If there is anything missing or damaged please call your dealer 1 Scanner main unit 2 USB cable 3 Software CD Quick guide Note Please keep all the packing material in case you may have to return the scanner for repair To access more service s...

Страница 8: ...er If you are running Windows XP or later after the installation of scanner driver is completed this scanner allows you to scan via a TWAIN user interface Start your TWAIN compatible image editing software application to select a TWAIN 1 Place the supplied CD ROM onto your CD ROM drive 2 The software installation graphic appears If not run setup exe 3 Click Install Scanner Driver to install the sc...

Страница 9: ... the USB port at the back of your computer 2 The computer should detect a new USB device and prompt a New Hardware Found message 3 Follow the on screen instructions and click the Next button to complete the installation When the certification screen appears click Continue Anyway to continue 4 When the Finish dialog is prompted click the Finish button ...

Страница 10: ...our Original 1 Open document cover 2 Place your document with your text FACE DOWN on the glass 3 Make sure the upper left corner of your original near the home position as marked in the scanner 4 2 1 3 1 Document Cover 2 Document 3 Glass 4 Home Position 2 1 ...

Страница 11: ... procedure describes how to verify your scanner installation If the installation is not correct please review the preceding section to check if the cable connection and scanner driver have been successfully installed Before you begin be sure the scanner is on 1 Select Start Programs Avision xxxx Scanner Avision Capture Tool xxxx scanner model The Select Scanner Model dialog box will be displayed 2...

Страница 12: ...in the File Path box Default is C Documents and Settings User Name My Documents My Scan Image Note If you do not wish to save the scanned image deselect the Save button since default is Save Enable In this case the thumbnail view will be disabled And therefore after viewing all the scanned images only the last one will remain on the screen 5 Click the Setup button or choose Setup from the File men...

Страница 13: ... more details about the Scanner Properties dialog box please see the subsequent chapter Using the Scanner Properties Dialog Box 8 Place your document face down on the document glass or face up in the auto document feeder 9 In the Scan Validation dialog box click the Scan button or choose Scan from the File menu 10 The document will be scanned and displayed in the Scan Validation screen After the s...

Страница 14: ... View Thumbnail View 11 You can view the scanned image in Fit Page or Actual Size 100 button from the Viewing toolbars at the right side 12 Click the Close box or Quit from the File menu to exit the Scan Validation Tool 2 5 ...

Страница 15: ...an Options vary based on type of scanner 3 Brightness Adjust the brightness level from 100 to 100 4 Contrast Adjust the contrast level from 100 to 100 5 Resolution Determine the quality of the scanned image The industry standard is 200 dpi 6 Invert Reverse the color of your scanned image 7 Scan Source Choice Auto Document Feeder Flatbed Flatbed Book Automatic varies due to different scanner model ...

Страница 16: ...ner s settings It consists of several tabbed windows each of which will be described in this chapter Note In this chapter all options are available based on a duplex double side scanner If you have purchased a simplex single side scanner all options are available for single sided only The Scanner Properties dialog box 3 1 ...

Страница 17: ...es Dialog Box The buttons on the Scanner Properties dialog box Buttons Description Defaults Click the Defaults button the factory default settings will be shown on each tab Cancel Click the Cancel button to leave the Scanner Properties dialog box 3 2 ...

Страница 18: ...Dropout None Paper Cropping Automatic Deskew Yes Orientation Portrait OverScan 0 00 Note The availability of this option varies due to scanner model Unit Inch Multi Feed Detection None Preview None Options Rotation Degrees None Blank Page Removal None Edge Fill White 0 mm Image Control Option None Setting Enable Energy Saver Enable 15 minutes after last scan action Show Scanning Progress Yes Show ...

Страница 19: ... Note the options vary based on scanner model 2 Choose the tab you want to display The selected tab will be shown with a check mark and then displayed in the Scanner Properties dialog box 3 To access the settings click the selected tab on the top of the Scanner Properties dialog box The page of the selected tab will be displayed To hide a tab window 1 Click the Scanner Properties icon on the upper...

Страница 20: ...User s Manual 3 5 User s Manual 3 5 ...

Страница 21: ...t except for the resolution you can set individual scan settings for the front side and the rear side For example all settings in the Image tab Compression tab Color Dropout tab can be set individually for the front and the rear side However the settings in the Paper tab the Option tab and the Setting tab have to be set the same for the front and rear side The Image tab dialog box 3 6 ...

Страница 22: ... side option If you wish to scan both the front side and the rear side of your color document you can check both Front Color and Rear Color at the same time Note the options vary based on type of scanner Example 1 Scanning a two sided color document both sides in color Side Image Selection Front Rear 3 7 ...

Страница 23: ...de Image Selection Front Rear Image Type Description Color Choose Color if you wish to scan a color image for your original in color Gray Choose Gray image if your original contains actual shades of gray B W Choose B W if your original contains only text pencil or ink sketch B W Gray Color 3 8 ...

Страница 24: ...This option is useful when you have a mixture of color and non color document Note If you choose Front Rear Auto Color Detection you can not specify the image mode of your rear page and vice versas Sensitivity of Auto Color Detection If your documents contain primarily B W text and small amount of light or pale colors and you do not wish them to be recognized as color image to save the file size y...

Страница 25: ...User s Manual Sensitivity 1 The image is recognized as a color one Sensitivity 100 The image is recognized as a black and white one 3 10 ...

Страница 26: ...ically evaluate each document to determine the optimal threshold value to produce the highest quality image This is used to scan mixed document containing faint text shaded background or color background with a single setting If Dynamic Threshold is selected Threshold Brightness and Contrast are not available Sensitivity of Dynamic Threshold Occasionally your scanned image may contain small dots o...

Страница 27: ...selected Contrast is not available Halftone In addition to the black and white display Halftone can present a somehow gray shade of image by using different size of dots Halftone image looks like the picture we have seen in the newspaper Options include Halftone 1 Halftone 2 Halftone 3 Halftone 4 Halftone 5 Error Diffusion Error Diffusion is a type of Halftone Error Diffusion gives good image text...

Страница 28: ...User s Manual Error Diffusion Image 3 13 ...

Страница 29: ... can be used to subdue backgrounds and subtle unneeded information A high threshold value produces a darker image and can be used to help pick up faint images Adjust the threshold setting by dragging the Threshold sliding bar to the left or right to achieve the desired threshold setting 200 dpi Threshold 50 Brightness 0 200 dpi Threshold 100 Brightness 0 3 14 ...

Страница 30: ...hoto if your original contains photo to reproduce your photo in vivid grayscale image When using Photo no Threshold and Contrast can be adjusted Normal When using Normal Threshold Brightness and Contrast can be adjusted Threshold The value ranges from 0 to 255 The default is 230 A low threshold value produces a lighter image and can be used to subdue backgrounds and subtle unneeded information A h...

Страница 31: ...User s Manual Normal Photo Document Threshold 230 Normal Photo Document Threshold 230 3 16 ...

Страница 32: ... brightness The range is from 100 to 100 Contrast Adjusts the range between the darkest and the lightest shades in the image The higher the contrast the bigger the different grayscale Drag the slider to the right or left to increase or decrease the contrast The range is from 100 to 100 Brightness 50 Brightness 0 Normal Brightness 50 Contrast 50 Contrast 0 Normal Contrast 50 3 17 ...

Страница 33: ...5 MB of disk space A higher resolution usually means over 600 dpi is only recommended when you need to scan a small area at True Color mode Choose a resolution value from the drop down list The default value is 200 dpi Available resolutions are 75 100 150 200 300 400 and 600 Or you may choose your desired value by clicking the box in the right side of the drop down list and press the arrow key to ...

Страница 34: ...the colors in the image The default setting is Black on a White background Reverse mode is White on a Black background For color images each pixel will be changed into its complementary color at the command of Invert Black on White White on Black 3 19 ...

Страница 35: ...he scan source will be set to flatbed Merge Two Sides into One Image If you have a sheet fed duplex scanner with front input tray you can scan an A3 size document with an innovative method Thus fold your A3 size document into A4 and then load the paper in the front tray Choose Merge Two Sides from the Scan Source option and then the scanner is able to scan both sides of your document and merge two...

Страница 36: ...page into one image vertically If the Merge Vertically option has not been selected the front side and the rear side of a page will be merged into one page horizontally Front Side Rear Side Merge Vertically Merge Horizontally Rear Side Front Side Note the options vary based on type of scanner 3 21 ...

Страница 37: ...of the image Choice None Document Photo None Choose None to disable this option Document Choose Document if your original contains pure text or a mixture of text and graphic since it is an optimal setting for regular business document Photo Choose Photo if your original contains photo to reproduce your photo in vivid color image Normal After Color Matching 3 22 ...

Страница 38: ...t 3 3 4 Scanning grayscale images The following options are available for scanning gray images Brightness Contrast Resolution Invert 3 3 5 Scanning B W images The following options are available for scanning B W images Binarization Dynamic Threshold Resolution Invert Or Binarization Fix Processing Threshold Brightness Resolution Invert 3 23 ...

Страница 39: ...r deleting them To add a new profile 1 Customize your settings For example change your resolution image type cropping method scan size or other scan settings 2 Click the Image tab and then choose Profiles to prompt the Edit Your Profile dialog box 3 Click Add to enter the name of the profile and then choose Save 4 The new profile will be saved and shown in the Profiles dropdown list box 3 24 ...

Страница 40: ...tely loaded and displayed on Scanner Properties dialog box To delete a profile 1 From the Image tab dialog box click Profiles to prompt the Edit Your Profile dialog box 2 Choose the profile you want to delete from the dropdown list box 3 Click Delete A Confirm message Are you sure you want to delete this profile is prompted 4 Choose Yes to delete or Cancel to quit 3 25 ...

Страница 41: ...d then click the Rename button 3 Enter new name for the profile 4 Choose Save to save the new profile or Cancel to quit Note The preset default profiles include Flatbed Simplex B W 200 dpi Simplex Gray 200 dpi Simplex Color 200 dpi Duplex B W 200 dpi Duplex Gray 200 dpi Duplex Color 200 dpi If you have a simplex or a sheetfed scanner the duplex or the flatbed option will not be available 3 26 ...

Страница 42: ...n your image editing application If your image editing application does not support the type of compression format then either a warning message will appear or the image quality of the compressed file will not be acceptable JPEG Joint Photographic Editor Group This group developed and lent their name to a file compression standard for color and grayscale images that is widely used by scanners and ...

Страница 43: ...User s Manual The Compression tab dialog box 3 28 ...

Страница 44: ...en your text when using OCR Optical Character Recognition software The Custom option allows you to specify your desired color to be removed by entering its RGB Red Green and Blue value respectively Tolerance Specify the allowable color range to be removed for the color you selected Specified range 1 100 The large the numeric value the wider the color dropout range is Note that this function suppor...

Страница 45: ...User s Manual The Color Dropout dialog box 3 30 ...

Страница 46: ...lor on the Color palette 1 Click the Color Dropout tab from the Scanner Properties dialog box 2 Choose Gray or B W from the Image Selection box and click Custom from the Color Dropout drop down menu The Color palette appears 3 31 ...

Страница 47: ...User s Manual 3 Move your cursor over the palette The cursor becomes a cross sign 4 Click to choose a color The RGB values are changed simultaneously 3 32 ...

Страница 48: ...the Preview window 1 Click the Preview tab to open the Preview dialog box 2 Place your document on the flatbed or load your document in the ADF Paper Tray Then click the Preview button to get a preview image at a low resolution The preview image will be displayed 3 33 ...

Страница 49: ...User s Manual 3 Click the Color Dropout tab The Color Dropout dialog box is displayed with a Preview Window button 4 Click the Preview Window button to prompt the Preview window as shown 3 34 ...

Страница 50: ...Click the Eyedropper button and then move the cursor over the preview image Click to select a color which you wish to remove 6 Click the Preview Result button to view the result after removing the specified color 3 35 ...

Страница 51: ...window and return to the Color Dropout dialog box 8 Click OK to leave the Scanner Properties dialog box and click the Scan button on the main window of Avision Capture Tool to perform your final scan The specified color is removed accordingly The image after color dropout 3 36 ...

Страница 52: ...ropped out A lower value will drop more of the selected color out while a higher value will leave more of the selected color in Background Level The pixel which is higher than the background value will be adjusted to the lightest point Adjust the value for both the Filter Threshold and Background Level to produce the best optimal result Example slightly adjusting the background value makes your te...

Страница 53: ...User s Manual Remove Blue Threshold 20 Background 255 Remove Blue Threshold 20 Background Level 210 3 38 ...

Страница 54: ...User s Manual 3 6 The Paper Tab The Paper tab allows you to define values relating to image output i e Auto Crop or not Scan Area OverScan Multi Feed Detection The Paper tab dialog box 3 39 ...

Страница 55: ...for batches of mixed sized document Note The availability of this feature varies due to scanner model Fixed to Transport This feature allows you to define the area or zone to be imaged Use for batches of same sized documents If you select this option you can use the arrow keys to define the x and y offset values width and length to redefine your scanned area The Display window will show image plac...

Страница 56: ...in B W and a part of the document in color to save storage space This is useful for documents where a photograph or signature appears in a consistent area on the document such as resumes and so on The following options are only available when Fixed to Transport is selected X Offset the distance from the left end of the scanner to the left edge of the scanning area Y Offset the position from the to...

Страница 57: ...Adjustment is used when the automatic document feeder is used Adjustment reduces the possibility of corner clipping on skewed images To set Adjustment values use the UP Down buttons to select where you want to apply Adjustment values Top Bottom or Left Right and then select the amount of inches mm pixels applied Select a value within the range of 0 00 to 1 00 1 00 3 42 ...

Страница 58: ...rs in a consistent area on the document such as resumes and so on The following procedure describes how to reproduce the entire document in B W and a portion of document picture in color 1 On the Paper tab choose Relative to Document or Fixed to Transport from the Cropping option 2 Choose your scan size from the Scan Area option The selected scan size will be displayed in a red rectangular box Thi...

Страница 59: ...orrectly crop your relative scan area The Preview Image The Preview Button 5 Select image type from the Image Selection box The selected image will appear in highlighted color For example Front Color 6 Place your cursor on the Preview window and click your left mouse button A cross sign will appear as illustrated Create your relative scan size diagonally by dragging the left mouse button to your p...

Страница 60: ... 7 Check the B W image from the Image Selection box to scan the entire document 8 Click the Scan button to start scanning the document in two image types and sizes See the result in below The entire document in B W The relative area in color 3 45 ...

Страница 61: ... scanned in the regular way Also documents larger than A4 size such as A3 and B4 can be scanned by folding in half inserting into the Carrier Sheet and scanning in duplex mode You can also scan documents that can be damaged quite easily such as photographs or irregular size documents that are difficult to load directly such as clippings To scan document using a Carrier Sheet For documents larger t...

Страница 62: ...upper corner For non standard document Center your document in the Carrier Sheet 2 Load the Carrier Sheet with the gray section printed section facing downwards 3 Adjust the paper guides to the width of the Carrier Sheet Adjust the paper guides so that there is no space between the guides and the Carrier sheet Space between the guides and Carrier Sheet may cause the Carrier Sheet to become unalign...

Страница 63: ...ith the drop down list box Or you may select a custom paper size by clicking the Scan Area box and then click Add to include in the choice Choices are listed below None US Letter 8 5 x 11 US Legal 8 5 x 14 ISO A4 21 x 29 7 cm ISO A5 14 8 x 21 cm ISO A6 10 5 x 14 8cm ISO A7 7 4 x 10 5 cm ISO B5 17 6 x 25 cm ISO B6 12 5 x 17 6 cm ISO B7 8 8 x 12 5 cm JIS B5 18 2 x 25 7 cm JIS B6 12 8 x 18 2 cm JIS B...

Страница 64: ... 600 dpi or lower 4 Depending on your system environments application or your specified paper size there may be insufficient memory to perform scanning OverScan Overscan allows you to add a specific margin at top and bottom or right and left Options vary based on the type of scanner of the edge of the image This is used to reduce possible corner clipping on the skewed images and often applied to a...

Страница 65: ... settings this feature is especially useful The default is 0 The value ranges from 0 to 30 seconds Note 1 Within the specified timeout period if you load your document to the feeder the scanner starts scanning automatically 2 If your scanner has a flatbed option and you place your paper on the flatbed after the timeout period you need to click the Scan button on the TWAIN user interface to start s...

Страница 66: ...ckground Black Background Note For a sheet fed scanner with an auto document feeder this option is currently available only in the Auto crop mode For a scanner with a flatbed platen this option is available either in the Auto crop or the Fixed to Transport mode White Background Black Background 3 51 ...

Страница 67: ... Detection allows you to detect overlapped document that go through the auto document feeder Multi Feed usually occurs due to stapled documents adhesives on documents or electro statically charged document Note The availability of the function varies based on type of scanner 3 52 ...

Страница 68: ...s in the auto document feeder Ultrasonic Detection Ultrasonic Detection allows you to set overlapped document by detecting paper thickness between documents Note The availability of the function varies based on type of scanner There are two options available if Multi Feed is detected 1 Stop Scanning after Multi Feed If this is selected the scanner will stop the feeder and display the following War...

Страница 69: ...eed Alarm If a wave file is added the scanner will make a sound alarm if multi feed is detected yet no Warning dialog box will be displayed If Stop Scanning after Multi Feed is selected the scanner will stop the feeder If Stop Scanning after Multi Feed has not been selected the scanner will continue to scan till the end of your document Action 1 If Stop Scanning after Multi Feed is selected follow...

Страница 70: ... the Browse button on the right side of the speaker icon The Open dialog box appears 2 Choose your wave file 3 Click the Open button The wave file is added Units Defines the primary measurement system Inches Millimeters and Pixels are available 3 55 ...

Страница 71: ... can choose your scan area by the Scan Area drop down list box or placing your cursor on the Display window and dragging it diagonally on the Display window Then a red rectangle box will appear to indicate the selected area Note If you choose Automatic Cropping on the Paper Tab then to select a scan area on the Preview tab is not allowed The Display Window The Preview Tab 3 56 ...

Страница 72: ...User s Manual 3 9 The Enhancement Tab The Enhancement tab allows you to set following additional image processing settings The Option tab dialog box 3 57 ...

Страница 73: ...oved when Resolution is set lower than 150dpi The hole is near the edge of the document The holes are not aligned along the edge of the document Punch Hole Removal is available only when Auto Crop is enabled If either Fixed to Transport EOP End of Page Detection Automatic Multiple Relative to Documents is selected from the Cropping option on the Paper tab the Punch Hole Removal option will be disa...

Страница 74: ... Choice Fast Quality Fast proceeds the operation in speed mode Quality proceeds the operation in normal mode with better processing result Mode Auto Moiré If Smooth is selected in the Background Processing option then the choices for the Mode option includes Auto and Moiré Auto uses the factory preprogrammed mode to proceed background smoothing Moiré Remove the moiré patterns that appear on the ba...

Страница 75: ...User s Manual Background Processing None Background Processing Smooth Background Processing Removal Fill Color White Note Background color in small zone will not be processed or removed 3 60 ...

Страница 76: ...ser s Manual Edge Fill Check White or Black if you wish to add white or black edge on the border of your scanned image Enter the value from 0 to 5 mm Default value is 0 Original Edge Fill 5mm Black 3 61 ...

Страница 77: ...Define the speckles also known as image noise you wish to remove by specifying its number size and radius range The measuring unit is pixel The higher the number the more speckles will be removed Before Despeckle noise number 0 noise radius 1 After Despeckle noise number 22 noise radius 10 Note The function is currently available for Black and White image only To scan at rated speed it is recommen...

Страница 78: ...User s Manual 3 10 The Rotation Tab The Rotation tab allows you to set the following image rotating options 3 63 ...

Страница 79: ...otate 180 Auto based on contents When Auto based on contents is selected images can be rotated to their proper orientations based on their contents Auto rotate every even page Automatically rotate 180 on every even page This is especially useful when you scan the inside pages from a book As a result if you choose Flatbed book from the Scan Source option auto rotate every even page will be selected...

Страница 80: ...or documents containing two pages per image when you want to save them as two images one page for one image Choice None Horizontal Vertical Default is None Horizontal Divide one image into the upper half and the lower half Vertical Divide one image into the left half and the right half Split Horizontally Split Vertical 3 65 ...

Страница 81: ...ouble sided document which are viewed in portrait are sometime fed into the scanner in landscape or vice versa Choice Book Fanfold If Book is selected the image of the reverse side will not be rotated The following illustration shows the documents which should be viewed in portrait are fed into the scanner in landscape 3 66 ...

Страница 82: ...User s Manual Image Control Option Check the Mirror box if you wish to reverse the right and left side of your image Original The Mirror Effect 3 67 ...

Страница 83: ...ocuments Choices Blank Page Removal Barcode Detection Patch Code Detection Blank Page Removal Check if you wish to remove the blank page and move the slider to the left or right to your desired threshold When the bar code has been detected successfully a file avbarcode ini will be created and stored in the following path Windows XP C Documents and Settings All Users Application Data PRODUCTNAME Vi...

Страница 84: ...nt will be checked and no specific detection area needs to be designated Barcode Types The following barcode types can be detected One dimensional barcodes Code 39 Code 93 Code 128 EAN 8 EAN 13 ITF Interleaved 2 of 5 UPC A Codabar GS1 DataBar formerly RSS 14 Two dimensional codes Aztec DataMatrix MaxiCode QR Code PDF417 MicroPDF417 not supported 3 69 ...

Страница 85: ...able to detect patch codes and notify the software application for advanced processing A patch code is a pattern of parallel alternating black bars and spaces i e a barcode that is printed on a document Patch code sheet is most commonly used as a document separator in a stack of document You can find various sizes of patch codes PDF by choosing Start menu All Programs Avision Scanner Series Patch ...

Страница 86: ...ized correctly when the print is too light Do not use thin paper in order to avoid bleed through from the back When you copy a patch code sheet that you printed out make sure to copy by the same size and brightness as the original copy Use the same sheet repeatedly may decrease the recognition accuracy due to accumulated dirt on the sheets If the sheet is not recognized correctly or gets smudged r...

Страница 87: ...rt the energy saver after your last action The range is from 1 to 242 minutes The default value is 15 minutes Enable Power Off Check the Enable Power Off box and move the slider to set the amount of time to automatically turn off the scanner after your last action The range is from 1 to 480 minutes The default is 242 minutes 4 hours Note the value of Power Off has to be greater than or equal to th...

Страница 88: ...ge data especially when you have a large amount of documents needed to be scanned You can also specify your memory size by the page number For your information an A4 color document scanning at 300 dpi consumes approximates 24MB Image Count When the selected cache mode is none the image count option allows you to assign number of pages you need to scan For example if you wish to scan the first two ...

Страница 89: ...ssages such as ADF pad count exceeds 50 000 scans the number varies based on type of scanner Please replace the ADF pad and reset the pad count Save Settings after Closing Check to save your scanner properties settings after leaving the dialog box Next time when you open the Scanner Properties dialog box the previously saved settings will be shown 3 74 ...

Страница 90: ...ted or at the back of your document if external imprinter is selected Choice External Imprinter Digital Imprinter If you have installed an external imprinter choose external imprinter If you do not have an imprinter choose digital imprinter Note External Imprinter provides a vertical and rear side print capability while digital printer provides a horizontal and front side print capability 3 75 ...

Страница 91: ...alue is increased sequentially by the scanner Date Time Choose if you wish to include the date and time in your print string Format YYYYMMDDHHSS For example 20090402170645 check0001 indicates year month date hour seconds your custom text and the counter Custom Font Choose your desired font Choice Normal Fixed Width Fixed Width Mono spaced fonts have a fixed character spacing So each character occu...

Страница 92: ...ted Vertical Vertical Inversion 90 degrees CW 90 degrees CCW Normal Rotated Vertical Vertical Inversion 90 degrees CW 90 degrees CCW If you check the digital imprinter to stamp text on your scanned image the illustration of normal and rotated string is shown below Normal Rotated 3 77 ...

Страница 93: ...he value indicates the height from the bottom of your paper to the last letter of your string This option is available only if an external imprinter is installed 0001abc 2010 The value of Print Position Print Position for digital imprinter Choose the position of your printed string Choice Top Middle Bottom Custom If Custom is selected enter the X and Y offset value to specify the position 3 78 ...

Страница 94: ...The Report button If you encounter any error message while using the scanner click the Report button A report txt file Windows XP C Documents and Settings All Users Application Data PRODUCTNAME Vista Windows 7 Windows 8 C ProgramData PRODUCTNAME C system drive will be generated Please send this file to the nearest service center for trouble shooting ...

Страница 95: ...g the Glass The Cleaning Procedures 1 Moisture a piece of soft cloth with some isopropyl alcohol 95 2 Open the document cover as shown below 3 Gently wipe the document glass 4 Close the document cover Your scanner is now ready for use Document Glass 4 1 ...

Страница 96: ...ings on the screen from application software Question When I choose resolution to be 600 dpi the auto crop and deskew functions will be disabled Answer Since to perform auto crop and deskew consumes great deal of system memory it is suggested if you wish to perform auto crop and deskew functions please choose your optical resolution to be smaller than 600 dpi to prevent a error message 4 2 ...

Страница 97: ...d interface card The name and version of your scanning software application The version of your scanner driver Please call us at Headquarter Avision Inc No 20 Creation Road I Science Based Industrial Park Hsinchu 300 Taiwan ROC TEL 886 3 578 2388 FAX 886 3 577 7017 E MAIL service avision com tw Web Site http www avision com tw US and Canada Area Avision Labs Inc 6815 Mowry Ave Newark CA 94560 USA ...

Страница 98: ... www avision com cn Europe Area Avision Europe GmbH Bischofstr 101 D 47809 Krefeld Germany TEL 49 2151 56981 40 FAX 49 2151 56981 42 E MAIL info avision europe com Web Site http www avision de Espaço Brasil Avision Brasil Ltda Avenida Jabaquara 2958 Cj 75 Mirandópolis CEP 04046 500 São Paulo Brasil TEL 55 11 2925 5025 E MAIL suporte avision com br Web Site http www avision com br ...

Страница 99: ...ode lamp Optical Resolution 1200 dpi Scanning Mode Black White Gray Color Interface USB 2 0 USB Power 5Vdc 500mA Power Consumption 2 5W Operation Humidity 10 85 RH Operating Temperature 10ºC 35ºC Dimension WxDxH 279 x 283 x 47 mm 11 x 11 1 x 1 9 Weight 1 3 Kgs 2 9 lbs Specifications are subject to change without notice 5 1 ...

Страница 100: ...kground Level 3 37 Despeckle 3 62 Background Setting 3 51 Noise Number Noise Radius 3 62 Binarization Dynamic Threshold Fixed Processing 3 11 Document Type Normal Photo Document 3 15 Blank Page Removal 3 68 Brightness 3 17 Dynamic Threshold C sensitivity 3 11 E Cache None Page Number Memory Size 3 73 Edge Fill 3 61 Enable Power Off 3 72 Color 3 8 Energy Saving 3 72 Color Dropout Remove Red Remove ...

Страница 101: ...27 M Mirror 3 67 Multi Feed Detection 3 52 O OverScan 3 49 P Print All 3 76 Print Position 3 78 Punch Hole Removal 3 58 R Resolution 3 18 Rotate Image 3 64 S Scan Area 3 48 Split Image None Horizontal Vertical 3 65 String Orientation Normal Rotated Vertical Vertical Inversion 90 deg CW 90 deg CCW 3 77 T Transport Timeout 3 50 U Ultrasonic Detection 3 53 ...

Отзывы: