54
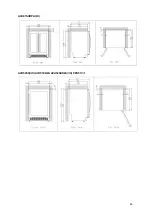
AVU53CDZA AVU54SXDZA(/IX)
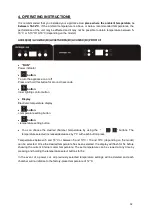
“RUN”
Power indicator
button
To turn the appliance on or off.
Press and hold this button for around 3 seconds.
button
Inner lighting control button
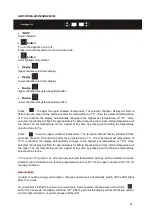
Display
Upper chamber electronic display
Display
Lower chamber electronic display
Bouton
Upper chamber temperature setting button
Bouton
Lower chamber temperature setting button
Press “ ” to adjust the upper chamber temperature. The relevant chamber display will start to
flash and each press on the button will alter the temperature by 1°C. Once the lowest set temperature
of 5°C is reached, the display automatically changes to the highest set temperature of 10°C. Once
selected, the display will flash for approximately 5s before showing the current internal temperature of
the cellar. The set temperature can be viewed at any time by pressing and holding the temperature
select buttons for 5s.
Press “ ” to set the upper chamber temperature.. The relevant chamber display will start to flash
and each press on the button will alter the temperature by 1°C. Once the lowest set temperature of
10°C is reached, the display automatically changes to the highest set temperature of 18°C. Once
selected, the display will flash for approximately 5s before showing the current internal temperature of
the cellar. The set temperature can be viewed at any time by pressing and holding the temperature
select buttons for 5s.
In the event of a power cut, all previously selected temperature settings will be deleted and each
chamber will re-initialize to the factory-preset temperature of 6°C for the upper chamber and 12°C for
the lower chamber.
Internal light
In order to reduce energy consumption, this wine cabinet will automatically switch off the LED lights
after 10 minutes.
If you want the LED light to remain on continuously, this is possible. Please press and hold the
button for 5 seconds, the display will show "LP". After 4 seconds the display will revert back to normal,
and the light will remain on until manually switched off.
Содержание AVU23SX
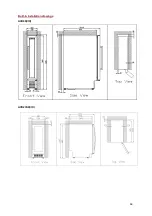
Страница 15: ...15 Sch mas d encastrement AVU8X IX AVU23SX IX...
Страница 16: ...16 AVU41SXDPA IX AVU52SX IX AVU53CDZA AVU54SXDZA IX PRO51C 1...
Страница 48: ...48 Built in installation drawings AVU8X IX AVU23SX IX...
Страница 49: ...49 AVU41SXDPA IX AVU52SX IX AVU53CDZA AVU54SXDZA IX PRO51C 1...
Страница 118: ...118 AVU23SX IX AVU41SXDPA IX AVU52SX IX AVU53CDZA AVU54SXDZA IX PRO51C 1...
Страница 152: ...152 Esquema de empotramiento AVU8X IX AVU23SX IX...
Страница 153: ...153 AVU41SXDPA IX AVU52SX IX AVU53CDZA AVU54SXDZA IX PRO51C 1...

