background image


47 

3. INSTALLATION INSTRUCTIONS 

Before using this appliance 


Remove the exterior and interior packing. 


Before  connecting  the  appliance  to  the  power  source,  let  it  stand  upright  for  approximately  24 
hours. This will reduce the possibility of a malfunction in the cooling system from handling during 
transportation. 


Clean the interior surface with lukewarm water using a soft cloth. 


When disposing your appliance, please choose an authorized disposal site. 


Place your wine cooler on a floor that is strong enough to support it when it is fully loaded. To level 
your Wine cooler, adjust the front leveling leg at the bottom of the wine cooler. 


Adequate ventilation is required, do not block the front air outlet. 


Not designed for placement in adage or basement. 


The appliance is for indoor use only. 


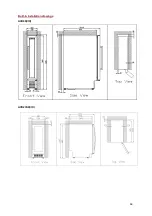
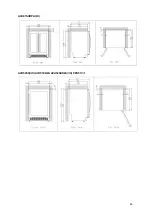
This wine cellar is designed for free-standing or built-under installation. 


Connect the cellar to a single socket, leaving a 30 mm gap between the back of the cellar and the 
wall.  Be  careful  to  support  it,  so  that  your  wine  cellar  is  perfectly  level  (use  of  a  spirit  level  is 
recommended). This will prevent any movement due to instability, causing noise and vibration, and 
will ensure that the door seals perfectly. 


This appliance is intended to be used exclusively for the storage of wine. 


This appliance is using flammability refrigerant. So never damage the cooling pipe work during the 
transportation.  


Attention 


Store wine in sealed bottles. 


Do not overload the cabinet. 


Do not open the door unless necessary. 


Do  not  cover  shelves  with  aluminum  foil  or  any  other  shelf  material  which  may  prevent  air 
circulation. 


Should  the  wine  cooler  be  left  empty  for  long  periods  it  is  suggested  that  the  appliance  is 
unplugged, and after careful cleaning, leave the door ajar to allow air to circulate inside the cabinet 
in order to avoid possible condensation, mold or odors forming. 


CAUTION: please keep the appliance away from substance, which can cause ignition. 


Ambient room temperature limits 

This  appliance  is  designed  to  operate  in  ambient  temperatures  specified  by  its  temperature  class 
marked on the rating plate. 
 

CLASS 

SYMBOL 

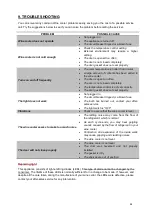
AMBIENT TEMPERATURES RANGE (°C) 

Extended temperate 

SN 

From +10 to +32 

Temperate 

From +16 to +32 

Subtropical 

ST 

From +16 to +38 

Tropical 

From +16 to +43 

Содержание AVU23SX

Страница 1: ...AVU41SXDPA IX AVU52SX IX AVU53CDZA AVU54SXDZA IX PRO51C 1 FR MANUEL D UTILISATION p 2 GB USE INSTRUCTIONS p 36 D GEBRAUCHSANWEISUNG p 70 NL HANDLEIDING p 104 SP MANUAL DE UTILIZACION p 139 Cave de se...

Страница 2: ...re les pr cautions donn es D une mani re g n rale votre appareil doit tre entretenu par un professionnel qualifi Pour votre s curit et pour une utilisation correcte de l appareil avant d installer et...

Страница 3: ...reil doit tre correctement connect une prise terre Ne pas couper ou retirer le fil de terre du c ble d alimentation fourni Pour des raisons de s curit ne pas utiliser une rallonge lectrique Si votre a...

Страница 4: ...reil loign de toute source de chaleur et ne l exposez pas directement au soleil Ne laissez pas pendre le c ble d alimentation d une table ou tre en contact avec des coins tranchants ou des surfaces ch...

Страница 5: ...nt se retrouve bloqu dans l appareil ou y suffoque ne sont pas des faits du pass Toutefois des appareils jet s ou abandonn s demeurent dangereux m me s ils sont juste laiss s dans le garage quelques j...

Страница 6: ...sauf d taillants ATTENTION Afin d viter tout danger d l instabilit de l appareil il est important de le fixer et le monter selon les instructions d installation ATTENTION Ne rangez jamais de substance...

Страница 7: ...clenchement d un feu ou d une explosion Liquide r frig rant De l isobutane r frig rant R600a est utilis dans le circuit r frig rant de l appareil Il s agit d un gaz naturel hautement inflammable et do...

Страница 8: ...mais la mise la terre Si la prise murale est l che ne branchez pas le cordon Il existe un risque d lectrocution ou d incendie Vous ne devez jamais utiliser l appareil si le cache de l clairage int rie...

Страница 9: ...tions correspondantes L appareil doit tre tenu loign des bougies luminaires et autres flammes nues afin d viter les risques d incendie L appareil est destin garder des boissons pour une utilisation no...

Страница 10: ...ces de chaleur peuvent augmenter la consommation lectrique Des temp ratures ambiantes extr mement froides ou chaudes peuvent aussi entrainer une mauvaise performance de l appareil Branchez votre cave...

Страница 11: ...e les prises sont accessibles une fois l appareil install conomies d nergie Pour limiter la consommation lectrique de votre appareil Installez le dans un endroit appropri voir chapitre Instructions d...

Страница 12: ...ant avec de l isobutane R600a ne peuvent tre plac es dans une zone avec des sources d ignition par exemple descell contacts lectriques ou lorsque le fluide frigorig ne pourrait rassembler en cas de fu...

Страница 13: ...24h avant sa mise en service Cela permettra de r duire la possibilit d un dysfonctionnement du syst me de refroidissement d au transport Nettoyez l int rieur l aide d un chiffon doux et d eau ti de Lo...

Страница 14: ...ait emp cher une bonne circulation de l air Si la cave vin doit tre laiss e vide pendant une longue p riode il est sugg r de d brancher l appareil et apr s un nettoyage tr s soigneux de laisser la por...

Страница 15: ...15 Sch mas d encastrement AVU8X IX AVU23SX IX...

Страница 16: ...16 AVU41SXDPA IX AVU52SX IX AVU53CDZA AVU54SXDZA IX PRO51C 1...

Страница 17: ...retirez la porte 4 et l axe de la porte Fig A Positionnez correctement la porte 4 Fig A et B 2 Retirez 3 vis 6 de la charni re sup rieure droite 5 et tez celle ci ainsi que la charni re inf rieure dro...

Страница 18: ...itif sur la partie sup rieure du cadre de la porte Il est pr f rable d utiliser un bouchon de rechange 12 pour obturer le trou sur la partie sup rieure du cadre Fig A B 3 Retirez 3 vis 6 de la charni...

Страница 19: ...ieur gauche l aide de trois vis Fig D 5 Toujours selon la proc dure ci dessus proc dez l installation de la charni re inf rieure restante gauche 9 Fig E 6 La porte s ouvre 180 degr s La m thode d inst...

Страница 20: ...elon mod le Une fois s lectionn e l afficheur clignotera environ 5s avant d indiquer la temp rature interne instantan e de la cave tout moment la temp rature de r glage est visible en appuyant 5s sur...

Страница 21: ...mm e d usine soit 6 C pour le compartiment haut et 12 C pour le compartiment bas Lumi re int rieure Afin de r duire la consommation d nergie la lumi re int rieure de cette cave vin s teint automatique...

Страница 22: ...les surfaces r frig r es de l appareil d givrent automatiquement L eau de d givrage ainsi r cup r e est vacu e vers un bac d vaporation des condensas qui est situ l arri re de l appareil pr s du comp...

Страница 23: ...es petites et grandes clayettes doit alors tre invers e fig 2 Dans chaque compartiment placez deux petites clayettes en haut et deux grandes clayettes en bas 5 Une fois les clayettes correctement posi...

Страница 24: ...es et permettent comme les litrages des r frig rateurs d avoir une estimation rapide de la taille de l appareil Elles correspondent des tests effectu s avec une bouteille talon la bouteille de type bo...

Страница 25: ...C Vins de pays blancs 8 10 C Champagnes 7 8 C Vins liquoreux 6 C 7 NETTOYAGE ET ENTRETIEN Avant de nettoyer votre appareil op ration faire r guli rement d branchez l appareil en retirant la prise de c...

Страница 26: ...in D branchez votre cave avant toute op ration Enlevez toutes les bouteilles pr sentes dans la cuve et fixez les l ments mobiles Pour viter d endommager les vis de mise niveau des pieds vissez les fon...

Страница 27: ...uantit de bouteilles a t mise dans la cave La porte de la cave est ouverte trop fr quemment La porte n est pas bien ferm e Le r glage n a pas t fait correctement Le joint de la porte n est pas tanche...

Страница 28: ...aux appareils lectriques et ou lectroniques ou bien si vous achetez un appareil quivalent au revendeur de ce nouvel appareil L utilisateur est responsable d apporter l appareil en fin de vie aux struc...

Страница 29: ...se du r sultat obtenu pour 24 heures dans des conditions d essai normalis es La consommation d nergie r elle d pend des conditions d utilisation et de l emplacement de l appareil VOLUME NET 23 L TEMP...

Страница 30: ...sultat obtenu pour 24 heures dans des conditions d essai normalis es La consommation d nergie r elle d pend des conditions d utilisation et de l emplacement de l appareil VOLUME NET 56 L TEMP RATURE...

Страница 31: ...ultat obtenu pour 24 heures dans des conditions d essai normalis es La consommation d nergie r elle d pend des conditions d utilisation et de l emplacement de l appareil VOLUME NET 59 5 L x 2 TEMP RAT...

Страница 32: ...sultat obtenu pour 24 heures dans des conditions d essai normalis es La consommation d nergie r elle d pend des conditions d utilisation et de l emplacement de l appareil VOLUME NET 146 L TEMP RATURE...

Страница 33: ...at obtenu pour 24 heures dans des conditions d essai normalis es La consommation d nergie r elle d pend des conditions d utilisation et de l emplacement de l appareil VOLUME NET 134 L TEMP RATURE AJUS...

Страница 34: ...ltat obtenu pour 24 heures dans des conditions d essai normalis es La consommation d nergie r elle d pend des conditions d utilisation et de l emplacement de l appareil VOLUME NET 134 L TEMP RATURE AJ...

Страница 35: ...ultat obtenu pour 24 heures dans des conditions d essai normalis es La consommation d nergie r elle d pend des conditions d utilisation et de l emplacement de l appareil VOLUME NET 146 L TEMP RATURE A...

Страница 36: ...ned by a qualified professional For your safety and correct usage before installing and first using the appliance read this user manual carefully including its hints and warnings To avoid unnecessary...

Страница 37: ...e supplied For safety reasons do not use an electrical extension cable If your appliance is damaged e g a major impact or suffers harm power surge due to lightning flood fire it may be dangerous to us...

Страница 38: ...appliance is positioned can support its weight when loaded a 75 cl bottle weighs approximately 1 3 kg Your cellar must be placed on a flat surface If you have to position it on a rug or carpet place...

Страница 39: ...hemselves inside it If this appliance featuring a magnetic door seals is to replace an older appliance having a spring lock latch on the door or lid be sure to make the spring lock unusable before you...

Страница 40: ...gs in the appliance enclosure or in the built in structure clear of obstruction and ensure that air can circulate especially if the ap pliance is recessed into a wall WARNING Do not use mechanical dev...

Страница 41: ...cuit should be damaged Avoid opening flames and sources of ignition Thoroughly ventilate the room in which the appliance is situated It is dangerous to alter the specifications or modify this product...

Страница 42: ...of reach of children In case of doubt contact your installation technician Daily use This appliance is intended to be used exclusively for the storage of wine Do not store flammable gas or liquids in...

Страница 43: ...nd servicing Before carrying out servicing switch off the power supply and disconnect the appliance When cleaning the appliance do not use metal objects steam systems volatile fluids organic solvents...

Страница 44: ...recommended that the appliance be allowed to settle for at least 24 hours before connecting the electrical power supply so that the compressor fluid feed is correct Proper air circulation is necessary...

Страница 45: ...rts The appliance is designed for home use only The manufacturer declines any liability whatsoever in the case of other use R600a Safety instructions Caution Do not obstruct the ventilation grills on...

Страница 46: ...2011 65 EU ROHS 2014 35 EU on electrical safety 2014 30 EU on electromagnetic compatibility 643 2009 CE relating to energy labels 2 TECHNICAL DATA Below is an example of the nameplate The nameplate at...

Страница 47: ...ectly level use of a spirit level is recommended This will prevent any movement due to instability causing noise and vibration and will ensure that the door seals perfectly This appliance is intended...

Страница 48: ...48 Built in installation drawings AVU8X IX AVU23SX IX...

Страница 49: ...49 AVU41SXDPA IX AVU52SX IX AVU53CDZA AVU54SXDZA IX PRO51C 1...

Страница 50: ...oor to 90 degrees take out two screws 2 from the lower door axis 3 remove the door 4 and door axis Fig A Position the door 4 safely Fig A and B 2 Take out three hinge screws 6 from the top hinge right...

Страница 51: ...0 Install the door limit device 10 at the top of the door frame Please use the spare plug 12 to block the hole at the top of the door frame Fig A B 3 Take out three hinge screws 6 from the upper hinge...

Страница 52: ...Take out three hinge screws 6 from the top hinge right 5 and remove it Fig C 4 Remove the decorative nail 8 from the top left of the cabinet and install the spare top hinge Left 7 on the top left of...

Страница 53: ...splay Electronic temperature display button temperature setting button button temperature setting button You can choose the desired chamber temperature by using the buttons The temperature selected in...

Страница 54: ...ber temperature The relevant chamber display will start to flash and each press on the button will alter the temperature by 1 C Once the lowest set temperature of 10 C is reached the display automatic...

Страница 55: ...ccount the sensitivity of corks to too low a level of ambient humidity This is why the tray should be placed on the shelf below the fan situated in the bottom to provide minimum humidity Be sure to ch...

Страница 56: ...SXDPA IX Place the shelves in the spaces provided a Spare part cardboard box b Small shelf c Large shelf 1 After removing the wrapping take the spare parts cardboard box a out of the cabinet 2 There a...

Страница 57: ...our appliance has a stainless steel handle To fit it simply screw it onto the door with the screws supplied as per the diagram below having first removed the seal 6 LOADING The maximum recommended loa...

Страница 58: ...see here 4 kinds of 75 cl wine bottles Burgundy and Bordeaux wine bottles of different dimensions There are many others of all shapes and sizes You will note the storage differences depending on bottl...

Страница 59: ...urs will not affect the temperature in your cabinet To protect your wines during a power cut avoid opening the door as much as possible During very long power cuts take the necessary measures to prote...

Страница 60: ...ing your retailer s after sales department please check that The appliance is properly plugged in There is not a power cut in progress The breakdown is not one of those described in the table at the e...

Страница 61: ...ork Not plugged in The circuit breaker tripped or a blown fuse The bulb has burned out contact your after sales service The light switch is OFF Vibrations Check to assure that the wine cooler is level...

Страница 62: ...e collection center at the end of its useful life Selective and appropriate collection for the recycling of no longer used appliances and their disposal and destruction in an environmentally friendly...

Страница 63: ...ated on the basis of results obtained over 24 hours in standardized test conditions Actual energy consumption depends on conditions of use and the location of the appliance NET VOLUME 23 L ADJUSTABLE...

Страница 64: ...he basis of results obtained over 24 hours in standardized test conditions Actual energy consumption depends on conditions of use and the location of the appliance NET VOLUME 56 L ADJUSTABLE TEMPERATU...

Страница 65: ...e basis of results obtained over 24 hours in standardized test conditions Actual energy consumption depends on conditions of use and the location of the appliance NET VOLUME 59 5 L x 2 ADJUSTABLE TEMP...

Страница 66: ...he basis of results obtained over 24 hours in standardized test conditions Actual energy consumption depends on conditions of use and the location of the appliance NET VOLUME 146 L ADJUSTABLE TEMPERAT...

Страница 67: ...sis of results obtained over 24 hours in standardized test conditions Actual energy consumption depends on conditions of use and the location of the appliance NET VOLUME 134 L ADJUSTABLE TEMPERATURES...

Страница 68: ...basis of results obtained over 24 hours in standardized test conditions Actual energy consumption depends on conditions of use and the location of the appliance NET VOLUME 134 L ADJUSTABLE TEMPERATURE...

Страница 69: ...e basis of results obtained over 24 hours in standardized test conditions Actual energy consumption depends on conditions of use and the location of the appliance NET VOLUME 146 L ADJUSTABLE TEMPERATU...

Страница 70: ...ngen zu verringern sollten Sie bei der Benutzung Ihres Ger ts die folgenden grundlegenden Sicherheitshinweise beachten Das Ger t muss grunds tzlich durch eine qualifizierte Fachkraft gewartet werden L...

Страница 71: ...tsrisiken f hren Im Zweifel ist die elektrische Installation durch eine Elektrofachkraft pr fen zu lassen Zu Ihrem Schutz muss das Ger t ordnungsgem an eine Schukosteckdose angeschlossen werden Auf ke...

Страница 72: ...das Ger t nicht in Wasser oder sonstige Fl ssigkeiten tauchen Das Ger t nicht mit feuchten H nden anfassen Das Ger t von W rmequellen fernhalten und vor direkter Sonnenbestrahlung sch tzen Das Netzkab...

Страница 73: ...e von Kindern aufbewahren da Erstickungsgefahr besteht Es besteht die Gefahr dass Kinder im Ger t eingeschlossen werden Leider kommt es immer wieder vor dass Kinder in solchen Ger ten eingeschlossen w...

Страница 74: ...Arbeitsumgebungen G steh user Hotels Motels und sonstige Wohnumgebungen Umgebungen vom Typ Bed and Breakfast Verpflegung und hnliche Gro handelsanwendungen ACHTUNG Um eine Gef hrdung infolge einer Ins...

Страница 75: ...Feuer aussetzen ACHTUNG Diese Ger te enthalten das K hlmittel R600a Isobutan stellen Sie keine brenn oder entz ndbaren und explosionsgef hrlichen Artikel in den K hlschrank oder in seine N he um jede...

Страница 76: ...ker kann berhitzen und einen Brand verursachen Sicherstellen dass der Netzstecker des Ger tes leicht erreichbar ist Nicht am Netzkabel ziehen Den Schutzkontakt auf keinen Fall entfernen Wenn die Wands...

Страница 77: ...sprechenden Anweisungen befolgen Das Ger t muss von Kerzen Beleuchtungsk rpern und offenen Flammen ferngehalten werden um der Brandgefahr vorzubeugen Das Ger t ist f r die Aufbewahrung von Lebensmitte...

Страница 78: ...t an einem feuchten Standort aufzustellen Das Ger t von direkter Sonnenbestrahlung und W rmequellen Ofen Heizger t Heizk rper usw fernhalten Direkte Sonnenbestrahlung kann die Acrylbeschichtung besch...

Страница 79: ...um die Gefahr der berhitzung zu vermeiden Zur Gew hrleistung einer ausreichenden Bel ftung die angegebenen Installationshinweise beachten M glichst vermeiden dass das Ger t die Wand ber hrt und oder m...

Страница 80: ...e verwendet werden Das Ger t ist ausschlie lich f r den Hausgebrauch bestimmt Der Hersteller kann nicht f r die unsachgem e Verwendung haftbar gemacht werden R600a Achtung Die L ftungsgitter des Ger t...

Страница 81: ...Kennzeichnung von Haushaltsk hlger ten in Bezug auf den Energieverbrauch 2 TECHNISCHE DATEN Nachstehend als Beispiel ein Typenschild Das Typenschild befindet sich im Ger teinneren bzw an der Ger ter...

Страница 82: ...nd der Mauer lassen Justieren Sie Ihren Weinschrank aus und bringen Sie ihn in die waagrechte Stellung am besten mit einer Wasserwaage Dies verhindert Bewegungen aufgrund mangelnder Stabilit t die Ger...

Страница 83: ...83 KLASSE SYMBOL UMGEBUNGSTEMPERATURBEREICH C Erweitert temperiert SN Von 10 bis 32 Temperiert N Von 16 bis 32 Subtropisch ST Von 16 bis 38 Tropisch T Von 16 bis 43 Einbauschema AVU8X IX AVU23SX IX...

Страница 84: ...SXDZA IX PRO51C 1 T rumkehrung T ranschlag wechseln Die T r kann links oder rechts befestigt werden Werksseitig ist das Scharnier rechts so dass die T r von links ge ffnet wird Sollte die T r von rech...

Страница 85: ...Sie die T r 4 Fig A und B 2 Schrauben Sie drei Schrauben 6 aus dem oberen Scharnier rechts 5 und nehmen Sie es ab und unteres Scharnier rechts Abb C 3 Ziehen Sie die Ziern gel 8 links oben aus dem Ge...

Страница 86: ...g 10 Bringen Sie diese Vorrichtung anschlie end im oberen Abschnitt des T rrahmens an Es sollte vorzugsweise ein Austauschstopfen 12 verwendet werden um das Loch im oberen Abschnitt des Rahmens zu ver...

Страница 87: ...atzscharnier links 7 links oben mithilfe der drei Schrauben an Abb D 5 Bauen Sie das verbliebene untere Scharnier links 9 ebenso wie oben beschrieben ein Abb E 6 Die T r ffnet sich 180 C weit Die T r...

Страница 88: ...ttgefunden hat blinkt die Anzeige etwa 5s lang und zeigt dann die Ist Temperatur im Inneren des Weinschrankes an Die Einstelltemperatur kann jederzeit angezeigt werden indem man 5s lang auf die Temper...

Страница 89: ...gesetzt Innenbeleuchtung Um Energie einzusparen schaltet dieser Weink hlschrank die LED Beleuchtung nach 10 Minuten automatisch ab Es ist m glich die LED Beleuchtung durchgehend eingeschaltet zu lasse...

Страница 90: ...lzyklus tauen die gek hlten Oberfl chen des Ger tes automatisch ab Das so aufgefangene Abtauwasser wird in die Verdunstungsschale f r Kondenswasser abgeleitet die sich an der Ger ter ckseite in der N...

Страница 91: ...einen und gro en Roste muss also umgekehrt sein Abb 2 Setzen Sie in jedes Fach oben zwei kleine Roste und unten zwei gro e Roste ein 5 Sobald die Roste richtig eingesetzt sind k nnen Sie Ihren Weinsch...

Страница 92: ...ormierung hat jede Flaschenform einen eigenen geografischen Ursprung z B Bordeaux Burgund Provence usw und Typ z B Tradition schwer leicht Fl te usw mit jeweils individuellem Durchmesser und individue...

Страница 93: ...Wasser und einem milden Reinigungsmittel zu reinigen Mit klarem Wasser absp len und vor dem Wiedereinschalten gut trocknen lassen Auf keinen Fall L se bzw Scheuermittel verwenden Bei der Erstinbetrieb...

Страница 94: ...nergiesparen Stellen Sie das Ger t in einem k hlen Raum aber ber 16 C von Hitzequellen andere Elektroger te und direkter Sonnenbestrahlung entfernt auf Der Raum in dem das Ger t installiert wird muss...

Страница 95: ...etzkabel wurde nicht angesteckt Die entsprechende Sicherung Ihrer Elektroanlage ist durchgebrannt Die LED ist au er Betrieb wenden Sie sich an den Kundendienst Der Beleuchtungsknopf steht auf Aus Schw...

Страница 96: ...gef hrt wird Eine zweckm ige getrennte Sammlung zur Weiterleitung des unbenutzten Ger tes zum Recycling zur Aufbereitung und umweltgerechten Entsorgung tr gt dazu bei m gliche negative Auswirkungen au...

Страница 97: ...Grundlage von Ergebnissen der Normpr fung ber 24 Stunden Der tats chliche Verbrauch h ngt von der Nutzung und vom Standort des Ger ts ab NETTOVOLUMEN 23 L TEMPERATUR EINSTELLBEREICH 5 18 C FROSTFREI...

Страница 98: ...von Ergebnissen der Normpr fung ber 24 Stunden Der tats chliche Verbrauch h ngt von der Nutzung und vom Standort des Ger ts ab NETTOVOLUMEN 56 L TEMPERATUR EINSTELLBEREICH 5 18 C FROSTFREI Automatisch...

Страница 99: ...on Ergebnissen der Normpr fung ber 24 Stunden Der tats chliche Verbrauch h ngt von der Nutzung und vom Standort des Ger ts ab NETTOVOLUMEN 59 5 L x 2 TEMPERATUR EINSTELLBEREICH 5 18 C FROSTFREI Automa...

Страница 100: ...von Ergebnissen der Normpr fung ber 24 Stunden Der tats chliche Verbrauch h ngt von der Nutzung und vom Standort des Ger ts ab NETTOVOLUMEN 146 L TEMPERATUR EINSTELLBEREICH 5 18 C FROSTFREI Automatisc...

Страница 101: ...Ergebnissen der Normpr fung ber 24 Stunden Der tats chliche Verbrauch h ngt von der Nutzung und vom Standort des Ger ts ab NETTOVOLUMEN 134 L TEMPERATUR EINSTELLBEREICH 5 10 C 10 18 C FROSTFREI Automa...

Страница 102: ...n Ergebnissen der Normpr fung ber 24 Stunden Der tats chliche Verbrauch h ngt von der Nutzung und vom Standort des Ger ts ab NETTOVOLUMEN 134 L TEMPERATUR EINSTELLBEREICH 5 10 C 10 18 C FROSTFREI Auto...

Страница 103: ...on Ergebnissen der Normpr fung ber 24 Stunden Der tats chliche Verbrauch h ngt von der Nutzung und vom Standort des Ger ts ab NETTOVOLUMEN 146 L TEMPERATUR EINSTELLBEREICH 5 18 C FROSTFREI Automatisch...

Страница 104: ...an uw apparaat te beperken In het algemeen dient het onderhoud aan uw apparaat door een bevoegde vakman te worden uitgevoerd Lees voor uw veiligheid en voor een correct gebruik van het apparaat deze h...

Страница 105: ...e contactdoos Onderbreek of verwijder in geen geval de aardingsdraad van het meegeleverde voedingssnoer Om veiligheidsredenen mag u geen elektrisch verlengsnoer gebruiken Als uw apparaat is beschadigd...

Страница 106: ...stel het niet rechtstreeks bloot aan zonnestralen Laat het voedingssnoer niet over een tafel hangen en zorg ervoor dat het niet in aanraking komt met scherpe randen of warme oppervlakken Trek niet aan...

Страница 107: ...van kinderen Opsluiting van en verstikking bij kinderen zijn geen problemen uit het verleden Afgedankte of verlaten apparaten zijn nog altijd gevaarlijk zelfs als ze maar voor enkele dagen in de garag...

Страница 108: ...de instabiliteit van het apparaat te vermijden moet het in overeenstemming met de voorschriften worden vastgemaakt WAARSCHUWING Plaats nooit ontvlambare producten zoals spuitbussen in dit apparaat daa...

Страница 109: ...rden geplaatst om brand of ontploffingen te vermijden Koelvloeistof Het koelcircuit van het apparaat bevat het koelmiddel isobutaan R600a dit is een licht ontvlambaar gas en dus schadelijk voor het mi...

Страница 110: ...t de aarding af Zit de contactdoos voor de netstekker los stop de netstekker er dan niet in U kunt een elektrische schok krijgen of er kan brand ontstaan U mag het apparaat nooit gebruiken zonder besc...

Страница 111: ...isico op brand te voorkomen Het apparaat is bedoeld om eet en of drinkwaren te bewaren in normale huishoudelijke omstandigheden zoals wordt uitgelegd in deze handleiding Het apparaat is zwaar Ga voorz...

Страница 112: ...e of warme omgevingstemperaturen kunnen er ook toe leiden dat de apparaten niet goed functioneren Stop de stekker van de wijnkoeler in een afzonderlijke juist ge nstalleerde en geaarde wandcontactdoos...

Страница 113: ...mag niet naast radiators of kookplaten geplaatst worden Controleer of de stopcontacten na het installeren toegankelijk zijn Energiebesparingen Om het energieverbruik van uw apparaat te beperken Instal...

Страница 114: ...losieve stoffen zoals spuitbussen met ontvlambaar drijfgas in dit apparaat op Waarschuwing vermijd schade aan de koelkringloop van het apparaat Waarschuwing koelunits die werken met isobutaan R600a mo...

Страница 115: ...SCHE GEGEVENS Hieronder ziet u een voorbeeld van een typeplaatje De op de binnen of achterzijde van het apparaat afhankelijk van het model geplakte typeplaat bevat alle informatie betreffende uw appar...

Страница 116: ...e wijnkast aan op een enkelvoudige contactdoos en laat een ruimte van 30 mm tussen de achterkant van de wijnkast en de muur Zorg dat uw de wijnkast perfect ondersteund wordt en dat ze waterpas staat h...

Страница 117: ...n de omgevingstemperaturen die worden opgegeven door de temperatuurklasse zoals aangegeven op het typeplaatje KLASSE SYMBOOL BEREIK VAN OMGEVINGSTEMPERATUUR C Uitgebreid gematigd SN Van 10 tot 32 Gema...

Страница 118: ...118 AVU23SX IX AVU41SXDPA IX AVU52SX IX AVU53CDZA AVU54SXDZA IX PRO51C 1...

Страница 119: ...aai de twee schroeven 2 van de onderste deuras 3 los en verwijder vervolgens de deur 4 en de deuras Fig A Zet de deur in de juiste positie 4 Fig A en B 2 Verwijder 3 schroeven 6 van de bovenste scharn...

Страница 120: ...vervolgens deze voorziening op het bovenste gedeelte van de deurlijst Het verdient de voorkeur een reservedop 12 te gebruiken om het gat op het bovenste gedeelte van de lijst te dichten Fig A B 3 Ver...

Страница 121: ...nier links 7 linksboven met behulp van drie schroeven Fig D 5 Ga volgens dezelfde procedure verder met het installeren van de resterende onderscharnier links 9 Fig E 6 De deur opent 180 graden De inst...

Страница 122: ...ur kan gekozen worden tussen 5 en 18 C of tussen 5 en 10 C 10 en 18 C afhankelijk van het model Wanneer deze eenmaal geselecteerd is knippert de display 5s alvorens de binnentemperatuur op dat moment...

Страница 123: ...ouden In geval van een stroomonderbreking worden alle voordien gekozen temperaturen gewist en keert ieder compartiment automatisch terug naar de in de fabriek voorgeprogrammeerde temperatuur van 6 C v...

Страница 124: ...fect beschermd worden Ontdooien Uw apparaat is uitgerust met een automatische ontdooicyclus Tijdens de stilstand van de koelcyclus worden de gekoelde oppervlakken van het apparaat automatisch ontdooid...

Страница 125: ...ote oplegplanken c vinden Verwijder de bovenste twee oplegplanken 4 De positie van de kleine en grote oplegplanken moet dan omgekeerd worden fig 2 Leg in ieder compartiment twee kleine oplegplanken bo...

Страница 126: ...vermeld is niet contractueel en maakt het mogelijk zoals de literinhoud bij koelkasten om snel te schatten hoe groot het apparaat is Dit aantal stemt overeen met tests die uitgevoerd werden met een st...

Страница 127: ...ssen berekende aanvankelijke hoeveelheid zit Methodes om flessen kruiselings neer te leggen Kop aan staart hals tegen hals Let goed op het verschil in diepte Kop aan staart hals tussen buiken Voorbeel...

Страница 128: ...arten Indien u de wijnkast eerder opnieuw probeert te starten zal de compressor pas na 3 5 minuten beginnen werken indien nodig op basis van de temperatuur Bij de eerste opstart en na een langdurige s...

Страница 129: ...de storing niet veroorzaakt wordt door n van de oorzaken beschreven in de tabel aan het einde van deze handleiding BELANGRIJK Als het meegeleverde voedingssnoer beschadigd is moet het vervangen worden...

Страница 130: ...et in het contact Gesprongen zekering Controleer uw elektrische installatie De LED weergave werkt niet meer neem contact op met uw klantenservice De toets voor de binnenverlichting staat op UIT Trilli...

Страница 131: ...ectieve en adequate ophaling die erop gericht is het ongebruikte apparaat te laten recycleren te laten verwerken en met respect voor het milieu te laten vernietigen helpt mee de mogelijke negatieve ge...

Страница 132: ...ten verkregen over 24 uur in genormeerde testomstandigheden Het werkelijke energieverbruik hangt af van de omstandigheden waarin het apparaat wordt gebruikt en de plaats waar het opgesteld is NETTO IN...

Страница 133: ...egen over 24 uur in genormeerde testomstandigheden Het werkelijke energieverbruik hangt af van de omstandigheden waarin het apparaat wordt gebruikt en de plaats waar het opgesteld is NETTO INHOUD 56 L...

Страница 134: ...en over 24 uur in genormeerde testomstandigheden Het werkelijke energieverbruik hangt af van de omstandigheden waarin het apparaat wordt gebruikt en de plaats waar het opgesteld is NETTO INHOUD 59 5 L...

Страница 135: ...gen over 24 uur in genormeerde testomstandigheden Het werkelijke energieverbruik hangt af van de omstandigheden waarin het apparaat wordt gebruikt en de plaats waar het opgesteld is NETTO INHOUD 146 L...

Страница 136: ...over 24 uur in genormeerde testomstandigheden Het werkelijke energieverbruik hangt af van de omstandigheden waarin het apparaat wordt gebruikt en de plaats waar het opgesteld is NETTO INHOUD 134 L INS...

Страница 137: ...n over 24 uur in genormeerde testomstandigheden Het werkelijke energieverbruik hangt af van de omstandigheden waarin het apparaat wordt gebruikt en de plaats waar het opgesteld is NETTO INHOUD 134 L I...

Страница 138: ...en over 24 uur in genormeerde testomstandigheden Het werkelijke energieverbruik hangt af van de omstandigheden waarin het apparaat wordt gebruikt en de plaats waar het opgesteld is NETTO INHOUD 146 L...

Страница 139: ...cado debe realizar el mantenimiento del electrodom stico Por su seguridad y para utilizar correctamente el aparato antes de instalarlo y utilizarlo por primera vez lea atentamente este manual as como...

Страница 140: ...ni retirar el hilo de puesta a tierra del cable de la red el ctrica suministrado Por razones de seguridad no utilizar un cable alargador el ctrico Si el electrodom stico est estropeado p ej si ha reci...

Страница 141: ...om stico con las manos mojadas Mantener el electrodom stico alejado de cualquier fuente de calor o fuera de la luz directa del sol No permitir que el cable de la red el ctrica quede colgando de una me...

Страница 142: ...s no son problemas del pasado Los aparatos desechados o abandonados siguen siendo peligrosos incluso si van a dejarse en el garaje unos d as Si decide desechar el aparato desench felo de la toma mural...

Страница 143: ...fijarse de acuerdo con las instrucciones ATENCI N No guarde bajo ninguna circunstancia sustancias inflamables como aerosoles dentro del aparato ya que podr an derramarse ATENCI N Si el cable de alime...

Страница 144: ...L quido refrigerante En el circuito refrigerante del aparato se utiliza isobutano refrigerante R600a Se trata de un gas natural sumamente inflamable y por tanto peligroso para el medio ambiente Compru...

Страница 145: ...rra Si el enchufe de alimentaci n est suelto no insertar el cable de alimentaci n Existe riesgo de descarga el ctrica o incendio No se debe poner en funcionamiento el electrodom stico sin la tapa de l...

Страница 146: ...iento No exponga el aparato directamente al sol El aparato debe mantenerse alejado de velas luminarias y dem s llamas abiertas para evitar riesgos de incendio Este electrodom stico est destinado a gua...

Страница 147: ...de calor pueden aumentar el consumo el ctrico El fr o extremo o las temperaturas ambiente de calor tambi n pueden provocar funcionamientos inadecuados de los electrodom sticos Enchufe la vinoteca en...

Страница 148: ...stalaci n El aparato no debe estar situado cerca de radiadores o de fogones de cocci n Una vez que se haya instalado el aparato compruebe que se puede acceder bien a las tomas Ahorro de energ a Siga l...

Страница 149: ...ene sustancias explosivas como esprays de aerosol inflamables con propulsor en este aparato Atenci n No estropee el circuito frigor fico del aparato Atenci n Las unidades de refrigeraci n que funciona...

Страница 150: ...oda la informaci n espec fica de la vinoteca Le aconsejamos que anote el n mero de serie en este manual antes de la instalaci n para consultarlo cuando lo necesite intervenci n t cnica solicitud de as...

Страница 151: ...ones y garantizar la perfecta hermeticidad de la puerta El uso previsto de este aparato es exclusivamente el almacenamiento de vino Este aparato uso refrigerante inflamable Por lo tanto no da e las tu...

Страница 152: ...152 Esquema de empotramiento AVU8X IX AVU23SX IX...

Страница 153: ...153 AVU41SXDPA IX AVU52SX IX AVU53CDZA AVU54SXDZA IX PRO51C 1...

Страница 154: ...Retire los dos tornillos 2 del eje inferior de la puerta y despu s la puerta 4 y el eje de la misma Fig A Posicione correctamente la puerta 4 Fig A y B 2 Quite los 3 tornillos 6 de la bisagra superio...

Страница 155: ...le el dispositivo en la parte superior del marco de la puerta Es preferible utilizar un tap n embellecedor de recambio 12 para tapar el agujero de la parte superior del marco fig A B 3 Quite los 3 tor...

Страница 156: ...ierdo con ayuda de 3 tornillos fig D 5 Proceda a la colocaci n de la bisagra inferior que queda izquierda 9 siguiendo siempre el procedimiento anterior fig E 6 La puerta se abre 180 grados El m todo d...

Страница 157: ...pantalla parpadear aproximadamente 5 segundos antes de indicar la temperatura interna instant nea de la vinoteca La temperatura de ajuste puede verse en cualquier momento pulsando durante 5 segundos l...

Страница 158: ...emperatura predeterminada de f brica es decir 6 C en el caso del compartimento superior y 12 C en el caso del compartimento inferior Luz interior Para reducir el consumo de energ a la vinoteca apagar...

Страница 159: ...lo autom tico de desescarche Durante la parada del ciclo de refrigeraci n las superficies refrigeradas del aparato se desescarchan de forma autom tica El agua de desescarche as recuperada es evacuada...

Страница 160: ...r la posici n de las bandejas grandes y peque as fig 2 Coloque dos bandejas peque as arriba y dos bandejas grandes abajo en cada compartimento 5 Una vez que haya colocado las bandejas correctamente po...

Страница 161: ...les y permiten al igual que la capacidad de los frigor ficos tener una estimaci n r pida del tama o del aparato Estas cantidades corresponden a unas pruebas realizadas con una botella est ndar la bote...

Страница 162: ...C Vinos blancos de la tierra 8 10 C Champanes 7 8 C Vinos licorosos 6 C 7 MANTENIMIENTO Antes de limpiar el aparato operaci n que se debe realizar regularmente descon ctelo retirando el cable de alim...

Страница 163: ...con la puerta cerrada Desplace el aparato en posici n vertical Prot jalo con mantas o cualquier otra protecci n similar Ahorros de energ a El aparato debe colocarse en un local fresco pero con temper...

Страница 164: ...usible de su instalaci n el ctrica ha saltado El LED est fuera de servicio p ngase en contacto con su servicio postventa El bot n de la luz esta en parada Vibraciones Controle y aseg rese de que la bo...

Страница 165: ...responsable de trasladar el aparato al final de su vida til al centro de recogida apropiado Una recogida selectiva y adecuada con el fin de que el aparato sea reciclado tratado y eliminado de forma re...

Страница 166: ...a o calculado en base a resultados obtenidos en 24 horas en condiciones de prueba normales El consumo energ tico real depende de las condiciones de uso y de la ubicaci n del aparato VOLUMEN NETO 23 L...

Страница 167: ...en base a resultados obtenidos en 24 horas en condiciones de prueba normales El consumo energ tico real depende de las condiciones de uso y de la ubicaci n del aparato VOLUMEN NETO 56 L AJUSTE DE TEM...

Страница 168: ...n base a resultados obtenidos en 24 horas en condiciones de prueba normales El consumo energ tico real depende de las condiciones de uso y de la ubicaci n del aparato VOLUMEN NETO 59 5 L x 2 AJUSTE DE...

Страница 169: ...en base a resultados obtenidos en 24 horas en condiciones de prueba normales El consumo energ tico real depende de las condiciones de uso y de la ubicaci n del aparato VOLUMEN NETO 146 L AJUSTE DE TEM...

Страница 170: ...ase a resultados obtenidos en 24 horas en condiciones de prueba normales El consumo energ tico real depende de las condiciones de uso y de la ubicaci n del aparato VOLUMEN NETO 134 L AJUSTE DE TEMPERA...

Страница 171: ...base a resultados obtenidos en 24 horas en condiciones de prueba normales El consumo energ tico real depende de las condiciones de uso y de la ubicaci n del aparato VOLUMEN NETO 134 L AJUSTE DE TEMPE...

Страница 172: ...de prueba normales El consumo energ tico real depende de las condiciones de uso y de la ubicaci n del aparato VOLUMEN NETO 146 L AJUSTE DE TEMPERATURA 5 18 C SIN ESCARCHE Desescarche autom tico CLASE...

Отзывы: