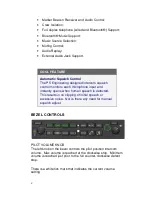
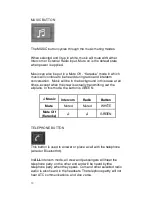
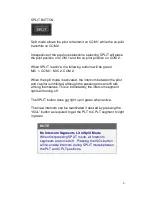
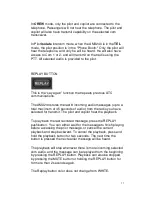
background image


7


SPEAKER BUTTON 


Selecting this button places the radio audio that is selected by the 
pilot over the cockpit speaker.  
 
The button turns green when the speaker function is active. 
 
If the SPKR button is held for more than 1 second, the unit enters 
the Public Announcement (PA) Mode. In PA mode, the pilots mic 
audio is passed over the cockpit speaker, and to all the headsets 
(assuming the intercom is in ALL mode) when the pilot presses 
the PTT.  The co-pilot can transmit over the selected radio in PA 
mode. 
 
When in PA mode, the SPKR button will flash green. 
 
To exit PA mode, press and hold the SPKR button for greater 
than one second. 


Содержание AMX240

Страница 1: ......

Страница 2: ...Pg Chg Cover 0 Page 1 TOC 1 0 1 0 2 0 3 0 4 0 5 0 6 1 7 0 8 0 9 0 10 0 11 0 12 0 13 0 14 0 15 0 16 0 17 0 18 0 19 0 20 0 21 0 22 0 23 1 24 1 Index 0 Inside Back Cover 0 Outside Back Cover 1 ...

Страница 3: ......

Страница 4: ...Marker Beacon Button 8 Mute Button 8 Intercom Isolate Button and Display 9 Music Button 10 Telephone Button 10 Replay Button 11 POWER ON OFF 12 ADDITIONAL FUNCTIONS 13 Integration with Avidyne IFDs 13 Intercom 14 Unswitched INputs 14 Marker Beacon 15 Auxiliary Inputs 16 Music Distribution 16 Bluetooth Pairing and usage 20 Front Panel Jack Smart Jack 21 BRIGHTNESS AND LIGHTING CONTROLS 22 ABNORMAL ...

Страница 5: ...as marked as NOTE within this manual identify certain situations or areas of operation having safety implications While it is important for the operator to be familiar with all of the information in the manual it is essential to the safe use of the AMX240 that pilots give careful attention to the material contained within these NOTEs AMX240 Audio Panel The AMX240 is a panel mount audio panel that ...

Страница 6: ...control monitors each microphone input and instantly opens when human speech is detected This results in no clipping of initial speech or excessive noise Nor is there any need for manual squelch adjust BEZEL CONTROLS PILOT VOLUME KNOB The left knob on the bezel controls the pilot position intercom volume Max volume is reached at the clockwise stop Minimum volume is reached just prior to the full c...

Страница 7: ...s reached at the counter clockwise stop There is a white tick mark that indicates the current volume setting TRANSCEIVER SELECTION Transceiver Selection Controls There are two pushbuttons associated with the transmitter selection The two left buttons MIC 1 MIC 2 control which transceiver is selected for transmit The right column of pushbuttons COM 1 COM 2 allows selection of the receiver audio Pus...

Страница 8: ...g from MIC 1 to MIC 2 while COM 2 audio was not previously selected COM 1 audio will be switched off In essence switching the mic selector will not override prior selection of COM receiver audio If both COM 1 and COM 2 are selected for receive then both will be heard equally The selected MIC button will flash green during com transmission In normal not split modes the AMX240 gives priority to the ...

Страница 9: ...en the pilot and co pilot is inhibited although the passengers can still talk among themselves This is indicated by the intercom segment lights all turning off The SPLIT button does not light up in green when active The crew intercom can be reactivated if desired by pressing the ISOL button as required to get the PLT to CPLT segment to light in green NOTE No Intercom Segments Lit in Split Mode Whe...

Страница 10: ...when active Dual radio monitor capability allows the pilot to listen to the standby frequency while still being able to transmit and receive on the primary frequency NAVAID RECEIVER SELECTION BUTTON These buttons select audio from desired nav radio source to be heard in the headsets Each button turns green when active Change 1 ...

Страница 11: ...ore than 1 second the unit enters the Public Announcement PA Mode In PA mode the pilots mic audio is passed over the cockpit speaker and to all the headsets assuming the intercom is in ALL mode when the pilot presses the PTT The co pilot can transmit over the selected radio in PA mode When in PA mode the SPKR button will flash green To exit PA mode press and hold the SPKR button for greater than o...

Страница 12: ...and Inner Marker Beacon lamps The audio stays muted until next beacon station received The MKR button turns green when Marker Beacon audio is selected MUTE BUTTON Pressing the Mute button sends a signal to any external alerting system that is connected to the AMX240 audio panel Examples include traffic systems TAWS EGPWS systems autopilots etc When pressed the MUTE button turns green for approxima...

Страница 13: ...n a shared intercom In Crew the LED segment connecting PLT and CPLT is lit and the usable intercom is between those two positions Note that the passengers can talk amongst themselves but cannot hear the crew Passengers will also not hear the transceiver in this case In Pilot Isolate the LED segment connecting CPLT and PAX is lit and the usable intercom is just between those positions ...

Страница 14: ...BUTTON This button is used to answer or place a call with the telephone wired or Bluetooth In ALL intercom mode all crew and passengers will hear the telephone party on the other end and will be heard by the telephone party when they speak Com and other selecte audio is also heard in the headsets The telephone party will not hear ATC communications and vice versa The MUSIC button cycles through th...

Страница 15: ...g audio messages up to a total maximum of 45 seconds of audio from the radio you have selected for transmit The pilot and copilot hear the playback To play back the last recorded message press the REPLAY pushbutton You can either wait for the message to finish playing before accessing the prior message or cancel the current playback and step backward To cancel the playback press and hold the playb...

Страница 16: ... on self test the AMX240 will default to the last configuration prior to the previous shutdown To manually power the AMX240 off twist the Pilot Volume knob to the full counter clockwise position until the detent is felt heard To manually power the AMX240 on following a manual power off twist the Pilot Volume knob clockwise out of the OFF detent ...

Страница 17: ...FDs When connected to an IFD the AMX240 enables Com frequency decoding and frequency monitoring of the two transmit and four receive channels of the IFD com radio This means that the active Com frequency and agency name are displayed on the IFD so you always know with whom you will be talking when you transmit IFD540 Integration R9 Integration ...

Страница 18: ... while in the ALL intercom mode all segments green The PLT to CPLT segment will blink to indicate this mode is active This function is remembered through power cycles UNSWITCHED INPUTS Unswitched inputs are presented to the pilot and co pilot regardless of the audio configuration or selections If audio comes in via one of the unswitched unmuted lines any entertainment audio is instantly muted Unsw...

Страница 19: ...t a 400 Hz dash tone The lamp and tone flash on off at a rate of 2 tones and flashes per second The Middle marker will light up the M lamp and present a 1300 Hz alternating dot and dash tone The combination dots and dashes will be at a rate of 95 per minute The Inner marker will light up the I lamp and present a 3000 Hz dot tone The lamp and tone flash on off at a rate of 6 tones and flashes per s...

Страница 20: ...f wired will be heard via the wired Telephone button MUSIC DISTRIBUTION Music 1 can be the rear connector J2 pins 23 24 25 the front panel jack OR a Bluetooth music stream The three inputs are paralleled so if more than one device is connected all will be combined into the audio not recommended Music 2 is only sourced from the rear connector J2 pins 26 27 28 Music 2 is presented only to the passen...

Страница 21: ...nnector Changes to the Music Distribution Function are activated by holding Music button until the audio mode annunciation plays Repeat to cycle to the next mode The two modes available are Standard Music Distribution Music One All Headsets The power on default mode is the last mode selected prior to the previous power down ...

Страница 22: ...h doesn t have any affect on the music distribution When the music is standard Music 1 will always go to the pilot and co pilot positions and is never heard by the passengers Music 2 is always heard by the passengers and never heard by the pilot and co pilot Music 2 will never mute including during crew radio transmission out of the cockpit ...

Страница 23: ...dsets and is independent of the intercom mode button ISOL Music One All Headsets Configuration Therefore even in the CREW mode the passengers will hear Music 1 even though they will not hear the intercom or radios The music muting feature follows the selected mode for Music 1 and is controlled by the front panel Music button ...

Страница 24: ...X240 should be able to make and receive calls with the audio directed through the audio panel and stream music Once paired playing music from the phone will be considered the Music 1 wired rear location on the AMX240 Meaning if you have an external device plugged into Music 1 and Bluetooth music playing at the same time then you will hear both audio devices Passengers will only hear Bluetooth musi...

Страница 25: ...ll be the primary music input for pilot copilot and will mute accordingly Wired cell phone input If connected through a 3 or 4 conductor cable 4 conductor with load resistor needed for iPhone BlackBerry then the telephone input will function as described earlier in this manual Unswitched Input This will only switch to an unswitched input when Music 1 has audio present If no audio is present then t...

Страница 26: ...ghts Checking the position of the manual cockpit dimming control should be the first thing to check if the AMX240 button indications appear off broken ABNORMAL OPERATIONS FAIL SAFE OPERATION If the audio panel detects an internal problem or if it has failed or lost power the fail safe feature will connect the pilot headset and microphone directly to the COM1 transceiver In this case the AMX240 is ...

Страница 27: ...and no further action or wiring is required but some functions may be missing without adding wiring or are not supported The following tables identify the functions that either don t exist in the AMX240 or will need extra wiring if they are to be available when replacing one of the legacy audio panels that are tray compatible An X in the block below indicates the function that may exist in the leg...

Страница 28: ...below indicates the optional function that may need extra wiring if replacing a legacy audio panel with the AMX240 See the AMX240 Installation Manual for details AMX240 Audio Panel Features Requiring Extra Wiring Change 1 ...

Страница 29: ...0 Mute 8 Nav 6 Pilot Volume 2 Replay 11 Speaker 7 Split 5 Transceiver Selection 3 Telephone 10 Bluetooth Pairing and Usage 20 Brightness and Lighting 22 Front Panel Smart Jack 21 Functional Overview 1 Integration with Avidyne IFDs 13 Intercom 14 Low Temperature Operations 21 Marker Beacon 15 Music Distribution 16 Power On Off 12 Plug and Play Details 23 System Overview 1 Unswitched Unmuted Inputs ...

Страница 30: ......

Страница 31: ... Australia Asia support avidyneaustralasia com Everywhere else should email techsupport avidyne com When calling or emailing for product related help please have the following information available if able Customer Name Account Information Aircraft tail number AMX240 serial number and software versions if known A good description of the problem or question SOFTWARE LICENSE AVIDYNE CORPORATION AVID...

Страница 32: ...DYNE CORPORATION 55 Old Bedford Road Lincoln MA 01773 P 781 402 7400 F 781 402 7599 Toll Free 800 AVIDYNE 800 284 3963 www avidyne com http www avidyne com products AMX240 index asp P N 600 00306 000 Rev 01 ...

Отзывы: