background image

42

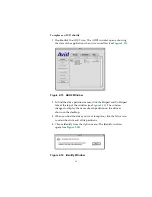
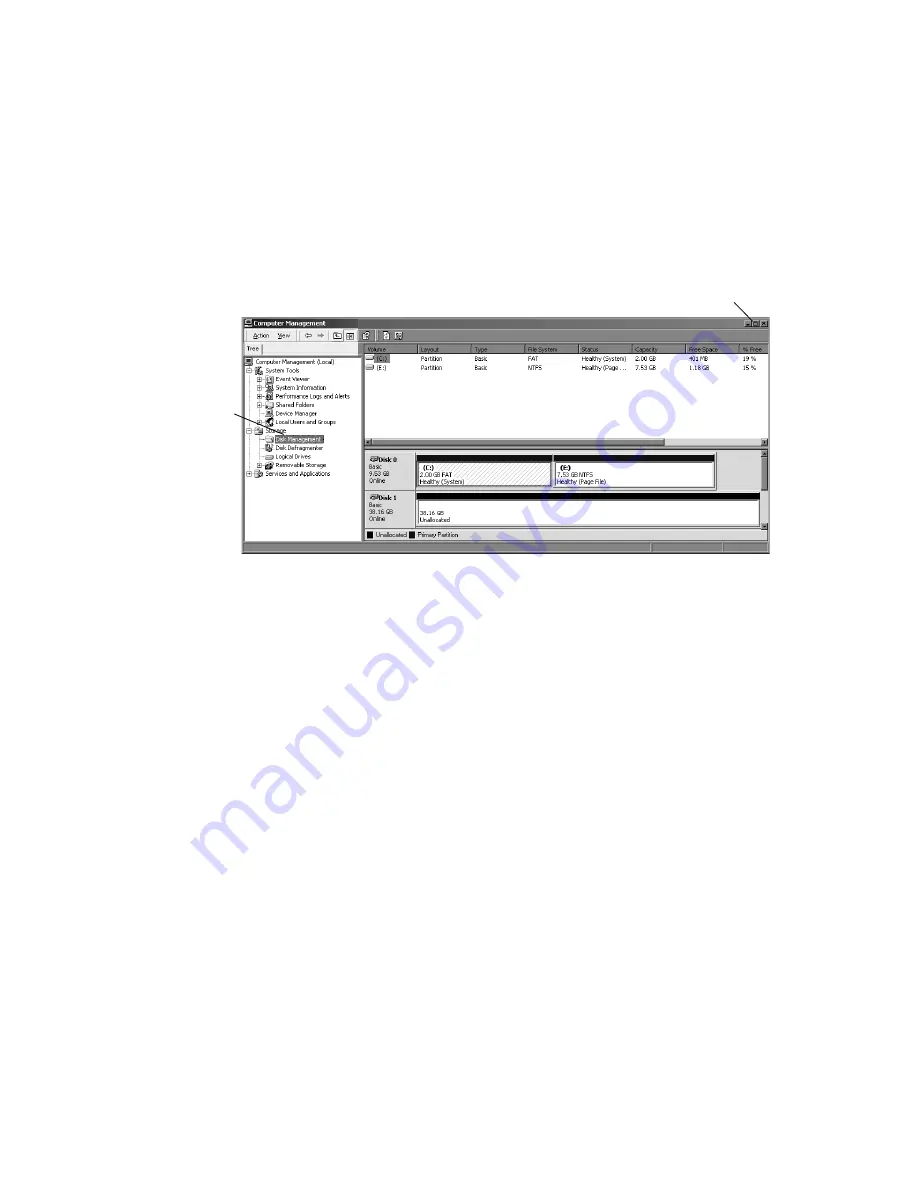
3. Select the Disk Management folder. If the size of the window is 

small, you might want to click the Maximize button in the upper 
right corner of the window.

Figure 2-12 Computer Management Window

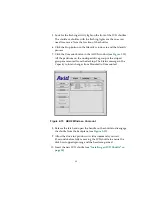
4. To spin-down the volume corresponding to the LVD shuttle you 

are removing, do the following:

a.

Choose Change Drive Letter and Path from the All Task 
sublist, in the Action menu of the Disk Management tool. For 
more information, see your Windows 2000 documentation or 
Disk Management Help for information on removing 
volumes.

b. Click Remove.

n

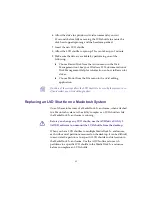
If your Avid software release includes Avid Storage Manager, use the 
Spin-Down feature in the utility.

5. Release the latch and open the handle on the shuttle to disengage 

the shuttle from the backplane (see 

Figure 2-11

).

Disk 
Management
folder

Maximize button

Содержание MediaDock 2 Plus

Страница 1: ...a Avid MediaDock 2 Setup and User s Guide...

Страница 2: ...reproduced or transmitted in any form or by any means electronic or mechanical including photocopying and recording for any purpose without the express written permission of Avid Technology Inc Copyr...

Страница 3: ...Ultimatte Corporation and are subject to copyright protection Attn Government User s Restricted Rights Legend U S GOVERNMENT RESTRICTED RIGHTS This Software and its documentation are commercial comput...

Страница 4: ...You Have Documentation Comments 14 How to Order Documentation 14 Chapter 1 Overview MediaDock 2 Enclosure Features 16 MediaDock 2 Enclosure Slots 17 Front Panel 18 Back Panel 19 Power Supply 20 LVD S...

Страница 5: ...Replacing an LVD Shuttle on a Macintosh System 43 Chapter 3 Preparing Your Drives Managing LVD Shuttles on Windows 2000 Systems 48 Supported Windows File Systems 49 Creating Primary Partitions and Fo...

Страница 6: ...s Dimensions and Weights 75 Environmental Specifications 76 Power Supply Specifications 77 Power Cord Specifications 77 CEE 22 Power Cord Requirements 78 United States and Canada Power Cord Requiremen...

Страница 7: ...nectors 32 Figure 2 4 Configuration Using Four MediaDock 2 Enclosures 33 Figure 2 5 Avid SCSI LVD Terminator 34 Figure 2 6 Setting SCSI IDs 35 Figure 2 7 SCSI ID Switch Location 36 Figure 2 8 SCSI ID...

Страница 8: ...IEEE 1394 Interface Panel 68 Figure 4 4 Blank Panel Tabs and Metal Plate Screw 69 Figure 4 5 Bracket Removal 70 Figure 4 6 Securing the Optional DVD Writer to the Bracket 71 Figure 4 7 Optional DVD W...

Страница 9: ...Table 1 3 SCSI LVD Cables Available Through Avid 26 Table A 1 Dimensions and Weights 75 Table A 2 Environmental Specifications 76 Table A 3 Power Supply Specifications 77 Table A 4 United States and C...

Страница 10: ...g system The MediaDock 2 enclosure is used in conjunction with Avid LVD shuttles to store play back and record media files The MediaDock 2 enclosure is qualified on Avid editing systems running Macint...

Страница 11: ...closure to your Avid editing system and setting the SCSI IDs Chapter 3 Preparing your Drives describes how to format your drives on Windows and Macintosh operating systems This chapter also includes i...

Страница 12: ...hat help you perform tasks more easily and efficiently n A note provides important related information reminders recommendations and strong suggestions c A caution means that a specific action you tak...

Страница 13: ...r 1394 device such as the MediaDrive rS IEEE 1394 enclosure HotPlug refers to the process of pulling out a component from a system and plugging in a new one while the power is still on and the unit is...

Страница 14: ...continuously seeks to improve its documentation We value your comments about this guide and other Avid supplied documentation Simply e mail your documentation comments to Avid Technology at TechPubs a...

Страница 15: ...ire n As drive size and performance improve different LVD shuttles will be available for use Contact your local Avid Reseller or call the Avid Sales and Product information line at 800 949 2843 for th...

Страница 16: ...es Rack Mount Options MediaDock 2 Enclosure Features The MediaDock 2 enclosure contains Two shuttle slots that support LVD SCSI operation Wide bus data transfers over a 16 bit bus up to 160 MB s depen...

Страница 17: ...uide illustrates the MediaDock 2 enclosure without any device in the optional device bay For instructions on installing a DVD writer in the optional device bay see Chapter 4 n The LVD shuttles are sol...

Страница 18: ...uttle s SCSI IDs The label on the right side of the front panel is the Avid product identification label Figure 1 2 MediaDock 2 Front Panel Detailed descriptions of the LEDs are provided in Table 1 1...

Страница 19: ...installed See Chapter 4 for more information Figure 1 3 MediaDock 2 Back Panel Thermal LED c The LED red flashes when the thermal overload circuitry senses that the temperature inside the MediaDock 2...

Страница 20: ...ures The MediaDock 2 enclosure uses only LVD shuttles These shuttles are not included with the MediaDock 2 enclosure and must be purchased and installed separately The LVD shuttles are available in a...

Страница 21: ...the MediaDock 2 enclosure Contact your local Avid Reseller or call the Avid Sales and Product information line at 800 949 2843 for the available LVD shuttles LVD shuttle front view LVD shuttle rear vi...

Страница 22: ...mage the read write heads or the magnetic coating on the drive platters Do not turn off the power to a drive while you can see the icon on a Macintosh desktop This can cause directory structure proble...

Страница 23: ...l if you frequently run the MediaDock 2 with only one LVD shuttle Figure 1 5 Drive Filler Panel System Requirements To use a MediaDock 2 enclosure you need the following hardware and software One of t...

Страница 24: ...em Version 1 5 or later or StorEx for the Windows NT operating system Version 1 2 or later or StorEx for the Windows 2000 operating system Version 1 3 or later n Use Avid Storage Manager ASM in place...

Страница 25: ...r assign SCSI ID 7 to an LVD shuttle n Mixing LVD shuttles with single ended or narrow drives on the SCSI bus is not supported Wide SCSI devices such as the LVD shuttles can use SCSI IDs 0 through 6 a...

Страница 26: ...8 pin SCSI LVD cable between SCSI LVD devices Table 1 3 shows a list of the Avid cables that are available for connecting LVD drives to your Avid system and where to use each cable Table 1 3 SCSI LVD...

Страница 27: ...ators are accessible when mounted Five threaded holes are provided on each side of the MediaDock 2 enclosure for mounting either brackets or slide rails see Figure 1 6 An optional rail kit can be atta...

Страница 28: ...provides rack mount brackets and screws with the MediaDock 2 enclosure These brackets attach to the sides of the MediaDock 2 enclosure as shown in Figure 1 7 Figure 1 7 Rack Mount Brackets Rack mount...

Страница 29: ...u Begin Connecting Cables SCSI LVD Terminator Determining SCSI IDs Installing an LVD Shuttle Removing an LVD Shuttle Before You Begin Before you begin to install a MediaDock 2 enclosure do the followi...

Страница 30: ...ou will also need a Phillips screwdriver to install the rack mount brackets If you are installing an optional DVD writer you will also need a 5 16 inch extended length nut driver Instructions for inst...

Страница 31: ...f the drives on a SCSI bus when you add a new drive Connecting the MediaDock 2 Enclosure The following sections explain how to connect the MediaDock 2 enclosure chassis to an Avid editing system Avid...

Страница 32: ...htening the thumbscrews that are part of the connector 6 Connect one of the following to the other SCSI connector on the MediaDock 2 enclosure t If you are connecting additional MediaDock 2 enclosures...

Страница 33: ...e SCSI LVD accelerator board and the first MediaDock 2 enclosure Optional 10 and 30 foot SCSI LVD cables are also available Use 15 30 or 40 inch SCSI LVD cables to daisy chain the MediaDock 2 enclosur...

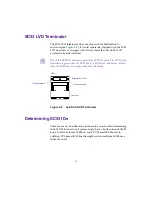
Страница 34: ...terminator is green when the SCSI bus is in LVD mode and amber yellow when the SCSI bus is in single ended fast wide mode Figure 2 5 Avid SCSI LVD Terminator Determining SCSI IDs There are many consi...

Страница 35: ...n each SCSI bus in sequential order that is starting with the device attached closest to the Avid system as ID 0 see Figure 2 6 Figure 2 6 Setting SCSI IDs SCSI IDs on Systems You must assign a SCSI I...

Страница 36: ...ure and system n Always turn the power off before changing the SCSI ID switch When the drive and system are turned back on the system will read the new SCSI ID 2 Locate the SCSI ID switches on the fro...

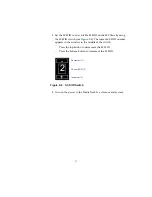
Страница 37: ...The current SCSI ID number appears in the window in the middle of the switch Press the top button to decrement the SCSI ID Press the bottom button to increment the SCSI ID Figure 2 8 SCSI ID Switch 4...

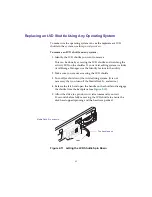
Страница 38: ...ward from the left of the LVD shuttle by pressing a latch on the inside of the handle see Figure 2 9 When you close the top handle with the LVD shuttle partially in the MediaDock 2 enclosure the lever...

Страница 39: ...spin up as soon as it is fully latched into the MediaDock 2 enclosure Removing an LVD Shuttle Removing the shuttle can be accomplished in different ways depending on the operating system you are usin...

Страница 40: ...age Manager use the Identify feature in the utility 2 Make sure you are not accessing the LVD shuttle 3 Turn off or shut down the Avid editing system It is not necessary that you turn off the MediaDoc...

Страница 41: ...rts LVD shuttle replacement without rebooting the Windows 2000 operating system However the simplest way to replace an LVD shuttle is to turn off the Avid editing system as described in Replacing an L...

Страница 42: ...ose Change Drive Letter and Path from the All Task sublist in the Action menu of the Disk Management tool For more information see your Windows 2000 documentation or Disk Management Help for informati...

Страница 43: ...ps allow the LVD shuttle to be seen by the system turn off and restart your Avid editing system Replacing an LVD Shuttle on a Macintosh System One of the main features of a MediaDock 2 enclosure when...

Страница 44: ...ition names click the Striped and UnStriped tabs at the top of the window see Figure 2 13 The window changes to display the name of each partition on the drive as shown on the desktop 3 When you find...

Страница 45: ...s on the unstriped drive group or the striped group are removed from the desktop The Status message in the Capacity column changes from Mounted to Unmounted Figure 2 15 ADU2 Window Unmount 8 Release t...

Страница 46: ...60 SCSI LVD or newer shuttles 12 Click the Scan Bus button in the ADU2 window The utility scans the SCSI buses and redisplays the ADU2 window showing the new striped and unstriped LVD shuttles 13 Clic...

Страница 47: ...nd stripe the LVD shuttle For mounting and unmounting striped sets on a Windows NT operating system use the Avid Disk Mounter utility The Windows 2000 operating system does not need to use this utilit...

Страница 48: ...sed for standalone disk drives in the Windows 2000 operating system Dynamic disk drives allow disks to be divided into volumes Disk drives must be dynamic if you want to stripe mirror or use disk driv...

Страница 49: ...e recovery features Drives employing NTFS support partitions of any size n Avid recommends NTFS when you partition your disk drives c One of your internal disk drives normally designated drive C has a...

Страница 50: ...as been selected To create a primary partition and format a drive n You might not have the same partitions and disk configuration shown in the following procedure However examples in the procedure wil...

Страница 51: ...artition Wizard window opens and explains the function of the wizard 6 Click Next The wizard leads you through partitioning and formatting of the selected unallocated section of your disk a In the Sel...

Страница 52: ...Volume label text box h Select the Perform a Quick Format option 7 Click Next The Completing the Create Partition Wizard window opens and provides a list of your selections 8 Verify your selections an...

Страница 53: ...he system 4 From the Partition menu choose Configuration and then choose Save from the submenu The Insert Disk dialog box appears 5 Click OK The stripe set disk configuration is placed on the floppy d...

Страница 54: ...oth systems are properly shut down and you move the disk drives to the Windows 2000 system Make sure you have installed the latest drivers for the disk controller board on the Windows 2000 system befo...

Страница 55: ...e following procedure To import the disk configuration 1 Start your Windows 2000 system and log in to an account with administrative privileges 2 Right click the My Computer icon and choose Manage fro...

Страница 56: ...Windows 2000 Systems on page 48 Managing LVD Shuttles on Macintosh Systems If you are using a Macintosh operating system install the latest version of the ADU2 software The ADU2 software that came wit...

Страница 57: ...ally caused by system crashes improper system shutdowns and power failures They should not be interpreted as a precursor to a mechanical drive failure Media Composer Release 8 0 or Later If you are us...

Страница 58: ...ystem is reporting drive errors or when files on the drive can t be opened and used by Avid application software n You can run Disk First Aid regularly as a proactive method of avoiding drive problems...

Страница 59: ...st Aid icon to start the application The Disk First Aid window opens see Figure 3 1 This window contains all the necessary controls for you to run Disk First Aid Figure 3 1 Disk First Aid Main Window...

Страница 60: ...ou can only verify these drives while they are in use Click OK to close the message box Figure 3 2 Disk First Aid Message Box 4 Verify and repair the selected drive by clicking the Repair button Disk...

Страница 61: ...e the drives on your Avid editing system to remove all the data that is on them Erasing recreates the partition map and directory structure improving overall drive performance It is best to erase driv...

Страница 62: ...I bus channel or across two SCSI bus channels On a Windows 2000 system you can move striped drives from one Avid editing system to another by using the Disk Management tool For information about the s...

Страница 63: ...performance information 1 Go to www avid com 2 Click support 3 Click online support 4 Click Documentation under the Avid Knowledge Center heading 5 Click Login n If you are not already a registered u...

Страница 64: ...ays check the release notes that ship with your Avid software release to see if there have been any updates that relate to the MediaDock 2 enclosure Windows NT Systems If you are using the MediaDock 2...

Страница 65: ...ck 2 enclosure on a Macintosh system there are three major software utilities available AVIDdrive Utility 2 allows you to Identify drives Select and create partitions Create striped groups Erase parti...

Страница 66: ...re interface panel for the rear of the MediaDock 2 enclosure The interface panel contains a pair of IEEE 1394 connectors w Use of controls or adjustments for performance of procedures other than those...

Страница 67: ...2 enclosure 2 Remove the 10 top cover screws see Figure 4 1 Figure 4 1 Top Cover Screws 3 Remove the two interface panel screws on the rear of the MediaDock 2 enclosure see Figure 4 2 Figure 4 2 Inte...

Страница 68: ...re 4 3 IEEE 1394 Interface Panel 5 Plug the power cable connector on the IEEE 1394 interface panel into an available power connector on the cable coming from the power supply n The signal cable is con...

Страница 69: ...move the screw securing the metal plate Remove the metal plate from the inside of the chassis 3 From inside the MediaDock 2 enclosure release the two tabs securing the blank panel to the front bezel s...

Страница 70: ...toward the rear so that the bracket nuts are aligned with the circular holes Lift the bracket out of the chassis Figure 4 5 Bracket Removal 6 Set the jumper on the DVD writer to Master Do not select...

Страница 71: ...s that come with it see Figure 4 6 Figure 4 6 Securing the Optional DVD Writer to the Bracket 9 Reposition the bracket over the nuts in the chassis 10 Push the bracket and DVD writer so that the front...

Страница 72: ...e the last power connector on the power cable coming from the power supply Fold the signal cable as shown in Figure 4 3 to reduce clutter Figure 4 7 Optional DVD Writer Cabling 13 Replace the MediaDoc...

Страница 73: ...urer for the location of the IEEE 1394 connector on your Avid editing system Figure 4 8 Connecting the IEEE 1394 Cables The IEEE 1394 standard supports hot pluggable installation of FireWire devices T...

Страница 74: ...IEEE 1394 cable length from the system to the last drive cannot exceed 236 ft 72 m Either IEEE 1394 port on the MediaDock 2 enclosure can be used to connect to the system and other drives Maximum com...

Страница 75: ...ifications for the MediaDock 2 enclosure Dimensions and Weights Environmental Specifications Power Supply Specifications Power Cord Specifications Dimensions and Weights Table A 1 shows the dimensions...

Страница 76: ...er installed 12 lb 5 4 kg 14 5 lb 6 5 kg Table A 1 Dimensions and Weights Continued Topic Specification Table A 2 Environmental Specifications Topic Specification Room temperaturea maximum 104 F 40 C...

Страница 77: ...A 3 shows the power supply specifications for the MediaDock 2 enclosure Power Cord Specifications Select the power cord according to the country destination it must comply with local safety requiremen...

Страница 78: ...e male plug is a NEMA 5 15P style and is UL listed and CSA certified Figure A 2 shows the plug SVT cord can be used with desktop or stackable units all other equipment requires SJT cord Only SJT type...

Страница 79: ...ble A 5 for the selection criteria for European power cords Table A 4 United States and Canada Power Cord Require ments Cord Type Size of Conductors in Cord Maximum Current Rating of Unit SJT 16 AWGa...

Страница 80: ...its for a Class A digital device pursuant to Part 15 of the FCC Rules These limits are designed to provide reasonable protection against harmful interference when the equipment is operated in a commer...

Страница 81: ...y According to ISO IEC Guide 22 and EN 45014 Application of Council Directives 73 23 EEC 89 336 EEC Standards to which Conformity is Declared EN60950 1992 A1 A2 A3 A4 A11 CISPR 22 1985 EN55022 1988 Cl...

Страница 82: ...were tested in an AirPlay or VideoSPACE configuration I the undersigned hereby declare that the equipment specified above conforms to the above Directives and Standards George R Smith Director of Har...

Страница 83: ...Regulations John Kells Australian Operations Manager Avid Technology Australia Unit B 5 Skyline Place French Forest NSW 2086 Australia Phone 61 2 8977 4800 Taiwan EMC Regulations Taiwan EMC Regulation...

Страница 84: ...VIDdrive Utility 2 56 See ADU2 B Back panel power connector 19 SCSI connectors 19 C Cable connecting IEEE 1394 73 connecting SCSI 32 Checking LVD shuttles 57 Computer Management window 41 50 55 Config...

Страница 85: ...moving LVD shuttles 39 striping 47 63 DVD writer cabling 73 configure 74 installation 69 interface panel 68 E Environmental specifications 76 Erasing LVD shuttles 61 F Fan 19 FAT file system 49 Featur...

Страница 86: ...D shuttles Macintosh systems 57 to 61 Windows 2000 systems 48 to 55 Maximum configuration IEEE 1394 74 SCSI 33 MediaDock 2 back panel 19 contents 30 dimensions 75 environmental specifications 76 front...

Страница 87: ...nnectors 19 terminator 34 SCSI ID configuration notes 35 numbering 35 requirements 25 25 settings 34 switch location 18 SCSI LVD controller connections 32 SCSI ID setting 34 Slot locations 17 Software...

Страница 88: ...systems 65 on Windows 2000 systems 48 65 on Windows NT systems 64 utilities 64 Thermal LED 19 Two SCSI buses 34 U Unpacking MediaDock 2 30 Utilities folder 64 Utilities requirements 24 V Ventilation...

Отзывы: