


E-21
English
Deutsch
Français
Italiano
Es
pa
ñol
Č
esky
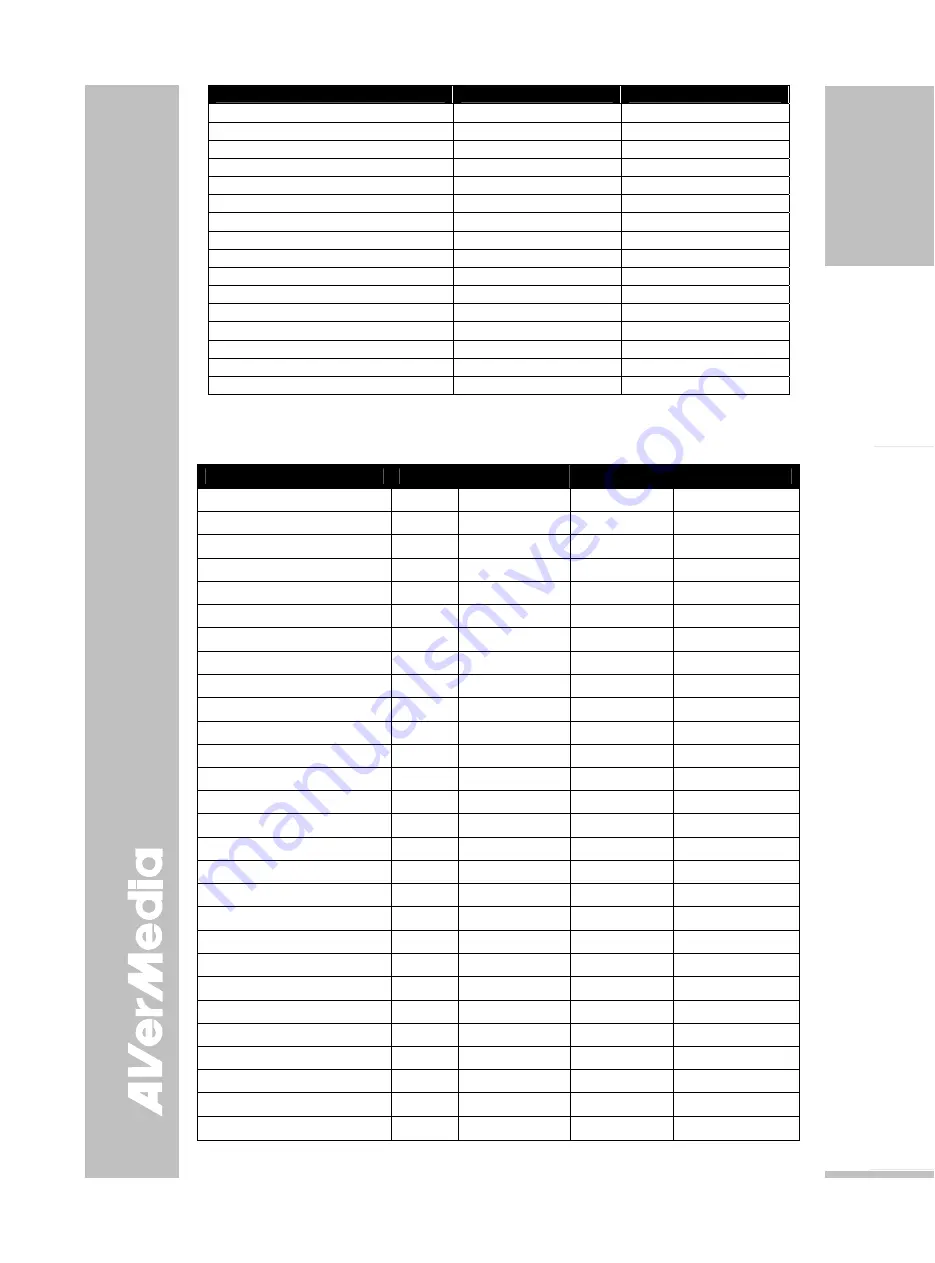
FUNCTION
DATA CODE
CHECKSUM CODE
ZOOM RESET
0x36
0x61
FREEZE 0x0C
0x5B
ROTATE 0x0D
0x5A
MIRROR 0x32
0x65
EFFECT 0x0E
0x59
BRT UP
0x2F
0x78
BRT DOWN
0x30
0x67
AUTO IMAGE
0x0A
0x5D
TIMER 0x0F
0x58
PROFILE 0x10
0x47
CAPTURE / DELETE
0x0B
0x5C
SPLIT SCRN
0x11
0x46
PIP
0x13
0x44
AVERBOX ON / OFF
0x26
0x71
AVERVISOR ON / OFF
0x27
0x70
AVERBOX COLOR
0x29
0x7E
Set Value Format:
Send Format
︰
0x52 + 0x0B + 0x03 + Data[0] + Data[1] + Data[2] + 0x53 + CheckSum
Receive Format
︰
0x53 + 0x00 + 0x01 + 0x0B + 0x53 + 0x59
Function
Data[0]
Data[1]
Data[2]
CheckSum Code
Flicker 50Hz
0x00
0x00
0x00
0x5B
Flicker 60Hz
0x00
0x01
0x00
0x5A
Exposure Value
0x01
Value[0 ~ 95]
0x00
*1
WB Red Value
0x02
0x00
Value[0~255]
*1
WB Blue Value
0x02
0x01
Value[0~255]
*1
Brightness Value
0x03
Value[0 ~ 63]
0x00
*1
Contrast Value
0x04
Value[0 ~ 255]
0x00
*1
Rotate 0 degree
0x06
0x00
0x00
0x5D
Rotate 90 degree
0x06
0x01
0x00
0x5C
Rotate 180 degree
0x06
0x02
0x00
0x5F
Rotate 270 degree
0x06
0x03
0x00
0x5E
Effect Color
0x07
0x00
0x00
0x5C
Effect B/W
0x07
0x01
0x00
0x5D
Effect Negative
0x07
0x02
0x00
0x5E
Mode Text
0x08
0x00
0x00
0x53
Mode Graphics
0x08
0x01
0x00
0x52
Mode High Frame
0x08
0x02
0x00
0x51
Mode Microscope
0x08
0x03
0x00
0x50
OPTICAL ZOOM 1X
0x0A
0x00
0x00
0x51
OPTICAL ZOOM 8X
0x0A
0x01
0x00
0x50
SPLIT SCRN VERTICAL
0x0B
0x00
0x00
0x50
SPLIT SCRN HORIZONTAL
0x0B
0x01
0x00
0x51
PIP LOWER LEFT
0x0C
0x00
0x00
0x57
PIP UPPER LEFT
0x0C
0x01
0x00
0x56
PIP UPPER RIGHT
0x0C
0x02
0x00
0x55
PIP LOWER RIGHT
0x0C
0x03
0x00
0x54
CAPTURE SINGLE
0x0D
0x00
0x00
0x56
CAPTURE CONTINUOUS
0x0D
0x01
0x00
0x57
*1
:
CheckSum = 0x0B xor 0x03 xor Data[0] xor Data[1] xor Data[2] xor 0x53
Содержание AVerVision SPB370
Страница 4: ......


