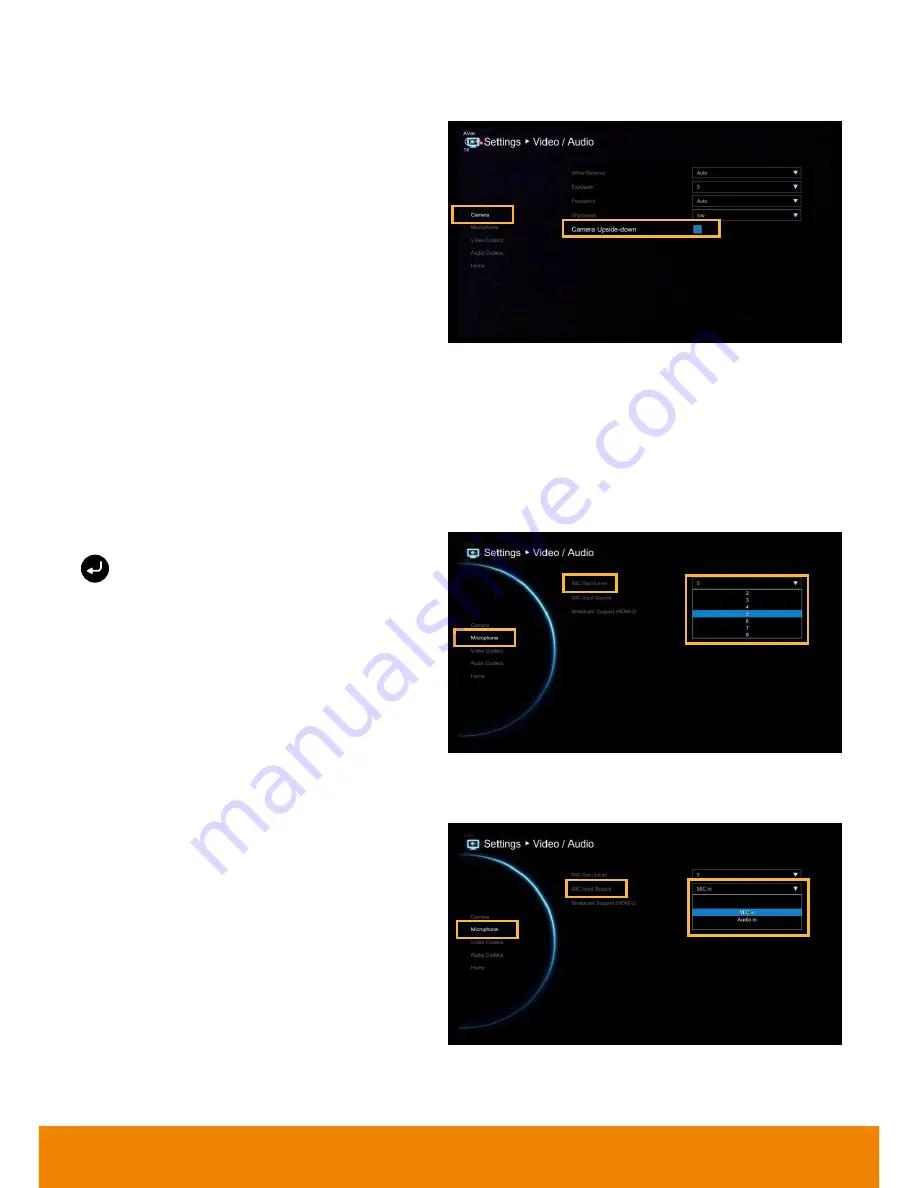
AVer EVC300 Скачать руководство пользователя страница 57


54 


Camera Upside-down 

When  camera  is  handed  at  up-side-down 
position,  enable  Camera  Upside-down  to  flip 
the image view. 


Microphone 

EVC main system allows you to adjust the 

MIC Gain Level 

up to 9 for proper MIC volume to improve 

audio reception on the microphone (s). 


MIC Gain Level 

Select  Video/Audio

Microphone  and  press 


Adjust the 

MIC Gain Level

 form the drop-down 

list.   


MIC Input Source 

Select  the  source  of  the  microphone from  the 
MIC  in  or  Audio  in.  If  you  connect  a 
microphone in AUDIO IN port, we recommend 
selecting  Audio  in  selection  to  avoid  the  echo 
issue. 


Содержание EVC300

Страница 1: ...EVC300 EVC900 User Manual...

Страница 2: ...orts 12 CAMERA AND MICROPHONE INTRODUCTION 13 Using the Camera 13 Infrared Sensor IR 13 Positioning the MIC 14 AVER EVC WIZARD SETUP 15 Start 15 Language 15 Site Name 16 Network Setting 16 Public IP C...

Страница 3: ...honebook Entries 75 Update System 76 TROUBLESHOOTING 77 Audio 77 Video Display 77 Network 78 Others 81 SCENARIOS FOR LAN CONNECTION 82 Public IP Configuration Outside of Firewall 82 Private IP Configu...

Страница 4: ...from VGA or HDMI Dual monitor support via HDMI1 and HDMI2 VGA Support CIF 352x240 up to Full HD 1920x1080 30fps video call EVC300 EVC900 PTZ camera is 16x Optics PTZ camera with 2Mp low lux sensor In...

Страница 5: ...tem 2 Camera 3 Microphone 4 Remote Control 5 Power Adapter 6 Power Cord 7 VGA Cable 8 Mini Din 8 pin MIC Cable 5m 9 HDMI Cable 2 10 Camera Cable 3m 11 RJ 45 Cable 3m 12 DVI to HDMI Connecter 13 Warran...

Страница 6: ...tem log saving and FW upgrade Back Panel 1 2 3 4 5 6 7 8 9 10 11 12 Name Function 1 LAN Port Use the RJ 45 Ethernet cable to connect an IP based network to the LAN port 2 CAMERA IN Port Connect the ca...

Страница 7: ...both video and audio signal In dual screen configuration the output screen connected to this port will be set up to secondary screen automatically 10 VGA OUT Port Connect the VGA cable to the VGA outp...

Страница 8: ...trol for system operation Amber light blinks when it detects key pressing event from remote 2 CAMERA OUT Port Connect the camera cable to the CAMERA OUT port located on the back of camera and CAMERA I...

Страница 9: ...honebook Search contacts to make a call Add edit delete or create group contact entries 6 Delete Press this button to back delete one character at a time 7 Call Start a call 8 Home Bring up the main s...

Страница 10: ...e The present icon will appear on the screen when the presentation function is enabled The icon will disappear after 5 sec 21 Layout Change the screen layout 22 AVer Point Specified for some special f...

Страница 11: ...re all devices are powered off Refer to the illustrated connections below and also to the user manual of the device you are connecting to the EVC300 EVC900 system Make sure all connections have been c...

Страница 12: ...nd connect it to VGA OUT HDMI OUT port of the AVer EVC with the supplied VGA HDMI cable You can connect the VGA OUT and HDMI 1 OUT ports or HDMI 1 OUT and HDMI 2 ports at the same time upon a dual scr...

Страница 13: ...C IN port of the EVC Then connect the other end of the MIC cable with the blue tag to MIC OUT port Press the button on the top of AVer EVC MIC to mute un mute the MIC Please connect the cable to the p...

Страница 14: ...he power cable and turning on the power 2 Make sure to use the supplied available power adapter Connecting PC VGA in DVI In Locate the VGA output port of the Laptop or Desktop and connect it to VGA IN...

Страница 15: ...and connect it to AUDIO IN port of AVer EVC with the supplied 3 5mm Audio cable 3 AUDIO OUT Locate the AUDIO in port of the LCD TV speaker or normal speaker and connect them to AUDIO OUT port of EVC w...

Страница 16: ...100 deg range tilt 25 deg range and zoom 16x Optics by using the and zoom buttons on remote controller Avoid physically turn camera while system is powered on to prevent permanent damaging the motors...

Страница 17: ...14 Positioning the MIC The best distance for EVC MIC to receive audio signal is within 3m The EVC MIC can connect up to 4 in one chain Single Microphone Two Microphones...

Страница 18: ...ist make confirm the selection Move the cursor up or down Move the cursor to right or on Next button Move the cursor to left or on Back button Start Please follow the below description to complete the...

Страница 19: ...umber button to select the character that user wants to enter 2 The site name is character only Network Setting Select the network environment that user has used Use or button to move to the selection...

Страница 20: ...step click Next and click Back to go back to Network Setting page 1 Your IP Address is Enter your IP address manually 2 Subnet Mask Enter the subnet mask address when the system does not automaticall...

Страница 21: ...ds to enter the IP address and prefix length in following 2 Your IP Address is Enter your IP address manually 3 Prefix Length Prefix Length allows you to place as many IPv6 devices as the underlying n...

Страница 22: ...ferred DNS server is the one your computer asks first The alternate is a backup Enter the Preferred and Alternated DNS Server address 5 Alternate DNS Server Enter another Domain Name server for second...

Страница 23: ...l type from the drop down list for using There are two types of Internet Protocol IP traffic They are Transmission Control Protocol TCP and User Datagram Protocol UDP To ensure proper connection verif...

Страница 24: ...to go next step 1 Terminal Name Enter the terminal server name 2 Terminal Password Enter the password of terminal server 3 Registrar Server Registrar Server accepts registrations from users and place...

Страница 25: ...ne clocks on the same time Enter the NTP Server name that you want to follow 2 Time Zone Timezone allows you to adjust the time when you are in a different country or area so that you can keep the sam...

Страница 26: ...to the system Cancel Cancel the changed value and exit the present screen Home Screen There are 2 selections divided on the Home screen Call and Setting Simply use the navigation buttons to move betw...

Страница 27: ...displayed and screen is blue When is displayed on that screen it means far site remote can be operated by remote controller is displayed indicating microphone is mute Try pressing the mute button on m...

Страница 28: ...n to switch to system information page The System Info shows you the relative information about your EVC main system including Site Name Model name IP Address MAC Address and System Version Also you c...

Страница 29: ...peration press numeric key multiple times to select the alphabet or symbol Note Press button and hold can switch between numeric mode 123 and alphanumeric mode ABC 123 Call Type AVer EVC supports H 32...

Страница 30: ...list default or 64K up to 4M bit per second Select the Call on the Dial configuration screen then press to make a call Make sure the network jack is plugged in and network is working properly before m...

Страница 31: ...you want to disconnect and press To end the meeting select Disconnect All 3 You will notice the site names in the meeting are color coded If you are not sure of which name you want to disconnect refer...

Страница 32: ...up and contact site name in the directory will be sorted in alphabetical order You may use the WebTool to edit or import the phonebook entries too Group Select Phonebook and press Select Group and pre...

Страница 33: ...on the remote controller to pop up the Input Group Name dialogue box Enter the group name that you want to create Select Save to save the new group Or select Cancel to exit the Input Group Name dialo...

Страница 34: ...me you enter has not been created the system will show you No Group Available please search again If the Group data are over one page you can also press Green button or Blue button to Page Up or Page...

Страница 35: ...group name will be saved and displayed in the group list If the revised name is the same as the saved name the revised name will be ignored Add Contact from Group List Select Phonebook Group and press...

Страница 36: ...the Group Site list select the item that you want to add to the contracts list and then press Red button on the remote controller to save the selection Select Save to save the Group name and added si...

Страница 37: ...roup name and Cancel to cancel group name deletion The selected group name will disappear in the group list when deleted New Site Contact in Phonebook New Site allows you to create and edit the inform...

Страница 38: ...Enter the site name with the remote controller and press Enter the used call type information either H 323 or SIP Select the desired call quality value in the drop down list Select Save to store the n...

Страница 39: ...ify and press Select Edit Site and press In the Edit Site screen you many change the Group name Site Name H 323 SIP and Call Quality After making the changes select Save to apply the new changes or Ca...

Страница 40: ...ts List and press Select the contact you want to delete and press Select Delete Site and press Select Yes to remove the selected contact and No to cancel contact deletion The selected contact will dis...

Страница 41: ...ote controller to search the contact that you want If the Group Site over one page you can also press Green button or Blue button to Page Up or Page Down Favorite AVer EVC allows you save up to 10 mos...

Страница 42: ...screen Call History The Call History allows you to check the incoming outgoing calls made and their status You can also make a call by selecting it in the Call History list Call Status Select Call His...

Страница 43: ...a Contact from the Call History You can also save the call in out information into your contacts list Select Call History and press Use the and buttons to move the selection and scroll up and down in...

Страница 44: ...General Setting Call Settings and press Select Auto Answer and press In the Auto Answer drop down list select OFF to turn off Auto Answer ON to answer the call automatically and First Call Only to aut...

Страница 45: ...General Setting Call Settings and press Select the Enable AES check box to active this function This function may be restricted and unavailable in some countries Enable Disable QoS Quality of Service...

Страница 46: ...multiple connections must over 3 points 2 When voice activate function is disabled the screen is displayed the video of first connected call 3 In Figure 1 the layout 2 3 and 4 are displayed the talkin...

Страница 47: ...ess EVC main system supports up to 21 languages for your selection Select the language from the drop down list directly and the language for the system will turn into the selected language automatical...

Страница 48: ...this function is enabled Administrator Change Admin Password Select General Setting Administrator and press Here allows you to change Admin Password Note The password is for WebTool loggin only Save...

Страница 49: ...team Firmware Update Notice Select this function check box to enable firmware updated notice function By default this function is enabled Far End Camera Control Select the Far End Camera Control check...

Страница 50: ...3 16 9 that you want from the drop down list and press If you want the system to detect the right setting automatically please select Auto Select the Screen Saver time OFF 10 Minutes 20Minutes 30Minut...

Страница 51: ...the Date and Time formats adjust the time setting and change the time zones around the world and countries Date Format Select General Setting Date and Time and press Select the Date Format yyyy mm dd...

Страница 52: ...NTP allows administrators to synchronize all network computers to a main server This keeps all network machine clocks on the same time Enter the NTP Server name that you want to follow Timezone Timezo...

Страница 53: ...50 Year and Hour Enter the date and time including year month day hour and minute that you want to show on the present system Select Apply to active your settings...

Страница 54: ...ng Reset LAN configuration video audio codec selection call settings and so on will be reset Click Yes to reset your system to factory default values Clear Phonebook All the phonebook entries saved in...

Страница 55: ...o automatic white balance It makes white objects bright white and alter all the other colors to match Cloudy You can use the Cloudy white balance setting instead of auto on a cloudy day This allows th...

Страница 56: ...when it is been captured by your camera Select the exposure level you prefer from 1 to 9 or auto Frequency Select the correct frequency setting Auto 50Hz 60Hz OFF form the Frequency drop down list Sha...

Страница 57: ...Level up to 9 for proper MIC volume to improve audio reception on the microphone s MIC Gain Level Select Video Audio Microphone and press Adjust the MIC Gain Level form the drop down list MIC Input So...

Страница 58: ...Audio Codecs in Video Codecs and Audio Codecs configuration screens Select Video Audio Video Codecs for Video Codecs configuration or Video Audio Audio Codecs for Audio Codecs configuration and press...

Страница 59: ...dely deployed internet protocol used to connect devices to the internet IPv4 uses a 32 bit address scheme written in decimal as four numbers separated by periods Each number can be zero to 255 For exa...

Страница 60: ...t Mask Show the designated IP address routing prefix enter the subnet mask address when the system does not automatically obtain the subnet mask Default Gateway A gateway is a network point that acts...

Страница 61: ...ettings LAN Configuration IPv6 IPv6 is an evolutionary upgrade to the Internet Protocol IPv6 will coexist with the older IPv4 for some time IPv6 addresses are 128 bit IP address written in hexadecimal...

Страница 62: ...he public IP address is available Auto Obtain the dynamic IP address automatically Your IP Address is Show the current IP address enter into when you need to configure your IP address manually Prefix...

Страница 63: ...nd press Configure the following relative items to setup the Firewall TCP UDP Ports By default the system communicates through TCP UDP ports in the range from 30000 to 30299 You can specify the range...

Страница 64: ...he LAN NAT Public WAN Address The NAT public address must be entered when you enable the feature on NAT configuration SIP Session Initiation Protocol SIP allows you around the world to communicate usi...

Страница 65: ...from the drop down list for using There are two types of Internet Protocol IP traffic They are Transmission Control Protocol TCP and User Datagram Protocol UDP To ensure proper connection verify if b...

Страница 66: ...rk system By default the SIP port is set to 5060 Enable SIP Select Enable SIP check box and press to activate deactivated using SIP BFCP Enable presentation sharing function in SIP It allows you to sh...

Страница 67: ...zed set of methods and a network protocol to allow an end host to discover its public IP address if it is located behind a NAT Enter IP address of SIP NAT traversal server STUN Port Enter port number...

Страница 68: ...e session 1 Select Network SIP Configuration and press 2 Configure the following relative items to setup the Server Operating Mode Select Operating Mode and press to select the mode from drop down lis...

Страница 69: ...iguration Then enter the following information to register to SIP server User Name Select User Name and press to enter user name Authorization Name Select Authorization Name and press to enter authori...

Страница 70: ...t to use Proxy Server Proxy Server is computing device typically a server that interfaces between data processing devices and others within a communications network These devices may be located on the...

Страница 71: ...authorize SIP client Anonymous No password required for any SIP client Password Password is required for SIP client to connect SIP server Set the password in Password column Password When authenticat...

Страница 72: ...ng services from E 164 IDs to IP addresses in an H 323 network Select Network Gatekeeper and press Configure the following relative items to setup the Gatekeeper H 323 Name Specify the name that gatek...

Страница 73: ...ekeeper to identify your system further Gatekeeper IP Address Enter the IP address for the gatekeeper server Connect to Gatekeeper Select this check box to Activate deactivate gatekeeper Make sure to...

Страница 74: ...eo content and data FECC TCP and UDP 80 HTTP Interface WebTool TCP 23 Telnet TCP 5060 SIP TCP and UDP Make sure your gatekeeper supports H 460 Firewall Traversal before enabling it Test This feature t...

Страница 75: ...history update the system and restore your previous settings For web configurations your AVer EVC system default IP address is 192 168 0 1 Please change your EVC s IP address at the start Using the We...

Страница 76: ...out on screen remote controller You can use mouse to click the on screen remote controller to operate functions on WebTool In the WebTool page you can access the following Phonebook Dial Call History...

Страница 77: ...AVer EVC Application One different is the Upload Download Edit and Save 1 Locate and open the file using MS Excel and select Office XML Handler to create a schema based on the XML source data 2 Edit t...

Страница 78: ...tem Upload Phonebook Entries Upload allows you to upload the data that you have edited or added from your WebTool to your AVer EVC system 1 Click Phonebook Upload Download 2 Click Upload Phonebook to...

Страница 79: ...EVC WebTool 1 Click General Setting System Update 2 Click System Update 3 Click Select to browse and locate the downloaded firmware file dat 4 Click Submit to begin the system update or Cancel to sto...

Страница 80: ...public IP address it will change after a certain period which depends on your local ISP There is a routing issue if you installed two AVer EVC systems sharing one public IP address Unable to connect t...

Страница 81: ...default IP address is 192 168 0 1 in order not to conflict with other devices in the same LAN please change your IP address at the start Cannot open WebTool by IE9 and IE10 1 Click General Setting ico...

Страница 82: ...79 4 Disable intranet sites in Compatibility View Go to Tools Compatibility view settings...

Страница 83: ...80 5 Unclick the checkbox Display intranet sites in Compatibility View and then click Close...

Страница 84: ...able to control the far end camera Make sure the Cam Ctrl icon is positioned on the screen you want to control Press Far Near button on the remote controller to switch to the desired screen Make sure...

Страница 85: ...EVC system is connecting directly to the internet 1 From the remote press Home Setting 2 Press Network 3 Press LAN Configuration 4 And In the drop down list Obtain IP address choose Static IP or PPPoE...

Страница 86: ...nfiguration Behind Firewall with Port Forwarding Please make sure you have set the following ports in port forwarding in your firewall Port Function Type 1719 Gatekeeper UDP 1720 H 323 Call setup TCP...

Страница 87: ...s from the DHCP server 5 Select Apply and press Enter 6 Press Back on the remote to return to previous menu If you have H 323 ALG enabled skip to step 10 7 In the same page go to Firewall and press En...

Страница 88: ...Gatekeeper outside the firewall 1 From the remote press Home Setting 2 Press Network 3 Press LAN Configuration IPv4 4 And In the drop down list Obtain IP address choose Static IP 5 Manually input the...

Страница 89: ...e batteries in any cool dry place 2 Do not dispose used batteries in domestic waste Dispose batteries at special collection points or return to stores if applies 3 Remove the batteries if they are not...

Страница 90: ...failure to follow instructions included with the Product b misapplication of service by someone other than the manufacturer s representative c any shipment damages such claims must be made with the ca...

Страница 91: ...y or the use or performance of any product whether based on contract or tort including negligence or any other legal theory even if AVer has advised of the possibility of such damages AVer s total agg...

Страница 92: ...n the equipment and receiver Connect the equipment into an outlet on a circuit different from that to which the receiver is connected Consult the dealer or an experienced radio television technician f...

Страница 93: ...ly checked for reliability however no responsibility is assumed for inaccuracies The information contained in this documentation is subject to change without notice In no event will AVer be liable for...

Отзывы: