SVS; Reviewed:
SPOC 6/18/2008
Solution & Interoperability Test Lab Application Notes
©2008 Avaya Inc. All Rights Reserved.
6 of 39
AES41-Taske
1.
Add an entry with the following values for fields on Page 1, as displayed in
Figure 5
below:
•
Service Type:
“AESVCS”
•
Enabled:
“y”
•
Local Node:
Node name for the Clan-1 assigned in
Figure 2
.
•
Local Port
Retain the default of “8765”.
change ip-services Page 1 of 3
IP SERVICES
Service Enabled Local Local Remote Remote
Type Node Port Node Port
CDR1 Clan-1 0 TestSite 9002
CDR2 Clan-1 0 CDR-2nd 9004
AESVCS y Clan-1 8765
Figure 5: IP Services Page 1
2.
Go to Page 4 of the IP Services form, and enter the following values as displayed in
Figure 6
:
•
AE Services Server:
Name obtained from the Avaya AES server, in this case
“AES-Test”.
•
Password:
Same password to be administered on the Avaya AES server.
•
Enabled:
“y”
Note that the name and password entered for the
AE Services
Server
and
Password
fields must match the name and password on the Avaya AES server. The administered
name for the Avaya AES server is created as part of the Avaya AES installation, and can
be obtained from the Avaya AES server by typing “uname –n” at the Linux command
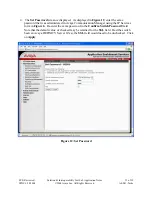
prompt. The same password entered in
Figure 6
below will need to be set on the Avaya
AES server using
Administration
Æ
Switch Connections
Æ
Edit Connection
Æ
Set
Password
as displayed in
Figure 12
.
change ip-services Page 3 of 3
AE Services Administration
Server ID AE Services Password Enabled Status
Server
1:
AES-Test *** y
2:
Figure 6: IP Services Page 3
3.3. Administer CTI Link with TSAPI Service
Add a CTI link and set the values as displayed in
Figure 7
below using the “add cti-link n”
command, where “n” is an available CTI link number.
1.
Enter an available extension number in the
Extension
field. Note that the CTI link
number and extension number may vary. Enter “
ADJ-IP
” in the
Type
field, and a


