


BS; Reviewed:
SPOC 2/14/2005
Solution & Interoperability Test Lab Application Notes
©2005 Avaya Inc. All Rights Reserved.
8 of 22
RAD-IP-Mux.doc
Step
Description
3. TDM
Configuration
Configure the following TDM parameters for a T1 or E1.
a. Admin
Status:
Admin Status
–
set it to
Enable
. This enables the T1/E1 link.
b. Transmit clock source –
a.
For the IPmux-14 at the r
emote site
, set the clock source to
External.
Make sure
the External clock port on the IPmux-14 at the remote site is connected to a public
T1 (or public E1). See Section 4.2 for more details on clocking (Synchronization).
b.
For the IPmux-14 at the
main site
, set the clock source to
Adaptive
.
c. Line type – Unframed G.703
(for E1) or
Unframed
(for T1).
d. Line code – b8zs
for T1. This field is not displayed for E1 and is internally set to
hdb3
.
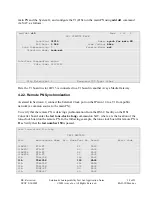
The following example shows a T1 configuration for an IPmux-14 at
main
site.
Note:
The Transmit clock source is set to
Adaptive
The T1 configuration at the remote site is the same as above, except that the Transmit clock
source is set to
External
.