HTTP Configuration for Backup/Restore
Issue 1 June 2007
51
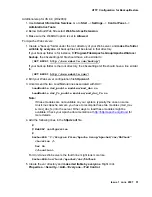
Additional step for IIS 6.0 (Win2003):
1. Use
Internet Information Services
. Go to
Start
-->
Settings
-->
Control Panel
-->
Administrative Tools
.
2. Below Default Web Site select
Web Services Extension
.
3. Make sure the WebDAV option is set to
Allowed
.
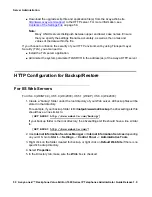
For Apache Web servers:
1. Create a “backup” folder under the root directory of your Web server, and
make the folder
writable by everyone
. All backup files will be stored in that directory.
If your backup folder is for instance
C:/Program Files/Apache Group/Apache2/htdocs/
backup
, the 46xxsettings.txt file should have a line similar to:
[SET BRURI http://www.website.com/backup/]
If your backup folder is the root directory, the 46xxsettings.txt file should have a line similar
to:
[SET BRURI http://www.website.com/]
2. Edit your Web server configuration file
httpd.conf
.
3. Uncomment the two LoadModule lines associated with DAV:
LoadModule dav_module modules/mod_dav.so
LoadModule dav_fs_module modules/mod_dav_fs.so
Note:
Note:
If these modules are not available on your system, typically the case on some
Unix/Linux Apache servers, you have to recompile these two modules (mod_dav
& mod_dav_fs) into the server. Other ways to load these modules might be
available. Check your Apache documentation at
http://httpd.apache.org/docs/
for
more details.
4. Add the following lines in the
httpd.conf
file:
#
# WebDAV configuration
#
DavLockDB "C:/Program Files/Apache Group/Apache2/var/DAVLock"
<Location />
Dav On
</Location>
For Unix/Linux Web servers the fourth line might look more like:
DavLockDB/usr/local/apache2/var/DAVLock
5. Create the var directory and
make it writable by everyone
. Right click
Properties
-->
Security
-->
Add
-->
Everyone
-->
Full Control
.

