background image

Mailing Lists 

Intuity Emulation Mode Mailbox Users Guide 

Page 29 

IP Office 3.0 

40DHB0002USCW Issue 8d (2nd March 2005) 

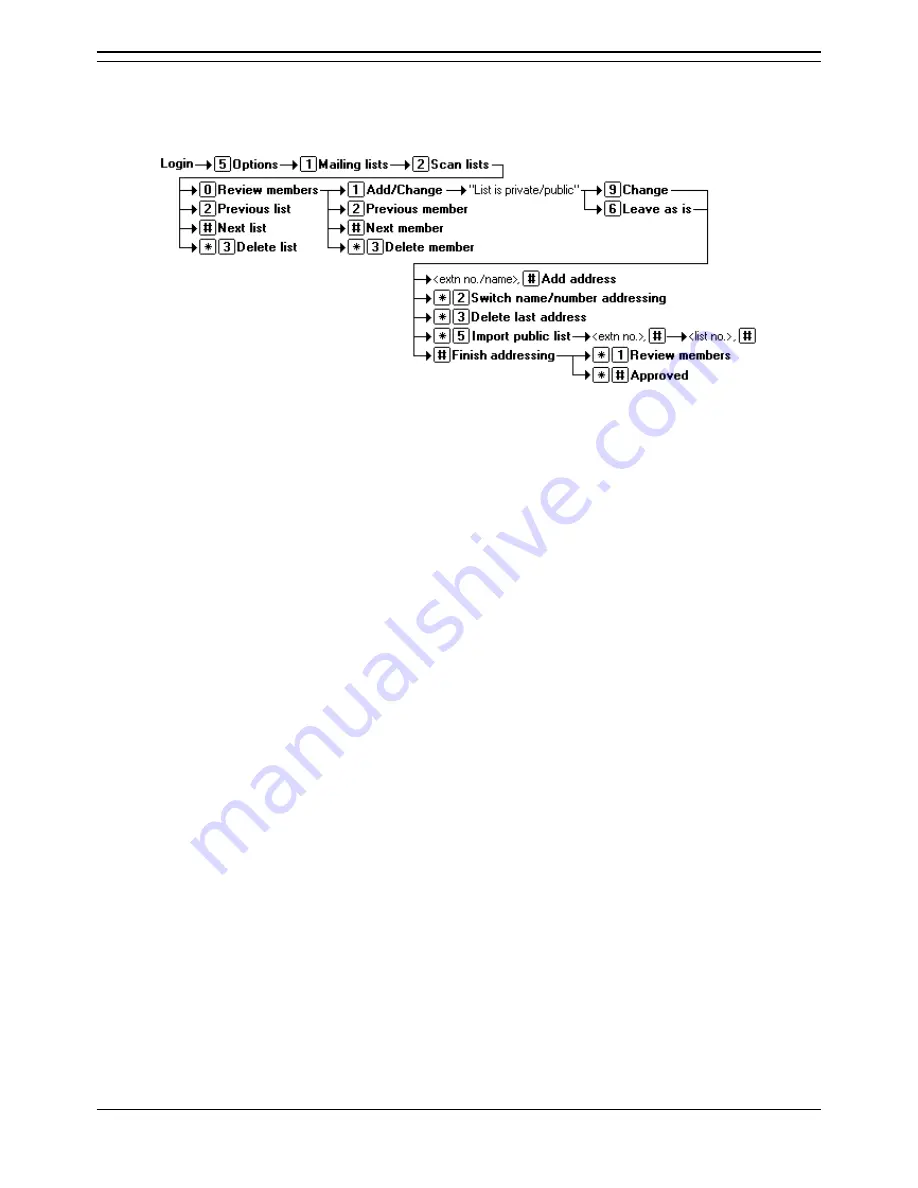
Scanning Your Mailing Lists 

Scanning will tell you what mailing lists you mailbox has and how many members (mailbox numbers) 
each contains. During the scan you can delete a list. You can also select to listen to a list of its members, 
at which stage you can also add or remove members. 


1.  Log into you mailbox.  

2. Press 

5

 to select personal options.  

3. Press 

2

 to select to scan your mailing lists. 

4.  The system will announce the number of your lowest numbered list, how many members it 

contains and whether it is private or public.  

5.  You can now use the following options:  

• 

To go to the next list, press 

#

• 

To go back to the previous list, press 

2

• 

To delete the list, press 

*3

• 

To review, and if necessary change, the list status and members, press 

0

.  

6.  If you press 

0

 to review the list, the system will start announcing the members names (if 

available) or numbers. You can use the following options:  

• 

To go to the next member, press 

#

• 

To go back to the previous member, press 

2

• 

To delete the member press 

*3

. If you delete all the member in a list the list is also 

deleted. 

• 

To add new members and change the list status, press 

1

• 

The system announces if the list is private or public. Press 

9

 to change its status 

or press 

6

 to leave it as is. You can then use the following options:  

• 

To add a new mailbox, enter the number and press 

#

• 

To adding a new mailbox by name matching, press 

*2

. Enter the name and 

then press 

#

• 

Repeat the above actions as necessary to add further member and then 
press 

#

 again. 

• 

To review the list again, including the new members press 

*1

• 

To approve and save the modified list press 

*#


Содержание IP Office 3.0

Страница 1: ...IP Office 3 0 Intuity Emulation Mode Mailbox Users Guide 40DHB0002USCW Issue 8d 2nd March 2005 ...

Страница 2: ......

Страница 3: ...ing the Message Sender 11 Replying to a Messages 12 Forwarding a Message 13 Recording Messages 14 Sending a New Message 15 Leaving a Message 16 Mailbox Options 17 Changing Your Password 17 Record Your Name 17 Setting a Fax Number 18 Address Before Record 18 Close Your Mailbox 19 Voicemail Ringback 19 Greetings 21 Administer Personal Greetings 21 Create a Personal Greeting 22 Call Types 23 Activate...

Страница 4: ......

Страница 5: ...re you may have alternate methods of access First Time Access The first time that you login to your mailbox you may be asked to set a mailbox password and to record your name Normal Login For subsequent logins you should only need to enter your mailbox number and password Avaya DS Phones Many Avaya phones have special keys or menus for accessing voicemail mailboxes Phone Manager Phone Manager is a...

Страница 6: ...ns Enter a new password and press Note that your password cannot be the same as your extension number or a set of repeated digit or consecutive numbers Re enter the new password and press 5 You will be asked to record your name You can record your name again at a later date through the mailbox personal options Press 1 At the tone speak your name and then press 1 again Your recording will be played...

Страница 7: ...n each 3 Click on any of the mailboxes to start voicemail access Continue as per a normal login Once they have logged into a mailbox users of Phone Manager Pro are able to control the playing of messages through the Phone Managers Voicemail tab Remote Access There may be occasions where you will want to access you own mailbox from a phone outside your companies phone system Normally to do this you...

Страница 8: ...tures does not imply that they are supported unless specifically detailed as such elsewhere Whilst collecting messages pressing 0 will transfer you to your mailbox s reception number if set by the System Administrator You can usually dial through a voice prompt to enter a command without waiting for the prompt to finish You can not dial through error messages or prompts that the system wants you t...

Страница 9: ...g the default IP Office short code 17 to start voicemail access This is the default method available to all extension users Depending on the type of phone you have or IP Office software you may have alternate methods of access First Time Access Details the information requested during the initial login to a new mailbox Normal Login Alternate Login Methods Summarizes logging in from various types o...

Страница 10: ...r messages 3 When messages are retrieved they are grouped in categories Priority messages are presented first then new messages and then old messages Once you have heard a new message it is marked as old 4 Each message starts with a header which contains details about who the message was from if known and when it was left 5 You can use the following control whilst listening to your messages Skip t...

Страница 11: ... scan mode required Scan headers and messages Press 1 Scan headers only Press 2 Scan messages only Press 3 5 Whilst your messages and or message header are playing you can use the following options Rewind current message Press 2 Pause Resume Press 3 Exit scan messages 7 6 After hearing all you messages you are returned to the activity menu Calling the Message Sender If the caller was another exten...

Страница 12: ...ther mailbox user To send a reply message 1 When listening to the message press 1 2 To select reply press 1 again 3 Select the type of reply To reply without the original message attached Press 6 To reply with the original message attached Press 9 4 After the tone start recording your reply and press when finished 5 Your reply will be sent and you are returned to message collection ...

Страница 13: ...ill prompt you for the forwarding addresses Whilst entering addresses you can press 2 to switch between entering an address by extension number or by matching a user name Enter a mailbox number or dial the required name and then press Repeat until you have enter all the mailboxes to which you want to forward the message To select and add a mailing list press 5 You will be asked to enter the mailbo...

Страница 14: ...ward the message Whilst entering addresses you can press 2 to switch between entering an address by extension number or by matching a user name Enter a mailbox number or dial the required name and then press Repeat until you have enter all the mailboxes to which you want to forward the message To select and add a mailing list press 5 You will be asked to enter the mailbox number of the mailing lis...

Страница 15: ...itch between entering an address by extension number or by matching a user name Enter a mailbox number or dial the required name and then press Repeat until you have enter all the mailboxes to which you want to forward the message To select and add a mailing list press 5 You will be asked to enter the mailbox number of the mailing list s owner and then the number of the list For more details see M...

Страница 16: ...lers can press rather than hanging up They will then hear the options for marking a message as private press 1 or priority press 2 followed by a request to press again The caller can then access a number of other options Access another mailbox Press 7 Transfer to another extension Press 8 Transfer via the name number directory Press 6 Transfer to cover extension Press 0 This will only happen if th...

Страница 17: ...llows passwords of up to 15 digits Note that your password cannot be the same as your extension number or a set of repeated digit or consecutive numbers 5 Re enter the new password and press Record Your Name Your name is played as a confirmation when you access the mailbox It is also used for other system announcements and for the system s directory search feature To record your name 1 Log into yo...

Страница 18: ...fax numbers cannot be set until a default system fax number is set by your system administrator 4 If you already have a personal fax print number set it is played to you To change or set a fax print number press 1 Press 5 to set a fax printing number Enter the extension number of your preferred fax destination and then press To delete your fax print number press 3 To return to the activity menu pr...

Страница 19: ...state is played 4 To change the current state press 1 To stop calls diverting to voicemail The IP Office also provides an additional voicemail on or off function accessed by dialing 18 or 19 from your own extension When off 19 callers are no longer diverted to voicemail when you are busy or do not answer Voicemail Ringback Ringback is an feature where the voicemail system will ring you if you have...

Страница 20: ......

Страница 21: ... can then select which greeting should be applied to various different types of calls all calls internal external busy no answer out of hours The process for using personal greetings can be summarized as 1 Create some personal greetings 2 Select the call types for which you may want different greetings used 3 Activate a greeting and the call types for which it should be used Accessing Personal Gre...

Страница 22: ... number 1 to 9 when requested 5 If the greeting already exists the system will announce if it is active in use and for what call types You can then select To listen to the greeting press 0 To record over the greeting press 1 and follow the steps below as for a new greeting To delete the greeting press 6 Start speaking at the tone and when finished press 1 Then To append further some further record...

Страница 23: ...To allow different greeting for internal and external calls press 1 To allow different greetings for busy and no answer calls press 2 To allow a different greeting for out of hours calls press 3 To return to using the same greeting for all calls press 5 When recording a greeting you can select to have it applied to all calls see Create a Personal Greeting 5 Press to end call type administration 6 ...

Страница 24: ...r mailbox 2 Press 3 to select personal greetings 3 Press 3 to activate a greeting 4 Enter the greeting number 1 to 9 when requested 5 The list of possible options will be played these depend on the selected call types To apply the greeting to all call types press 0 To apply the greeting to internal calls press 1 To apply the greeting to external calls press 2 To apply the greeting to out of hours ...

Страница 25: ...hrough your current personal greetings telling which are active and for what call types and allowing you to listen to the greeting if required 1 Login to your mailbox 2 Press 3 to select personal greetings 3 Press 2 to scan greetings 4 The first greetings status and usage is played To listen to the actual greeting press 0 To skip to the next greeting press ...

Страница 26: ...ting personal greetings 1 Login to your mailbox 2 Press 3 to select personal greetings 3 Press 2 to listen to a delete a greeting 4 Enter the greeting number 1 to 9 when requested 5 The greeting is played You can then select from the following actions To hear the greeting again press 0 To record over the greeting press 1 To hear the greeting status press 2 To delete the greeting press 3 To exit to...

Страница 27: ...s either private or public When addressing a message you can select one of your own lists or a another mailboxes public list Similarly when creating or modifying your own lists you can import the contents of one of another mailboxes public lists into your list Creating and modifying mailing lists 1 Log into you mailbox 2 Press 5 to select personal options 3 Press 1 to select mailing lists 4 The pr...

Страница 28: ...forwarding message However they cannot be modified by other users Private lists can only be used by yourself 7 You can now start adding other mailboxes to the mailing list 8 To add a mailbox enter the mailbox number and press For local mailboxes the mailbox users name will be played as confirmation 9 You can also select the following options whilst adding mailboxes To switch to selecting mailboxes...

Страница 29: ...ist press 2 To delete the list press 3 To review and if necessary change the list status and members press 0 6 If you press 0 to review the list the system will start announcing the members names if available or numbers You can use the following options To go to the next member press To go back to the previous member press 2 To delete the member press 3 If you delete all the member in a list the l...

Страница 30: ...by 6 The system will start announcing the members names if available or numbers You can use the following options To go to the next member press To go back to the previous member press 2 7 For your own mailing lists you can also use the following To delete the member press 3 If you delete all the member in a list the list is also deleted To add new members and change the list status press 1 The sy...

Страница 31: ...M Mailbox Lists Reviewing 30 Mailbox Lists 30 Mailing Lists 27 Mailing 27 Mailing List 28 Menu key 7 Message Sender Calling 11 Message Sender 11 Message waiting 7 Messages Forwarding 13 Recording 14 Replying 12 Messages 7 8 10 12 13 14 27 Msgs 7 N New Message Sending 15 New Message 10 15 Normal Login 6 O Outcalling 19 P Pause Resume 10 Pause Resume 11 PDD 30 Personal Greeting Create 22 Personal Gr...

Страница 32: ...a or others Intellectual property related to this product including trademarks and registered to Lucent Technologies have been transferred or licensed to Avaya All trademarks identified by the or are registered trademarks or trademarks respectively of Avaya Inc All other trademarks are the property of their respective owners This document contains proprietary information of Avaya and is not to be ...

Отзывы: