


AVAYA DEFINITY G3 / ProLogicx
Confidential
7
•
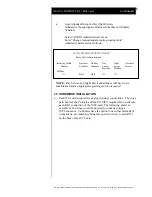
Message Waiting MWI Device Assignment
Select “Switch Interface Administration” menu
Select “Call Data Interface Administration” menu
Select “MWI Administration” menu
Select “Device Assignment” option
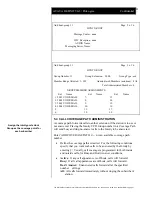
Administer parameters as follows:
If the group of channels for MWI updates is 3, the screen will
look like figure 1.
Link Test [Y/N]:
Link Test Interval:
Switch Number
Device ID
Link Test Number
1
3
Figure 1
•
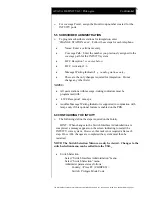
System Translation Administration
Select “Switch Interface Administration” menu
Select “Call Data Interface Administration” menu
Select “System Translation Administration” menu
Select “Dial Plan Translation” option
Administer
the
following:
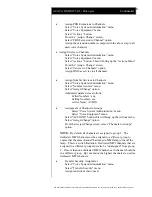
INTUITY Extension Length: <Switch Subscriber extension
length>
Administer extension ranges in the table as follows:
•
1) Leave “Switch Prefix” field blank
2) Enter the valid extension ranges in “Switch Start Ext.” and
“Switch End Ext.” fields
3) Leave “INTUITY Prefix” field blank
4) Enter the Switch number in the entry. This is the same
number used in the AUDIX subscriber database
5) Enter”N” in the remote [Y/N] field
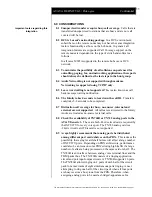
The following example shows how this form should be filled, if
the extension length is 3 digits on the INTUITY and the valid
extension
ranges on the switch begin 1111 through 1222 and
2555 through 2999, while INTUITY subscribers ranges are 111
through 222, 555 to 999.
INTUITY Extension Length: 3
Switch Network Access Code:
Switch
Switch
Switch
INTUITY
Switch
Remote
Prefix
1
2
Start Ext.
End Ext.
Prefix
Number[Y/N]
111
222
1
N
555
999
1
N
The information contained in this document is provided by AVAYA Inc. to serve as a guide. See the disclaimer on page 1