


9
OPERATING YOUR ICE MAKER
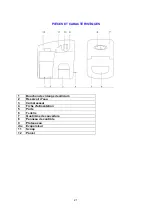
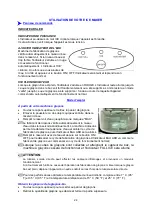
Control Panel Description
LED INDICATORS
POWER INDICATOR
The indicator above the word ICE will flash when the unit is plugged in.
It will be lit green when the unit is turned on.
ADD WATER INDICATOR
The ice maker automatically checks the
water level in the tank. If the water level
is too low, the indicator will illuminate in
RED and will stop working automatically.
The ‘ICE’ indicator will flash. Once you
add water to the unit and push the
ON/OFF button the indicator will turn off
and will resume normal operation.
ICE FULL INDICATOR
When the ice-bin is full, the indicator will illuminate in RED. The indicator will remain lit until the
ice in the bin either melts away slowly or has been removed. The unit will stay in a “Standby”
mode until the ice has been removed / melted at which time the unit will automatically start
operation as normal.
Operating Instructions
Starting your Ice maker
•
Open the top cover and remove the ice basket.
•
Remove any dust or objects that may be in the water tank
•
Fill the water tank up to the area marked “MAX”.
•
The ice-maker will automatically check the water level in the
reservoir periodically. The ice maker will detect any shortage
of water and will stop the ice-making cycle, and then the ADD
WATER indicator will be lit.
•
Fill the reservoir with water and press the ON/OFF button to
restart the ice-making cycle and the ADD WATER indicator
goes out as the ice-maker will begin its normal operation cycle automatically.
•
When the ice cubes are collected and reach the bin sensor, the ice maker will
stop operating and the ICE FULL indicator will be lit.
•
WARNING:
Direct sunlight may affect the infrared sensors and cause the unit to malfunction.
If at any time the unit does not stop the ice-making operation even when the ice-bin is full, move
the unit to another location where it is out of direct sunlight.
•
For best performance, water temperature should be between 7°C (45ºF) and 35°C (95ºF)
and ambient between 15°C (59ºF) and 25°C (77ºF).
Getting Ice from the Ice-bin
•
Open the top cover to access the ice basket.
•
Remove the amount of ice as desired and close the top.
Содержание IM12C-IS
Страница 28: ...28...
Страница 29: ...29...
Страница 30: ...30...
Страница 32: ...32 Ver IM12C IS 1 0 04302015 PRINTED IN CHINA...


