background image

Page 

13

 of 

45


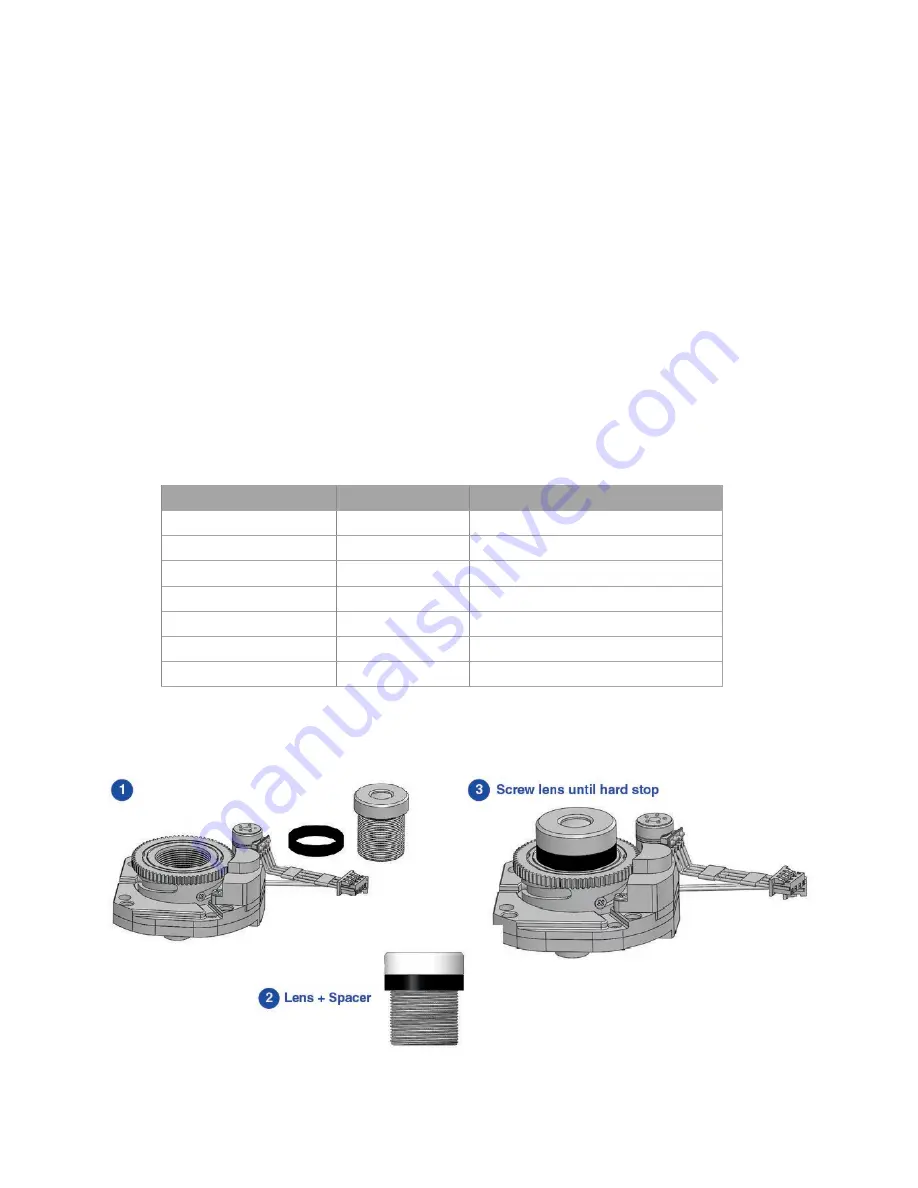
Lens Replacement 

1.


Use the supplied security L-key, to loosen the four (4) screws which secure the cover. (See Pic. 1). 
Remove the cover. 

2.


Manually turn the lens counterclockwise, this may take several turns. 

3.


Screw the replacement lens clockwise until you feel some resistance and hit a hard stop. 

4.


Repeat for another camera module if necessary. 


Lens Options 

NOTE: Spacers are required for some lens options.  See table below. 


Lens Part Number 

Description 

Numbers of Spacers Needed 

MPM2.4 

2.4mm 

MPM2.8C 

2.8mm 

MPM4.0A 

4mm 

MPM6.0 

6mm 

MPM8.0 

8mm 

MPM12.0A 

12mm 

MPM16.0 

16mm 

Содержание AV10856DN-28

Страница 1: ...1 818 937 0700 www avcostar com avsales arecontvision com ConteraIP MicroDome Duo LX Installation Manual 4MP 10MP 16MP AV4856DN 28 AV4856DN NL AV10856DN 28 AV10856DN NL AV16856DN 28 AV16856DN NL...

Страница 2: ...stallation 7 Cap Installation 8 Flush Mount Installation 10 Pan and Tilt Adjustment 12 Lens Replacement 13 Lens Options 13 Camera Power Up 14 Reset to Factory Default 17 Audio SD Card Info 18 Camera D...

Страница 3: ...testing or connection or unauthorized repair or iv is no longer covered under the Warranty Period AV COSTAR MAKE NO WARRANTIES OR CONDITIONS EXPRESS IMPLIED STATUTORY OR OTHERWISE OTHER THAN THE EXPR...

Страница 4: ...r capturing details in extremely poor lit scenes Power can be supplied via a single PoE IEEE 802 3af compliant network cable or via an 12 48V DC 24V AC power supply The installer friendly ConteraIP Mi...

Страница 5: ...Page 4 of 45 Package Contents AV4856DN AV10856DN AV16856DN Description QTY AV4856DN AV10856DN AV16856DN IP camera 1 Mounting Template 1 Mounting Plate 1 Accessory Pack 1...

Страница 6: ...he cover Do not remove screws from the dome cover 4 Use Phillips screwdriver to loosen the four 4 screws securing the camera to adapter plate some parts removed for clarity 5 Separate Camera from Adap...

Страница 7: ...Page 6 of 45 8 Re attach camera to adapter plate Reverse step 4 and 5 9 Re attach cover to camera Reverse step 2 and 3...

Страница 8: ...s for four mounting holes in Drop Ceiling Panel 3 Using enclosed 6 32 screws attach enclosed Drop Ceiling Mount Plate Adapter and Adapter Plate onto opposite sides of Drop Ceiling Panel so the panel i...

Страница 9: ...a Ethernet cable Cap Installation 1 Repeat step 1 5 of Surface Installation 2 Insert Adapter Plate into the Cap and attach it to the cap using the 4 screws through 4 A holes using enclosed 6 32 screws...

Страница 10: ...Page 9 of 45 PIC 7 5 Assembly Pic 7 can be used with wall mount or ceiling mount PIC 8...

Страница 11: ...eate mounting provisions for the Flush Mount Ceiling Panel PIC 10 2 Use the supplied security L key to loosen the four 4 screws which secure the cover on camera See Pic 1 Remove the cover 3 Install Fl...

Страница 12: ...Page 11 of 45 PIC 11 4 Plug PoE cable not shown for clarity 5 Hold all four latches as shown on PIC 12 6 Insert camera into cutout prepared in step 1 PIC 12 PIC 13 PIC 14...

Страница 13: ...amera module to obtain the desired field of view Do not to press the remote focus motor against the sides of camera module when adjusting the field of view refer to the image below 4 Lock the camera h...

Страница 14: ...y take several turns 3 Screw the replacement lens clockwise until you feel some resistance and hit a hard stop 4 Repeat for another camera module if necessary Lens Options NOTE Spacers are required fo...

Страница 15: ...net cable 2 If the camera is powered by an external power supply 12 48V DC or 24V AC must be supplied 3 Connect the PoE switch to your computer s network port by using an ethernet cable LED Status Des...

Страница 16: ...a insert the wire not supplied into grommet 3 If intend to use I O cable insert the supplied cable into grommet 4 Insert Ethernet cable with tool on it into the grommet as shown Make sure the grommet...

Страница 17: ...onnector to the alarm input sensor and then connect the Alarm Out DO connector to the alarm output signal To avoid any damage please follow the specification of the part as below Alarm In Wet Contact...

Страница 18: ...factory default except for the network settings 2 Press and hold the reset button for more than 5 seconds then release the reset button This resets the camera to the factory default and this resets th...

Страница 19: ...Page 18 of 45 Audio SD Card Info SD Card Slot Audio Connector...

Страница 20: ...amera settings import and export camera settings via a csv file and update firmware and or hardware from virtually anywhere with a network connection The AV Costar Utility tool is efficient and conven...

Страница 21: ...ry Multicast 3 You can access the camera s web interface by typing the camera IP address on the preferred web browser 4 If there is no DHCP server present in the network the camera will default to the...

Страница 22: ...Dynamic Range Mode o Day Night Mode o Lighting Compensation Frequency OSD On Screen Display o General Setting o Text Overlay ROI Regions of Interest Video Audio Codec o Channel o Main Stream Configur...

Страница 23: ...re SD Card FTP Upload SMTP Simple Mail Transfer Protocol Notification Network Storage System Maintenance o Camera Information o Camera Name o Firmware Upgrade o Download Log o Reboot the Camera o Rest...

Страница 24: ...allows you to rotate images up side down 180 degrees with reorienting the channel order 2 You will be able to see the Channel number when you move the mouse over the image of the channel 3 You will be...

Страница 25: ...owsers are Internet Explorer and Firefox Manual Focus 20 5 1 20 5 1 Number indicates the level of focusing in order to adjust the field of view Full range Focus Full range Focus button The camera begi...

Страница 26: ...ma level affects the overall luminance of the image Hue Configures the overall hue of the image with a range of 0 100 Increasing the value will adjust the image hue towards red Decreasing the value wi...

Страница 27: ...tting of exposure time between 1 and 500ms Shorter exposure times reduces motion blur for applications such as monitoring fast moving objects and reading license plates The trade off is an increased l...

Страница 28: ...user selects Custom Day Night Mode Automatic Day Night Schedule Day Mode Automatic Enables the camera to automatically switch from day mode to night mode User can define the switching level from Day t...

Страница 29: ...ile using lower image quality for other non ROI zones in order to save bandwidth and storage To setup the ROI 1 Select the desired channel 2 Select Main Stream or Sub Stream 3 Enable zones up to five...

Страница 30: ...crease when no moving objects are detected Smart ROI will increase the bitrate of moving objects and make them clearer Variable Bitrate Maintains the Quality settings configured There may be variation...

Страница 31: ...ty Low Mid High Adjusts the compression level for JPEG images Video Compression MPJEG The third stream is designed for the live view on web interface and the only option of Video Compression is MPJEG...

Страница 32: ...ferent network Port HTTP Second HTTP Port HTTPs HTTP The port default is 80 It is used to access the camera via the web browser Second HTTP Port Sets an alternative HTTP port This port can be useful w...

Страница 33: ...e pathname for each stream Link for external media players Copies the link from here for external media players Enable RTSP Multicast Stream Enables RTSP Multicast stream for stream 1 Main stream stre...

Страница 34: ...nity to access to SNMP information Trap Configuration Address Community String Specifies the destination IP address to send SNMP trap messages SNMP v3 Enables SNMP version 3 support SNMP User Specifie...

Страница 35: ...ed You can access files in the SD card via FTP Password Confirm Specifies and confirms the password to access the FTP Max Connection Specifies the maximum number of FTP connections to the IP camera Pr...

Страница 36: ...le Privacy Mask Creates a privacy mask on the image so the selected areas will not be visible Select Channel Select the desired channel to add privacy masks Drag mouse to Mask Unmask Select Mask to ad...

Страница 37: ...e size of objects in the image moving through the zone Higher values will trigger motion only for larger objects moving through the zone and lower values will cause detection of smaller objects in the...

Страница 38: ...er Tamper Detection When a tamper event is detected the Alarm out will be triggered Trigger Network Failure When a network failure event is detected the Alarm out will be triggered Type Selects the ty...

Страница 39: ...rage Displays the available storage of the SD card if it is installed Format SD Card Erases all the data stored on the SD Card Usage Displays the total storage that has been used now Status Displays t...

Страница 40: ...Authentication Host Address Specifies the host name or IP address of the SMTP server Port Specifies the port number of the SMTP server Username Specifies the login username of the SMTP server Passwor...

Страница 41: ...es the desired action when an event is triggered The options are Snapshot and Video Login Certificate Specifies the login Username and Password for the network storage sever Mount Network Storage Remo...

Страница 42: ...ettings Except Network Settings Restore to Factory Default Settings Reboot the Camera Reboots the camera Restore Factory Default Settings Except Network Settings Restores all settings to factory defau...

Страница 43: ...ck Apply NTP Server Configuration NOTE Please make sure to set up appropriate gateway before configuring the NTP server Computer System Synchronizes the date time information with current computer s d...

Страница 44: ...erased by AV Costar Utility using the key file Please contact AV Costar technical support to obtain the key file required to perform this function Or if the camera has a reset button you can also rese...

Страница 45: ...Page 44 of 45 Support Menu Feature Description Support Provides several hyperlinks to get more information on the camera...

Страница 46: ...135 00 5 31 220 00 8 66 CABLE POSITION REFERENCE Paper Size Letter...

Страница 47: ...t written permission from AV Costar The information in this publication is believed to be accurate in all respects However AV Costar cannot assume responsibility for any consequences resulting from th...

Отзывы: