


15
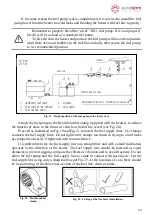
If the desired mounting situation requires the exhaust
silencer to be mounted vertically, the condensation drain
hole must be drilled, as shown in Fig. 14b, to avoid the
build-up of condensation in the exhaust silencer. If that is
not possible, it is recommended to install it sideways (see
Fig.14a).
The outlet of the exhaust pipe must be installed
pointing downwards (Fig. 8)
, and in such a position that
would prevent the clogging or invasion of snow and dirt,
and also provide a free drain for any water that gets into
it.
When installing on a maritime vessel, the silencer
must be mounted using the bolt and nut provided, so it
will be in a fixed position.
Make longitudinal cuts (about 15mm) (see Fig. 11,
Fig. 13, Fig.15) on the ends of the metal hose to ensure
better sealing when connecting the heater pipe to the pipe
for discharge of exhaust gases through the board of the
vessel, but without going beyond the pipe to be covered.
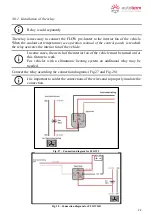
A rubber bushing (sold seperatly) must be used if
exhaust pipe goes through plastic parts. For example, the
bumper of a vehicle (see Fig. 15).
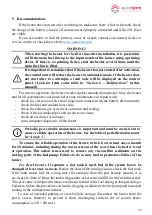
The exhaust pipe needs additional insulation at every connection of the
metal hose. For example, use a heat-resistant tape or sealant to prevent any
leaks of exhaust gases at connection points.
Additional heat insulation must be installed at all places where the exhaust
pipe goes through the floor or the sidewall of the vehicle (Fig.16) to avoid an
unnecessary fire hazard.
Fig. 15 - Attachment of the exhaust pipe to the heater and usage of rubber bushing
Fig. 14a – Condensate drain hole for
horizontal mounting
5mm drill bit
Silencer
Condensate
drain hole
Silencer
Condensate
drain hole
5mm
drill bit
Fig. 14b – Condensate drain hole for
vertical mounting
Exhaust pipe
Bolt and nut for
fixation
Clamp
Clamp
Cut
Silencer
Exhaust pipe
Cut
Cut
Rubber bushing
Insulation
Plastic partition