background image


25


 TIMER CHECKING TYPE:


Enter Start Feature ‘D’


Programming Mode: 

1. Turn the Ignition ‘switch ‘ON/OFF’ 3 TIMES and stay in OFF position.   
2. Push the Valet switch 

9

 times (holding in on the 9th push) until 

four


chirps with a long chirp is heard then release the valet switch. You are 
now in the Start feature 

‘D’

 programming mode. 

Select “Checking Type”: 

3. Press the 

 + 

 transmitter button to set the “Timer Checking Type”. 

[3] LED flash, [3] horn chirp to confirm this setting   

4. Once you complete step 3, you can adjust and test “Start Timer” as 

below:


 TIMER START PROGRAMMING: (TEST & ADJUST)


While the system stay in Start Feature 

“D”

 programming mode, 

1. Press the 

 button on the transmitter to start the vehicle.   

2. If everything goes well: 
a. Press the ‘

 button on the transmitter to stop engine running. You 

have completed this programming successfully. 

b. Press 

 button on the transmitter to exit the program mode. There 

will be 3 long chirps & 3 parking light flashes for confirmation.   

3. If the crank time is too long, (Engine is running, while starter   
   still cranks): 
a. Press the 


button on the transmitter to stop engine running. 

b. Press the 


button on the transmitter to set proper “Start Timer”. The 

chirp & LED pause will confirm entry. (Decrease “Start Timer” is 
necessary.) 

c. Repeat the step 1 – 4.


4. If the crank time is too short, (Engine not running, while starter 
   stops cranking): 
a. Press the 

 button on the transmitter to stop engine running. 

b. Press 

 button on the transmitter to set proper “Start Timer”. The 

chirp & LED pause will confirm this entry. (Increase “Start Timer ” is 
necessary.) 

c. Repeat the step 1 – 4.


Содержание RS-620

Страница 1: ...1 RS 620 PROFESSIONAL REMOTE CAR STARTER KEYLESS ENTRY SYSTEM INSTALLATION MANUAL THIS PRODUCT IS DESIGNED FOR PROFESIONAL INSTALLATION ONLY ...

Страница 2: ... H 4 Valet Switch 16 Wiring H 6 Door Lock Connector 16 2 Step Unlock Diagram RS232 Serial Data Port Connection 17 18 Transmitter Programming 18 Feature Programming A 19 Feature Programming B 20 Feature Programming C 21 Start Feature Programming D Tachometer Checking Type 22 22 RPM Learning 23 Voltage Check Type 24 Timer Check Type 25 Return to Factory default 26 Shutdown Diagnostics 26 Test Your I...

Страница 3: ... any forward or reverse gear regardless of the type of vehicle n Please read the operation manual for operating instructions n Do not install any component near the brake gas pedal or steering linkage n Some vehicles have a factory installed transponder immobilizer system that can severely complicate the installation There is possibility that this system can not be installed on some immobilizer eq...

Страница 4: ...r Input 20A 20A Red Remote Start Power 1 Red Remote Start Power 2 Violet Starter Output Pink Ignition 2 Output Yellow Ignition 1 Output Brown Acc Heater Output Blue Unlock Pulse or LockPulse 500mA Green Lock Pulse or Unlock Pulse 500mA 10 Pin Molex Connector H1 6 Pin White H2 5 Pin White H3 4 Pin Black H4 2 Pin Blue H5 2 Pin White H6 3 Pin White H7 10 Pin White H8 Black Data con ...

Страница 5: ... Ignition 2 Output Yellow Ignition 1 Output Brown Acc Heater Output H2 5 PIN WIRE HARNESS Red 12v Battery Power Brown Horn Output Black System Main Ground White Parking Light Relay Output Red White Parking Light Relay Power Input 3 A H6 3 PIN DOOR LOCK CONNECTOR 1 Blue Wire 3 Green Wire Lock Pulse Unlock Pulse Unlock Pulse Lock Pulse ...

Страница 6: ...hite Blue wire Instant Start and Turn Off Input 5 White Red wire Tachometer Signal Input 6 Yellow wire 200mA Ignition 3 Control Output 7 White wire 200mA Dome Light Control output Default Factory Security Rearm Output 8 Gray wire 200mA Channel 2 Trunk Output Default Factory Security Rearm Output 9 Orange wire 500mA Ground when Locked Output 10 Pink wire 200mA 2 Step Unlock Output Default Factory S...

Страница 7: ...ze why the connection of the safety wire is required for all mechanical switch configurations Failure to make this connection properly can result in personal injury and property damage In all installations it is the responsibility of the installing technician to test the remote start unit and assure that the vehicle can not start via RF control in any gear selection other than park or neutral In b...

Страница 8: ...is turned OFF the ignition wire should receive 0 voltage The YELLOW wire must be connected PINK Wire Ignition 2 Output Some vehicles have 2 ignition wires that must be power Connect the PINK wire to the ignition 2 wire from the ignition switch The ignition wire should receive 12 volts when the ignition key is in the ON or RUN and START or CRANK position When the ignition is turned OFF the ignition...

Страница 9: ... the dimmer will result The limitation of the WHITE wire is 10 AMP max Do not exceed this limit or damage to the alarm and parking relay will result BLACK WIRE SYSTEM GROUND This is main ground connection of the alarm module Make this connection to a solid section of the vehicle frame Do not connect this wire to any existing ground wires supplied by the factory wire loom make the connection to the...

Страница 10: ...the vehicle s interior windshield molding H7 10 PIN MOLEX WHITE CONNECTOR WIRE HARNESS ORANGE WIRE 500ma GROUNDED OUTPUT WHENARMED This wire will become grounded when the alarm is armed The current capacity of this wire is 500mA This output can control starter disable when an intrusion is detected and the system is triggered 87 87a 85 30 86 IN4003 Diode H5 1 ORANGE wire from control module Start O...

Страница 11: ...alue 2 Locate the pair of VATS wires in the vehicle usually a pair of thin gauge wires running from the ignition switch to the VATS control module 3 Connect the YELLOW wire from Remote Start Unit to Terminal 85 of the relay Connect terminal 86 of the relay to a fused 12 volt 4 Cut 1 wire as shown and connect the ignition switch side of the cut wire to terminal 87a of the relay Connect the other si...

Страница 12: ... SECURITY REARM SIGNAL OUTPUT See Alarm Feature A 2 Programming This wire is designed to rearm a factory installed security system This wire will supply a pulse whenever the remote start times out or is shut down using the transmitter and remote door locking PINK WIRE 200ma PROGRAMMING OUTPUT See Alarm Feature A 3 Programming 2 STEPS UNLOCK OUTPUT Factory Default Setting The 2 steps unlock feature...

Страница 13: ...TPUT See Feature A 2 Programming CHANNEL 2 Output Factory Default Setting This will become a 1 second pulse ground by activate channel 2 on transmitter for two seconds the current capacity of this wire is 200 mA This feature allows you to remote control trunk release or other electric device 87a 86 87 30 85 Fuse Gray Wire 12V Or Ground Depending On System Requirements 12V Electric Device CHANNEL 2...

Страница 14: ...wire can be connected to the PARK NEUTRAL switch in the vehicle See the TESTING YOUR INSTALLATION GUIDE IMPORTANT NOTE Directly connect the BLACK WHITE wire to the GROUND when this wire is not used WHITE VIOLET WIRE POSITIVE SAFETY SHUT DOWN INPUT This wire provides an instant shutdown for the remote start whenever it gets 12volts If the brake lights switch in the vehicle switches 12 volts to the ...

Страница 15: ...Once connected you must Program the Start Feature D 2 to Tachometer checking type and teach the system the RPM signal See Start Feature D 2 3 Programming To test for a tachometer wire a multi meter capable of test AC voltage must be used The tachometer wire will show between 1V and 6V AC at idle and will increase as engine RPM increases In multi coil ignition system the system can learn individual...

Страница 16: ...et switch wires to the control module H6 3 PIN DOOR LOCK CONNECTOR NEGATIVE TRIGGER DOOR LOCK SYSTEM Blue Wire Door Unlock Green Wire Door Lock Locking Master Switch To Exiting Door Lock Relay POSITIVE TRIGGER DOOR LOCK SYSTEM Blue Wire Door lock Green Wire Door Unlock Locking Master Switch To Exiting Door Lock Relay 12V 12V Master Door Lock Switch X X Splice Splice Cut the Existing Lock Wire To D...

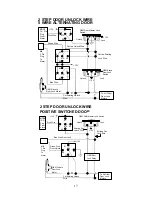
Страница 17: ...iver s Door Lock Motor 12V 12V 85 86 87 87A 30 30 87 85 87A 86 30 87 85 87A 86 Green Wire H6 3 Pin Plug To Alarm 2 STEP DOOR UNLOCK WIRE POSITIVE SWITCHED DOOR LOCKS Cut Existing Unlock Wire X Lock Unlock OEM Door Master Lock Switch To All Other Door Lock Motors Pink Wire OEM Driver s Door Lock Motor 12V Existing Pos Lock Wire Existing Pos Unlock Wire 30 87A 87 86 85 12V 12V OEM Door Lock Relay 86...

Страница 18: ... with Autopage Data Modules PROGRAMMING Note This system can keep up to 4 remote transmitter in its memory If more than 4 transmitters programmed the system will keep only the last 4 transmitters PROGRAMMING THE REMOTE TRANSMITTER Enter 1 Turn the Ignition switch OFF ON 3 TIMES and stay in the ON position Within 15 seconds 2 Push the Valet switch 2 times Holding in on the 2nd push until you hear a...

Страница 19: ...sh 3 horn chirps etc Exit Turn Ignition to ON position or leave it for 15 seconds 3 long chirps 3 parking light flashes will confirm exit Press Transmitter Button One Chirp LED one pulse Factory Default Setting Two Chirps LED two pulse Three Chirps LED three pulse Four Chirps LED four pulse 1 Pathway illumination feature off Parking lights turn on for 30 seconds upon disarm Parking lights turn on ...

Страница 20: ...oor Lock before after start Without this feature 2 Ignition controlled door locks unlocks With ignition controlled door locks Only With ignition controlled door Unlocks Only Without ignition controlled door locks unlocks 3 0 8 second Door lock pulses 3 0 second Door Lock pulse Double pulse unlock Door Lock Comfort Feature 4 Green Wire 1 Pulse start trigger input Green Wire 2 Pulse start trigger in...

Страница 21: ...it To Start Light 15 sec warm up Diesel Engine Wait To Start Light 20 sec warm up 3 20 minutes run time 30 minutes run time 10 minutes run time 5 minutes run time 4 Factory alarm disarm with channel 2 on Without this feature 5 Constant parking light output upon Remote Start Flashing parking light output upon Remote Start Vehicle with Turbo The system Can be Armed with the engine running and the en...

Страница 22: ...e 3 B Start Crank Time 0 6 second 0 8 second 2 chirps 1 0 second 3 chirps 1 2 second 4 chirps 1 4 second 5 chirps 1 6 second 6 chirps 1 8 second 7 chirps 2 0 second 8 chirps 3 0 second 9 chirps 4 0 second 10 chirps 4 Low check level Hi check level 5 Start or Stop the system for TESTING ADJUSTMENT Exit Press the button on the transmitter 3 long chirps 3 parking light flashes will confirm exit TACHO...

Страница 23: ... the transmitter to start the vehicle 2 If everything goes well a Press the button on the transmitter to stop engine running You have been completed this programming successfully b Press button on the transmitter to exit the program mode There will be 3 long chirps 3 parking light flashes for confirmation 3 If the crank time is too long starter will crank while the engine is running a Press the bu...

Страница 24: ...completed this programming successfully II Press button on the transmitter to exit the program mode There will be 3 long chirps 3 parking light flashes for confirmation b If the engine shuts down after the vehicle has started I Press the button on the transmitter to stop engine running II Press button on the transmitter to set Check Level to LOW position 1 LED flash 1 horn chirp to confirm this se...

Страница 25: ...hicle 2 If everything goes well a Press the button on the transmitter to stop engine running You have completed this programming successfully b Press button on the transmitter to exit the program mode There will be 3 long chirps 3 parking light flashes for confirmation 3 If the crank time is too long Engine is running while starter still cranks a Press the button on the transmitter to stop engine ...

Страница 26: ...ng light flash 3 times to confirming the system Start Feature C D Programming all returns to factory default setting SHUT DOWN DIAGNOSTICS The unit has the ability to report the cause of the last shutdown of the remote start system Enter 1 Turn the Ignition switch to ON position 2 Press the button on the transmitter 3 The LED will now report the last system shutdown by flashing for one minute in t...

Страница 27: ... SAFETY TEST 1 Set the vehicle parking brake 2 Block the drive wheels to prevent vehicle movement 3 Sitting in the vehicle turn the ignition switch to ON or RUN position But do not start the engine 4 Step on the brake pedal and shift the gear selector into DRIVE D 5 Put your foot over the brake pedal but do not press down on it Be ready to step on the brake to shut down the Remote Start Device 6 S...

Страница 28: ...king on has this ECM input The installation required for this application shown below indicates in the slight reconfiguration of the control switch wiring Shown is a typical GM Park Neutral ECM input circuit To connect the Remote Start unit to the GM Park Neutral ECM input 1 Locate the Orange Black reference wire in the C2 connector found at the ECM in GM B Body vehicles or locate the equivalent r...

Страница 29: ...han Park or Neutral while the key is in the ignition cylinder however if the key is left in the ignition switch and the door is left opened the added relay will be energized causing a 150mA drain on the battery Method 2 will allow the safety required for the remote start unit and prevent the vehicle from starting while in any gear other than Park or Neutral while the key is in the ignition cylinde...

Страница 30: ... Unit The cathode Striped side must be connected to the hood pin switch METHOD 2 Ignition Key In Sensor Switch Closes with Key In Ignition Cylinder Switch Connected to Negative Safety Input Wire White Black H7 1 To Hood Pin Switch Safety Shut Down H7 1 1N4003 To connect to the key in sensor circuit as shown for method 2 A Locate the control wire that connects the drivers door pin switch to the key...

Страница 31: ...ON Retest by following the steps outlined in the NEUTRAL START SAFETY TEST shown in this manual pin switch TECH LINE Autopage technical assistant is available to Authorized Dealers ONLY The 800 tech line is open from M F 8 00 am to 5 00 pm pacific time 800 262 2527 Ext 461 463 or 460 www autopageusa com ...

Страница 32: ...1 White Black wire Negative Safety Shut Down for Hood pin 2 White Violet wire Positive Safety Shut Down Input for Brake Switch 3 Black White wire Negative Neutral Safety Switch Input Negative Remote Start Toggle Switch Input 4 White Blue wire Instant Start and Turn Off Input 5 White Red wire Tachometer Signal Input 6 Yellow wire 200mA Ignition 3 Control Output 7 White wire 200mA Dome Light Control...

Страница 33: ...33 960 Knox Street Unit B Torrance CA 90502 Tel 310 323 1800 or 800 262 2527 www autopageusa com ...

Отзывы: