When first setting up the radio, set the volume to a low level and ask someone to talk to you using a similar
radio (set to the same frequency and tone). Adjust the volume to the desired level. To compensate for
additional helmet noise at higher speeds you may need to increase the volume slightly over the level set
whilst stationary.
Radio Discipline
should be observed in order to have trouble-free communication. If you finish your
transmission with ‘OVER’, that will tell the other person/people that you have finished talking. You must
then release the P-T-T button to allow the radio to go back to standby mode. After each transmission A
TWO SECOND pause should be observed to allow the radios to both go on to standby mode.
Performance and range is dependent on antenna location, laying the radio on its back or side so the
antenna is horizontal may reduce range and performance.
The system is capable of giving high performance once set-up properly to suit you and your bike. No further
adjustments should be needed once set up correctly.
To maintain performance only an authorised Autocom dealer should service any damaged or worn parts.
DO NOT MAKE ANY ADJUSTMENTS WHILST RIDING YOUR MOTORCYCLE.
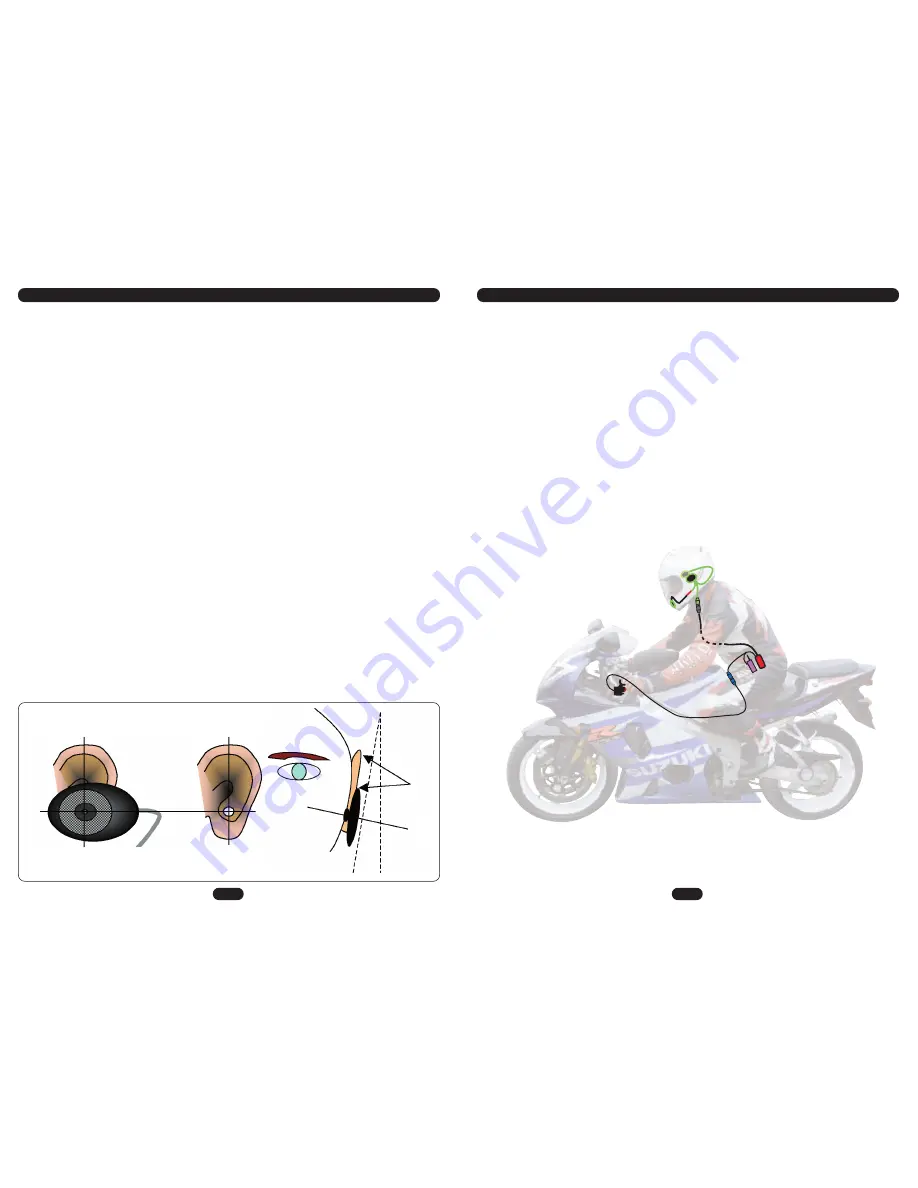
Typical example of a;
non expandable, rider only, portable, push-to-talk, bike-to-bike system.
The bike-to-bike system is powered via the radio’s battery.
HOW TO GET THE BEST OUT OF YOUR SYSTEM
UNDERSTANDING HEADSET INSTALLATIONS
There are far too many different helmets to be able to fully describe every possible installation and so these
instructions are designed as a basic guide only. Please see your local Autocom dealer or our website
www.autocom.co.uk for more detailed specific helmet installations.
There are three main types of full face helmet design, one is a one part chin and cheek pad design, per the
illustration shown on page 7, another is a three part chin/cheek pad design per the illustration shown on page
7 and the third type is an open recess area within the helmet’s inner shell itself. Most full face helmets do not
have the cheek pads glued in and are just a compression fit, which makes them much easier to remove
(although some are quite tight). Put the helmet on and work out exactly where the centre of each
ear hole
is relative to the straps or any seams etc. in the lining, and also while doing this try to find and mark the
exact location of the centre of your lips inside the chin pad with the helmet sat in its natural position. When
you have established these positions within the helmet you are then ready to start the headset installation/s
Decide which side of the helmet you would prefer the lead to hang from and then release that side’s check
pad so as to allow you fit the boom and main speaker harness behind it, such that the boom comes up from
behind the check pad and into the visor area, so that it can be bent down (from between the outer shell and
check pad) in front of your mouth, per the illustrations. If required, tape the boom and also the main harness
down lead to the back of the cheek pad or preferably to the inside of the outer shell of the helmet.
Most helmets have pockets (indentations) in the lining by your ears, which let your ears fold back after
they are folded over while putting the helmet on. Sometimes the fabric covering these pockets is glued
back to the cheek pad forming a visible pocket, and other times the fabric is just stretched over the foam
pocket and is not glued back. If the helmet has deep pockets and the fabric is glued back you may need
to fit padding behind the speakers (like our optional foam speaker pads, which are 6mm (
1
⁄
4
”) or 12mm
(
1
⁄
2
”), these foam speaker pads have velcro fitted so that you can velcro the speakers to them.
If the fabric is not glued back forming a visible pocket then it is easiest to just velcro the speakers on top
of the fabric which can often work quite well in some helmets, but is more likely to cause your ears to fold
over when putting the helmet on and so most people prefer a more professional installation where the
speakers are set behind the fabric but on top of the foam/polystyrene behind. If you have time and can
install the speakers behind the fabric like this it makes for a much more professional semi permanent
fitment which is normally much more comfortable and this is how we would normally try to install the
headset/s for you if you brought them to us.
In order to be able to place the speakers behind the fabric you normally need to remove the cheek pads
from the helmet.
Carefully
remove the cheek pads to reveal the back where the fabric is either glued back
or taped back to the polystyrene.
Carefully
peel the fabric back
just enough
to slide the speakers into
place (normally about level or just below the level of the hole for the strap and just behind the strap). Try
to copy the illustrations on page 7.
Centre of
speaker
Note that wire
normally comes out
towards back
Centre
of
speaker
Centre of ear hole
Avoid
speaker
near top
of ear
3
6


