background image

Dexter 

10 

english 


3. CORRECT OPERATION OF YOUR STOVE 


Approved fuels 

Dry,  well  cured  and  natural  wood  (hardwood  preferred), 

wood briquettes. 


Maximum amount of fuel 

Maximum amount of fuel to be added: 1,4 kg wood. Larger 

amounts of fuel can lead to overheating and thus damage 

the stove. 


Clean burning 

The wood must be dry (relative wood moisture < 15%) and 

untreated and the right amount of wood must be burned in 

order  to  ensure  a  clean  fire  that  releases  only  small 

amounts of emissions. 


Startup procedures 

During the first 3-4 operations -  at nominal heat output - 

there may be some odour development and the varnish has 

not yet hardened. 


Making a fire 

For the correct and safe operation of your stove please pay 

attention  of  the  chimney  developing  the  necessary  feed 

pressure.  This  must  especially be  considered  before  the 

initial operation (or e.g. after the summer heating break) and 

during the mid-season heating periods (e.g. at strong wind, 

etc.). 

If there is not enough feed pressure, please light only some 

paper or small kindling first, in order to “warm up” the stove 

and the chimney. 

The air inlet must not be covered or closed. 


Clean grate, empty ash drawer if necessary (watch out for 

ambers!). 


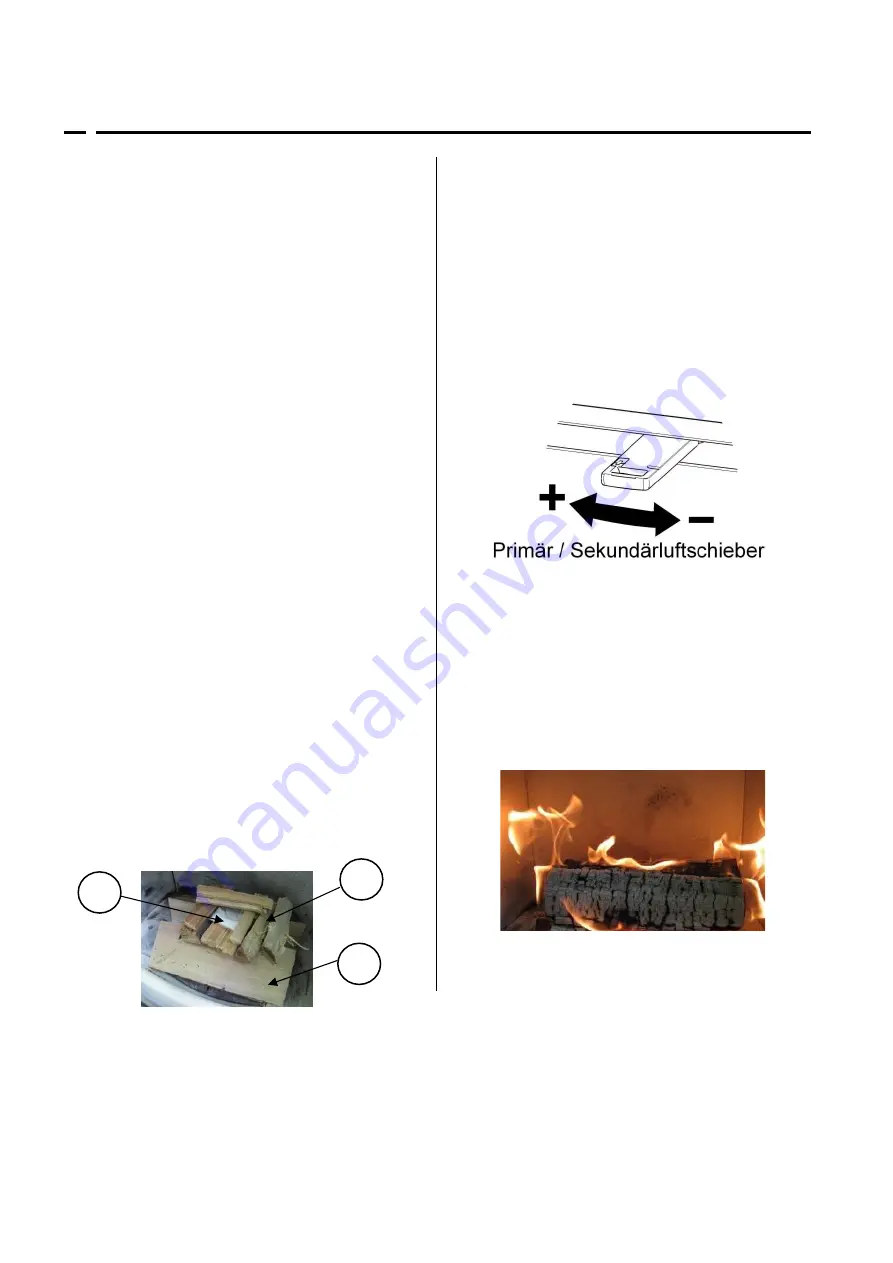
Position the lever for the combustion air to the open (“AUF”) 

position 

(see fig. 4). 


Place  2-3  logs  (approx.  1,0  kg  in  total)  crossways  in  the 

combustion chamber (1) with sufficient distance from each 

other (min. 2 cm), on top of that place some softwood 

chippings (0,4 kg) (2) and some ignition aid and light (3). 

(see fig. 3) 


Close the door! 


We recommend to let the first load burn down without 

changing the air lever position. 


As soon as no visible flames are left (only embers left in the 

combustion  chamber),  you  can  put  another  load  of  logs 

(approx. 1,4 kg) in the combustion chamber if desired. 


When reloading the stove please repeat the procedure as 

mentioned under “first lighting”: air lever position on “AUF” 

(= open), open door carefully, place logs, close door. 


Fig. 4: air knob 


After a few minutes, when the logs burn well on all sides 

(bright, high flames - 

see fig. 5

), you can adjust the heat 

output with the air lever (lever on max. position “AUF” = 

maximum heat output), the flames should be yellow and 

never look blueish or have black tips (otherwise add more 

air)  – 

see fig. 4

. Never close air supply completely during 

operation. Danger of flash-fire! 


The  stove  door  may  be  opened  only  for  refuelling  or 

disposing of ashes and is to be closed again afterwards. 


Figure 5 


Figure 3:ignite the fire 

sy

m

bol

 fi

gur

es


sy

m

bol

 fi

gur

es


sy

m

bol

 fi

gur

es


Содержание Dexter 2.0 L

Страница 1: ...Benutzerhandbuch manual manuale manuel User instructions Dexter 2 0 ...

Страница 2: ...y air supply english Contents 1 Techn data 5 2 Important information 5 3 Correct operation of your stove 6 4 The most important spare parts overview 7 5 Special features 8 Guarantee 17 This instruction describes the Dexter left Fig 2 ...

Страница 3: ...ve Attention stove varnish is no rust prevention Make your children aware of this particular danger and keep them at a distance from the heating unit whenever it is in operation Only burn approved fuels and materials listed in the chapter Clean Burning The burning or placing of flammable or explosive materials like empty spray cans and such like into the firebox as well as the storage of such mate...

Страница 4: ...bre cement sheet Bellis board or similar with minimum of 300mm in front of 2 sides of glass Flue Connection to Heater The flue collar fitted to the unit is 5 Inner diameter is tapered from 137mm and outer diameter is 148mm The top flue connection requires either a 5 to 6 adaptor to fit within the top box or the Austroflamm Flue damper fits to the outside of the flue collar ensure the connection is...

Страница 5: ... must have its own dedicated flue The active flue must be 8 for the entire length of the flue and always less than 45 degrees from the vertical Replacement room air from outside equivalent to 160cm2 must be supplied into the room Flue Outlet Positions Minimum Flue Height as per AS NZS 2918 2018 NOTE Flue exit MUST also be as high as any nearby structure within a 6m Radius AS 2918 2018 ...

Страница 6: ...8 english Exter External Requirements Refer to AS NZS 2918 2018 Note All external air vents ceiling penetrations must be bird rodent proofed with permanently fixed screens Flue Collar Connection for Rear Flue ...

Страница 7: ...DING CODE OR CODES o WARNING APPLIANCES INSTALLED IN ACCORDANCE WITH THIS STANDARD SHALL COMPLY WITH THE REQUIREMENTS OF AS NZS 4013 2014 WHERE REQUIRED BY THE REGULATORY AUTHORITY I E THE APPLIANCE SHALL BE IDENTIFIABLE BY A COMPLIANCE PLATE WITH THE MARKING TESTED TO AS NZS 4013 2014 o ANY MODIFICATION OF THE APPLIANCE THAT HAS NOT BEEN APPROVED IN WRITING BY THE TESTING AUTHORITY IS CONSIDERED ...

Страница 8: ...rawer if necessary watch out for ambers Position the lever for the combustion air to the open AUF position see fig 4 Place 2 3 logs approx 1 0 kg in total crossways in the combustion chamber 1 with sufficient distance from each other min 2 cm on top of that place some softwood chippings 0 4 kg 2 and some ignition aid and light 3 see fig 3 Close the door We recommend to let the first load burn down...

Страница 9: ...e 5 720427 Vertical Keramott outside 6 720424 Vertical Keramott corner 7 720425 Vertical Keramott rear 8 720426 Keramott baffle plate 1 9 720428 720473 Grate 716408 Other parts Dexter L Dexter R Keramott numbering installation instructions Description No Part number Dexter L Part number Dexter R Door complete 13 720430 720476 Door handle 14 361089 Door glass short side 15 720433 Door glass long si...

Страница 10: ...ructions if secondary air is closed the door glass soots rather fast wood logs are too large keep to the max fuel quantity according to user s instruction operating temperature was not reached more fuel use dry wood 15 residual moisture attend air regulation stove does not get enough combustion air chimney draught not sufficient contact your chimney sweep elongate chimney draught metering stove is...

Страница 11: ...surface coatings lacquer glass and ceramics Conditions of the Guarantee 1 Your AUSTROFLAMM stove was installed by a certified professional and is operated in accordance with the operator s manual 2 Claims to the guarantee shall be subject to a completely filled out Guarantee Card and submittal of the original invoice issued by a certified AUSTROFLAMM sales agent IMPORTANT Our guarantee includes fr...

Отзывы: