background image

P.4

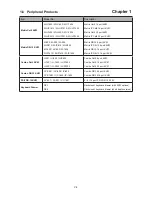
1.6   Peripheral Products


Chapter 1

Item

Model No.

Description

Matrix Cat6 KVM

MU-1602 / MU-1603 / MU-1604

MU-IP1613 / MU-IP1614 / MU-IP1624

MU-3202 / MU-3203 / MU-3204

MU-IP3213 / MU-IP3214 / MU-IP3224

Matrix Cat6 16 port KVM

Matrix IP Cat6 16 port KVM

Matrix Cat6 32 port KVM

Matrix IP Cat6 32 port KVM

Matrix DB-15 KVM

M-802 / M-803 / M-804

M-IP813 / M-IP814 / M-IP824

M-1602 / M-1603 / M-1604

M-IP1613 / M-IP1614 / M-IP1624

Matrix DB-15 8 port KVM

Matrix IP DB-15 8 port KVM

Matrix DB-15 16 port KVM

Matrix IP DB-15 16 port KVM

Combo Cat6 KVM

U-801 / U-802 / U-IP802 

U-1601 / U-1602 / U-IP1602 

U-3201 / U-3202 / U-IP3202

Combo Cat6 8 port KVM 

Combo Cat6 16 port KVM 

Combo Cat6 32 port KVM

Combo DB-15 KVM 

CV-S801 / CV-802 / IP-802

CV-S1601 / CV-1602 / IP-1602

Combo DB-15 8 port KVM 

Combo DB-15 16 port KVM

PS/2 DB-15 KVM

CV-401 / CV-801 / CV-1601

4 / 8 / 16 port PS/2 DB-15 KVM

Keyboard Drawer

RK-1

RK-2

Rackmount keyboard drawer (with KVM options)

Rackmount keyboard drawer (short depth version)

Содержание CyberView RP-1020QD

Страница 1: ...ze 4 3 Quad Display Drawer Models RP 117QD RP 119QD RP 120QD 4 3 LCD Quad Display Models RP 817QD RP 919QD RP 1020QD Widescreen LCD Quad Display Wide 19 22 screen size Widescreen Quad Display Drawer Models RP W119QD Widescreen LCD Quad Display Models RP W922QD RP W819QD ...

Страница 2: ...es 3 1 6 Peripheral Products 4 Part 1 Widescreen LCD Quad Display Chapter 2 RP W922QD RP W819QD 2 1 Package Contents 5 2 2 Structure Diagram 6 2 3 Installation 7 8 2 4 Connection 9 Chapter 3 RP W119QD 3 1 Package Contents 10 3 2 Structure Diagram 11 3 3 How to Use the Slides 12 3 4 Connection 13 Chapter 4 LCD Specification 14 Chapter 5 Dimensions 15 ...

Страница 3: ...on 23 Chapter 8 LCD Specification 24 Chapter 9 Dimensions 25 Chapter 10 Operation 10 1 On screen Display Operation 26 10 2 On screen Menu 27 Chapter 11 Quad Operation 11 1 Basic System Connection 28 11 2 Alarm I O Connection Operation 29 30 11 3 Remote Control Connection Operation 31 35 11 4 Quad Display Connection 36 11 5 Quad Display On screen Menu 37 39 11 6 VCR Operations 40 11 7 Quad Display ...

Страница 4: ...P 41 Blank page ...

Страница 5: ...ire water lightning or other acts of nature unauthorized product modifi cation or failure to follow instructions supplied with the product Repair or attempted repair by anyone not authorized by us Any damage of the product due to shipment Removal or installation of the product Causes external to the product such as electric power fluctuation or failure Use of supplies or parts not meeting our spec...

Страница 6: ...ower outlet to prevent being damaged by transient over voltage Keep all liquids away from the equipment to minimize the risk of accidental spillage Liquid spilled on to the power supply or on other hardware may cause damage fire or electrical shock Only qualified service personnel should open the chassis Opening it yourself could damage the equip ment and invalidate its warranty If any part of the...

Страница 7: ...ter moisture and vibration Convenience for connecting the Rackmount LCD Drawer Display to the related facilities should be well considers too The Rackmount LCD Drawer Display comes with the standard parts shown on the package contents Check and make sure they are included and in good condition If anything is missing or damage contact the supplier immediately 1 4 Unpacking 1 3 Before Installation C...

Страница 8: ...4 M IP1613 M IP1614 M IP1624 Matrix DB 15 8 port KVM Matrix IP DB 15 8 port KVM Matrix DB 15 16 port KVM Matrix IP DB 15 16 port KVM Combo Cat6 KVM U 801 U 802 U IP802 U 1601 U 1602 U IP1602 U 3201 U 3202 U IP3202 Combo Cat6 8 port KVM Combo Cat6 16 port KVM Combo Cat6 32 port KVM Combo DB 15 KVM CV S801 CV 802 IP 802 CV S1601 CV 1602 IP 1602 Combo DB 15 8 port KVM Combo DB 15 16 port KVM PS 2 DB ...

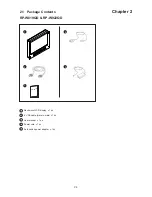
Страница 9: ...ackmount LCD display x 1 pc 6 VGA cable male to male x 1 pc User manual x 1 pc Power cord x 1 pc Auto switch power adapter x 1 pc 5 4 2 1 3 User Manual 1 5 4 3 2 RP W819QD RP W922QD Setu p VCR SEQ Qu ad Dis pla y Co ntr ol LC D OS D Me nu ...

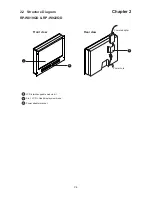
Страница 10: ...r 2 LCD interchangeable module kit 2 in 1 LCD Quad display membrane Power adapter bracket 1 1 3 2 Front view Rear view 3 2 Power adapter Power cord RP W819QD RP W922QD P 6 Set up VC R SE Q Qua d Di sp lay Co ntro l LC D OSD Men u ...

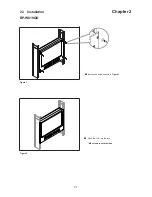
Страница 11: ...Install each screws shown in Figure 1 Figure 1 Figure 2 Fixed the LCD into the rack M6 screws is not provided RP W819QD Setu p VCR SEQ Qu ad Di sp lay Co ntro l LC D OS D Me nu Setu p VCR SEQ Qu ad Di sp lay Co ntro l LC D OS D Me nu ...

Страница 12: ... screws shown in Figure 3 M6 screws is not provided Figure 3 Figure 5 Push the lower part of the LCD into the rack RP W922QD Insert the upper part of the LCD display to the rack shown in Figure 4 Figure 4 Figure 6 Installation completed 1 4 3 2 ...

Страница 13: ...versible damage of the servers KVM and Rackmount LCD Drawer Before attempting to connect anything to the Rackmount LCD Drawer we suggest that turn off power to all devices be fore connecting them Apply power to connected devices again only after the Rackmount LCD Drawer receiving power The company is not responsible for damage caused in this way RP W819QD RP W922QD RS 232 Alarm I O VCR in VCR out ...

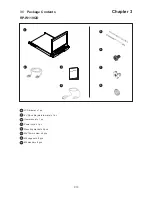
Страница 14: ...Q Qu ad Dis pla y Co ntr ol LC D OS D Me nu 1 4 User Manual 3 2 LCD drawer x 1 pc 6 VGA cable male to male x 1 pc User manual x 1 pc Power cord x 1 pc Mounting bracket x 2 pcs M6 15mm screw x 8 pcs M6 cage nut x 8 pcs M6 washer x 8 pcs 5 4 2 6 1 3 7 5 6 7 8 8 ...

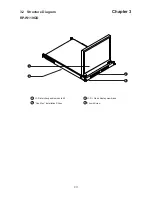
Страница 15: ...3 2 Structure Diagram Chapter 3 P 11 RP W119QD LCD interchangeable module kit One Man Installation Slides 1 1 2 2 LCD Quad display membrane Thumb Screw 3 4 3 4 ...

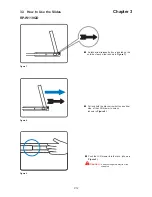
Страница 16: ...ted on the outside of each slide shown in Figure 7 Figure 8 Pull and hold the black arrow button on either side of the LCD drawer to unlock shown in Figure 8 Figure 9 Push the LCD drawer into the rack shown in Figure 9 Caution Keep your fingers away from the slide stop L I L I RP W119QD ...

Страница 17: ... irreversible damage of the servers KVM and Rackmount LCD Drawer Before attempting to connect anything to the Rackmount LCD Drawer we suggest that turn off power to all devices be fore connecting them Apply power to connected devices again only after the Rackmount LCD Drawer receiving power The company is not responsible for damage caused in this way RP W119QD RS 232 Alarm I O VCR in VCR out S Vid...

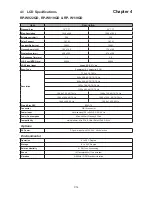
Страница 18: ...z 640 x 480 60 70 72 75 Hz 800 x 600 60 70 72 75 Hz 1024 x 768 60 70 75 Hz 1152 x 864 60 70 75 Hz 1280 x 720 60 75 Hz 1280 x 720 60 70 75 Hz 1280 x 1024 60 75 Hz 1280 x 1024 60 70 75 Hz 1440 x 990 60 Hz 1680 x 1050 60 Hz Plug Play DDC EDID 1 3 Connector DB 15 connector Power Input Auto sensing 100 to 240VAC 50 60Hz Power Consumption Max 48 Watt Standby 5 Watt Compatibility Multi platform Mix PCs S...

Страница 19: ... 500 4 x 70 5 mm 19 7 x 2 8 9U 565 x 539 x 156 mm 22 2 x 21 2 x 6 1 12 kg 26 lb 15 kg 33 lb RP W819QD 480 x 71 5 mm 18 9 x 2 8 8U 565 x 495 x 156 mm 22 2 x 19 5 x 6 1 8 kg 18 lb 10 kg 22 lb RP W119QD 442 x 650 x 44 mm 17 4 x 25 6 x 1 73 581 x 755 x 172 mm 22 9 x 29 7 x 6 8 13 kg 29 lb 18 kg 40 lb RP W922QD RP W819QD RP W119QD ...

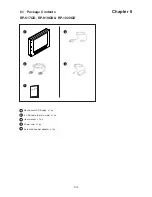
Страница 20: ...Contents Chapter 6 P 16 Rackmount LCD display x 1 pc 6 VGA cable male to male x 1 pc User manual x 1 pc Power cord x 1 pc Auto switch power adapter x 1 pc 5 4 2 1 3 User Manual 1 5 4 3 2 RP 817QD RP 919QD RP 1020QD ...

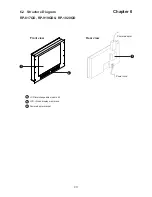
Страница 21: ...6 2 Structure Diagram Chapter 6 P 17 LCD interchangeable module kit LCD Quad display membrane Power adapter bracket 1 1 3 2 Front view Rear view 3 2 Power adapter Power cord RP 817QD RP 919QD RP 1020QD ...

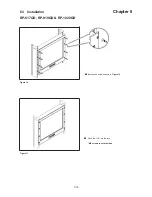
Страница 22: ...P 18 6 3 Installation Chapter 6 Install each screws shown in Figure 10 Figure 10 Figure 11 Fixed the LCD into the rack M6 screws is not provided RP 817QD RP 919QD RP 1020QD ...

Страница 23: ...sible damage of the servers KVM and Rackmount LCD Drawer Before attempting to connect anything to the Rackmount LCD Drawer we suggest that turn off power to all devices be fore connecting them Apply power to connected devices again only after the Rackmount LCD Drawer receiving power The company is not responsible for damage caused in this way RP 817QD RP 919QD RP 1020QD RS 232 Alarm I O VCR in VCR...

Страница 24: ...r Manual 3 2 LCD drawer x 1 pc 6 VGA cable male to male x 1 pc User manual x 1 pc Auto switch power adapter for external power version x 1 pc Power cord x 1 pc Mounting bracket x 2 pcs M6 15mm screw x 8 pcs M6 cage nut x 8 pcs M6 washer x 8 pcs 5 4 2 6 1 3 7 6 7 8 9 8 5 9 ...

Страница 25: ...7 2 Structure Diagram Chapter 7 P 21 RP 117QD RP 119QD RP 120QD LCD interchangeable module kit One Man Installation Slides 1 1 2 2 LCD Quad display membrane Thumb Screw 3 4 3 4 ...

Страница 26: ... outside of each slide shown in Figure 12 Figure 13 Pull and hold the black arrow button on either side of the LCD drawer to unlock shown in Figure 13 Figure 14 Push the LCD drawer into the rack shown in Figure 14 Caution Keep your fingers away from the slide stop L I L I RP 117QD RP 119QD RP 120QD ...

Страница 27: ...sible damage of the servers KVM and Rackmount LCD Drawer Before attempting to connect anything to the Rackmount LCD Drawer we suggest that turn off power to all devices be fore connecting them Apply power to connected devices again only after the Rackmount LCD Drawer receiving power The company is not responsible for damage caused in this way RP 117QD RP 119QD RP 120QD RS 232 Alarm I O VCR in VCR ...

Страница 28: ...70 72 75 Hz 1024 x 768 60 70 75 Hz 1152 x 864 60 70 75 Hz 1280 x 720 60 70 75 Hz 1280 x 720 60 75 Hz 1280 x 1024 60 70 72 75 Hz 1280 x 1024 60 70 75 Hz 1440 x 1050 60 Hz 1600 x 1200 60 Hz Plug Play DDC EDID 1 3 Connection DB 15 connector Power Input Auto sensing 100 to 240VAC 50 60Hz Power Consumption Max 48 Watt Standby 5 Watt Compatibility Multi platform Mix PCs SUNs IBMs HPs DELLs Regulation Ap...

Страница 29: ...x 71 5 mm 18 9 x 2 8 10U 565 x 539 x 156 mm 22 2 x 21 2 x 6 1 16 kg 35 lb 20 kg 44 lb RP117QD series 442 x 600 x 44 2 mm 17 4 x 23 6 x 1 74 581 x 755 x 172 mm 22 9 x 29 7 x 6 8 12 kg 17 lb 17 kg 37 lb RP119QD series 442 x 600 x 44 2 mm 17 4 x 23 6 x 1 74 581 x 755 x 172 mm 22 9 x 29 7 x 6 8 13 kg 29 lb 18 kg 40 lb RP120QD series 442 x 650 x 44 2 mm 17 4 x 25 6 x 1 74 589 x 856 x 168 mm 23 2 x 33 7...

Страница 30: ...tton for 5 seconds or Toggle analog digital video connection DVI D and video options only Scrolls through menu options and adjusts the displayed control Display the OSD menu Power on off LCD Power light Green On Orange Power saving For Quad Display Control For LCD OSD Menu Set up VCR SEQ Qu ad Di sp lay Co ntro l LC D OS D Men u Setup VCR SEQ Qu ad Dis pla y Co ntr ol LC D OS D Me nu LCD OSD Menu ...

Страница 31: ...e Geometry To enter into the auto adjust H position V position phase and clock Video Audio To enter into volume mute and power save Misc To enter into the language OSD position graphic mode OSD time ratio and reset Brightness Contrast Red 255 Green Blue Image Color Temp 50 User 1024 x 768 59 8Hz Select Adjust Exit Set M 50 255 255 ...

Страница 32: ...5Ω and Hi Z impedance Incorrect termination will degrade the quality of the video signal All video inputs not looped through to another device the corresponding switches need to be set to 75Ω termination position If another device is connected to video out loop through connector set the corresponding termination switch to Hi Z position Any device connected to the video out loop through connectors ...

Страница 33: ...ger period of time Combined with alarm sensor detection the VCR will record only when an alarm sensor is activated 11 2 ALARM I O Connection Operation Chapter 11 If more than one sensor have been trigged VCR will start to record after the last trigged event In order to make use of the alarm called full screen display function the VIDEO IN connector from the VCR has to be connected to LIVE monitor ...

Страница 34: ...d under Security Lock ON mode Push Lock button for 2 seconds to disable the function then push any button in the front panel 4 Video Loss Alarm Loss of video at any input is automatically detected by the device The device will Activate the built in buzzer Switch the corresponding channel indicator LED to blinking mode Display warning message on quad screen Quad output channel 4 Blinking Video Loss...

Страница 35: ...11 3 Remote Control Connection Operation Chapter 11 h i z 1 2 3 4 75 IN OUT RS 232 ALARM dc 12V 1amp monitor vcr I O RS 232 Cable Wire Computer Remote Keypad Rear Panel P 31 ...

Страница 36: ...ter can be connected to the male type 9 pin D sub connector on the real panel from it RS 232 port to control this device using standard uppercase ASCII codes 2 1 The ASCII command codes for the quad are listed in the table below The transmission protocol is 1200 baud rate 8 data bit 1 start bit 1 stop bit and no parity Pin Assignment for Remote Control Connector 1 GND 4 NC 7 VCC 2 RX 5 NC 8 GND 3 ...

Страница 37: ...p menu is switched ON by sending VCR DVR and Lock button codes together 4 Text Select and Cursor Control functions can be performed only under menu Setup mode 2 2 Right after computer terminal has sent out the above mentioned control command code to the device the devic will respond with following status code back to computer through RS 232 port 11 3 Remote Control Connection Operation Chapter 11 ...

Страница 38: ... status of the alarm operations of the unit BYTE 1 Status code for normal operation modes Channel Select 1110 CH1 1101 CH2 1011 CH3 0111 CH4 Display Mode 0 Quad screen display 1 Full Screen display Auto sequencing mode 0 Auto sequencing mode 1 Quad or full screen mode VCR mode 0 VCR operation 1 Live operation Security Lock mode 0 Security lock ON mode 1 Security lock OFF mode Menu Setup mode 00 Me...

Страница 39: ...s code for alarm operations The first 4 bits show the sensor activated alarm status of each channel next 4 bits show the video loss alarm status of each channel The digit 1 means alarm event is detected and 0 means no alarm event is detected 11 3 Remote Control Connection Operation Chapter 11 b7 b6 b5 b4 b3 b2 b1 b0 CH4 CH3 CH2 CH1 CH4 CH3 CH2 CH1 b7 b4 Sensor Activated Alarm b3 b0 Video Loss Alar...

Страница 40: ...l 1 2 Setup buttons Push these two buttons simultaneously to get into Menu Setup mode and display page 1 of system setup menu Push these two buttons simultaneously again to display page 2 of the setup menu Use page 1 to program time date and camera title and page 2 to configure alarm operations Under menu setup mode Channel Select buttons 5 are used for cursor control and text selection to program...

Страница 41: ...h video channel 8 characters may be entered for each video channel The available alphanumeric characters are 0 1 2 3 4 5 6 7 8 9 A B C D X Y Z space 1 2 DWELL Time setup The Dwell time menu permits setting the dwell time for all cameras and the Quad Screen on the LIVE output channel The menu shows a table of all cameras and associated dwell time Dwell time can be programmed by setting a number bet...

Страница 42: ... signal a detected alarm through sound User can choose to disable the buzzer by setting it to OFF 2 4 V Loss Alarm This entry is used to enable or disable the video loss alarm The device automatically detects loss of video at any input if this entry is set to ON User can choose to disable this feature by setting it to OFF for applications like video conferenc ing or others that will need constant ...

Страница 43: ... first turn the quad display button 4 to ON to set the unit to display in the quad mode At this time you may press any of the four channel selection buttons 5 to freeze the corresponding channel 7 2 Under Zoom On VCR playback mode if the unit is showing quad screen pushing the channel selection but tons 5 will call up the specific channel to display in full screen Push the same channel selection b...

Страница 44: ...ull screen display P 40 11 7 Quad Display Specifications Item Description Model Number QD NTSC QD PAL Number of Color 16 7 M 16 7 M Imaging System NTSC PAL Resolution 1024 x 525 1024 x 625 Refresh Rate 60 50 Video Input Camera Input 1 0 Vpp 75 Ohm x 4 VCR Input 1 0 Vpp 75 Ohm x 1 Video Output Live Monitor 1 0 Vpp 75 Ohm x 1 Loop Through Out 1 0 Vpp 75 Ohm x 4 VCR Output 1 0 Vpp 75 Ohm x 1 Auto Gai...

Страница 45: ...Input current No load 50 mA 50 mA 50 mA Full load 4950 mA 2450 mA 1220 mA Output rating Output voltage 12 Volt 12 Volt 12 Volt Output current 4 16A 4 16A 4 16A Efficiency 84 85 85 Remarks Package does not include power cord and AC power adapter DC Power input RP W819QD RP W922QD RP 817QD RP 919QD RP 1020QD RP W119QD RP 120QD DC Power input ...

Страница 46: ...In rare cases interference may appear on the monitor This may be caused by signal rate of VGA card and is considered normal The image quality can be improved by adjusting the phase or pixel rate automatically or manually 3 The membrane power light is not ON Press the power On Off on LCD membrane to check if the monitor is in the ON mode Check the power cord is properly connected to the LCD keyboar...

Страница 47: ...Blank page ...
Страница 48: ...thout prior notice and assumes no responsibility for any error which may appear in this publication All brand names logo and registered trademarks are properties of their respective owners Copyright 2008 Austin Hughes Electronics Ltd All rights reserved CV QD34 0109V1 ...

Отзывы: