AURES SMP 58 Скачать руководство пользователя страница 6

8

9


Button


Name


function

Power 
Button

This button is used to turn the printer on and off. 
When the printer is off, press this button for approximately 3 seconds 
and the printer will power on. When you press this button while the 
printer is powered on, the printer will turn off.

Paper 
Feed 
Button

This button can be used to manually feed the paper.
Additionally, this button is also used to initiate self-tests and 
Hexadecimal Dumping.
1. Refer to the Self Test section of this manual for information 
regarding self-tests.
2. Refer to the Note in Self Test section of this manual for information 
regarding Hexadecimal Dumping.

Battery 
Status 
Lamp

1. If the Batt LED is lit, the battery is fully charged.
2. If you can hear a beeping sound and LED light is turned off, the 
battery is at the lowest level.
3. If the battery is not charged at all, the printer turns off
automatically.

Error 
Lamp 

If the red light is turned on, there is no paper or the
paper cover is open.

LINK/ 
Power 
Light 

- LINK: LED BLINK
- POWER ON: GREEN LED ON
- POWER OFF: LED OFF

4. Usage and Installation

4-1 Control Panel Usage

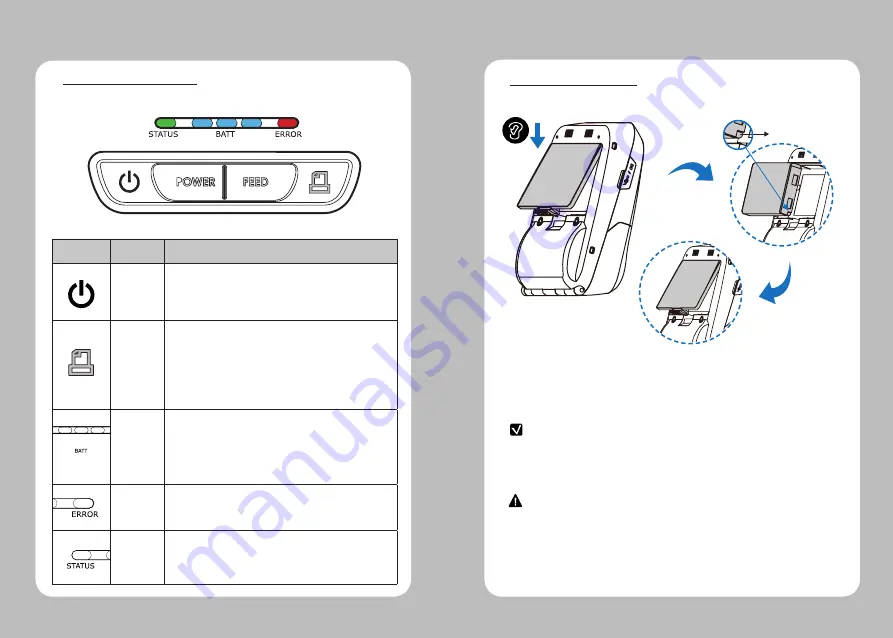
1. Align battery hook as shown in the picture
2. Push the battery into the printer until it locks in place.

NOTE

As the battery is not charged at the time of your purchase, charge the 
battery prior to using the printer
(Battery charger or Cradle can be used to charge) 

Hook


4-2 Battery Installation


CAUTION

Risk of explosion if the battery is replaced by an incorrect type.
Dispose of used batteries according to local regulations.

Содержание SMP 58

Страница 1: ...All specifications are subject to change without notice MOBILE PRINTER SMP 58 Rev A 08 18 www aures com MODEL SMP 58 Wi Fi Bluetooth...

Страница 2: ...e complies with part 15 of the FCC Rules Operation is subject to the following two conditions 1 This device may not cause harmful interference and 2 This device must accept any interference received i...

Страница 3: ...4 1 Charging Usage 11 4 4 2 Charging Cradle 12 4 5 Set Cradle Usage 13 4 6 Belt Strap Bracket Usage 14 4 7 Paper Installation 16 4 8 Self Test 17 5 Peripheral Connection 19 5 1 Bluetooth Connection Op...

Страница 4: ...to be pinched or crushed by heavy objects If a power plug is broken or a plug is cut or worn do not use it Do not overload an electrical outlet WARNING Failure to follow these instructions could resu...

Страница 5: ...Roll paper Belt Strap Bracket USB Cable Charger CD Manual Quick Manual Set Cradle Charging Cradle Adaptor Standard 3 Product Overview Paper feed Button Open Button Power Button Control Panel DC Power...

Страница 6: ...tt LED is lit the battery is fully charged 2 If you can hear a beeping sound and LED light is turned off the battery is at the lowest level 3 If the battery is not charged at all the printer turns off...

Страница 7: ...needs to be installed to operate the printer 5 While charging do not turn on the power 6 Do not operate the printer while charging the battery 7 Do not connect the charger while the printer is operat...

Страница 8: ...K to the charging cradle 3 Plug the power cord into an electrical outlet 4 Once the charging is completed remove the printer from the charging cradle CHARGING RED ON ERROR RED Flicker CHARGING COMPLET...

Страница 9: ...e loop on the back side Put the strap into the hole on the top of the belt bracket Make sure the strap is fastened tight enough 4 6 Belt Strap Bracket Usage 5 6 After connecting the strap and bracket...

Страница 10: ...f the additional paper using tear bar 4 7 Paper Installation 1 2 3 NOTE Turn off the power by pressing the power button for approximately 3 seconds The self test will print While you are holding the F...

Страница 11: ...the motor from overheating stop the printer for at least 30 seconds after continuously printing 1 5 meters Self Test Printout Sample 5 Peripheral Connection This product can communicate with other dev...

Страница 12: ...mmunicate with other devices via NFC NOTE Please refer to the configuration manual for detail NFC is only compatible with Bluetooth Optional 5 2 Wi Fi Connection 1 The Printer can be connected to devi...

Страница 13: ...E Use the cable offered by the manufacturer USB 6 Roll Media Specification Core Diameter A 12 5mm 0 5mm Roll Max diameter B 40mm Max Media Width C 58 0 5mm Min media Thickness 0 06mm Protect the print...

Страница 14: ...rinter power and wait approximately 10 minutes before cleaning 3 When cleaning the printhead take care not to touch the heated portion of the printhead The printhead can be damaged by static electrici...

Страница 15: ...axicode Datamatrix Aztec TLC39 RSS14 Emulation ESC POS CPCL ZPL Command compatible Driver WindowsDriver 10 2012 8 7 2008 VISTA 2003 XP 32bit 64bit WindowCE MobileDriver SDK CE4 2 Mobile5 0 LinuxDriver...

Отзывы: