4
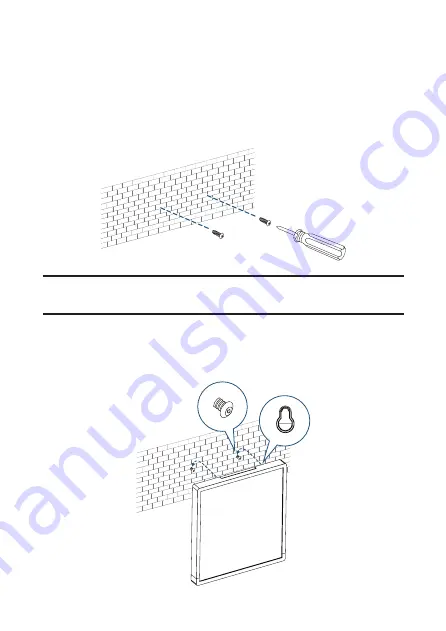
Wall Mount Instructions
Follow the steps below to install the screws into the wall so that
the display can be firmly secured in place.
1.
Install the two screws into the wall based on the dimensions
described in the previous section.
NOTE:
You can use a spirit level to ensure that the two screws
are installed perfectly straight.
2.
Mount the display onto the wall ensuring that the installed
screws fit into the mount holes on the back side of the
display.
Содержание A.R.T. 17
Страница 1: ......
Страница 25: ......
Страница 26: ...25 5GHz EPE Class I...
Страница 27: ...26 Micro USB Type A USB...
Страница 28: ...27 11mm 6mm 6 5mm 200 mm 6 mm 11 mm 2 mm 6 5 mm...
Страница 29: ...28 1 2...
Страница 30: ...29 1 2...
Страница 31: ...30...
Страница 33: ...32 1 Type C USB 2 AC...
Страница 34: ...33 1 3 1 1...
Страница 35: ...34 A R T iOS App Store Google Play Store ART AUO...
Страница 36: ...35 1 2 Wi Fi Wi Fi 3 A R T 4 Device 5 NEXT Wi Fi...
Страница 37: ...36 6 Confirm 15 Cancel 5 7 Wi Fi Wi Fi...
Страница 38: ...37 8 DONE Device ADD ANOTHER DEVICE 9 Device...
Страница 39: ...38 1 Playlist Device Playlist Playlist 2 NEXT...
Страница 40: ...39 3 SKIP SKIP CROP CROP Add photo Remove photo Rename this playlist Delete this playlist...
Страница 41: ...40 Expand image to fit the canvas 4 DEPLOY...
Страница 42: ...41 A R T 1 Device Settings 2 Device sync PIN PIN PIN 0000...
Страница 43: ...42 3 Wi Fi 4 A R T 5 Device 6 PIN 7...
Страница 44: ...43 Device Settings Settings RENAME 5 23 59 59 0 100 4000K 5000K 6500K...
Страница 45: ...44 PIN PIN 0000 Wi Fi RESET 1 Internet Device date time zone SYNC UPDATE AVAILABLE Settings...
Страница 48: ......


