background image

53

8. TROUBLESHOOTING

8.1

 MEDIA FIRMWARE UPGRADE

8.2

 CONTROL FIRMWARE UPGRADE

All FIRMWARE updates must be performed in strict accordance with the following procedures.

The FIRMWARE update must be performed with utmost care, following the precautions displayed on the

monitor, to prevent damage to the product.

Turn off the bit Play HD.

2. 

Go to the bit Drive Portal URL: 

www.bitdrive.it

 to download the latest firmware version, if available.

3.

 Download the “install.img” file and copy it to the main directory of a USB flash drive.

4. 

Connect the USB flash drive to the “Wi-Fi USB” connector.

5. 

Press the “PEN DRIVE UPGRADE MEDIA” button releasing it about 30 seconds after turning the bit Play HD on.

6.

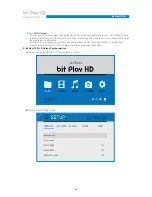
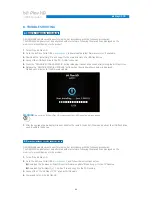
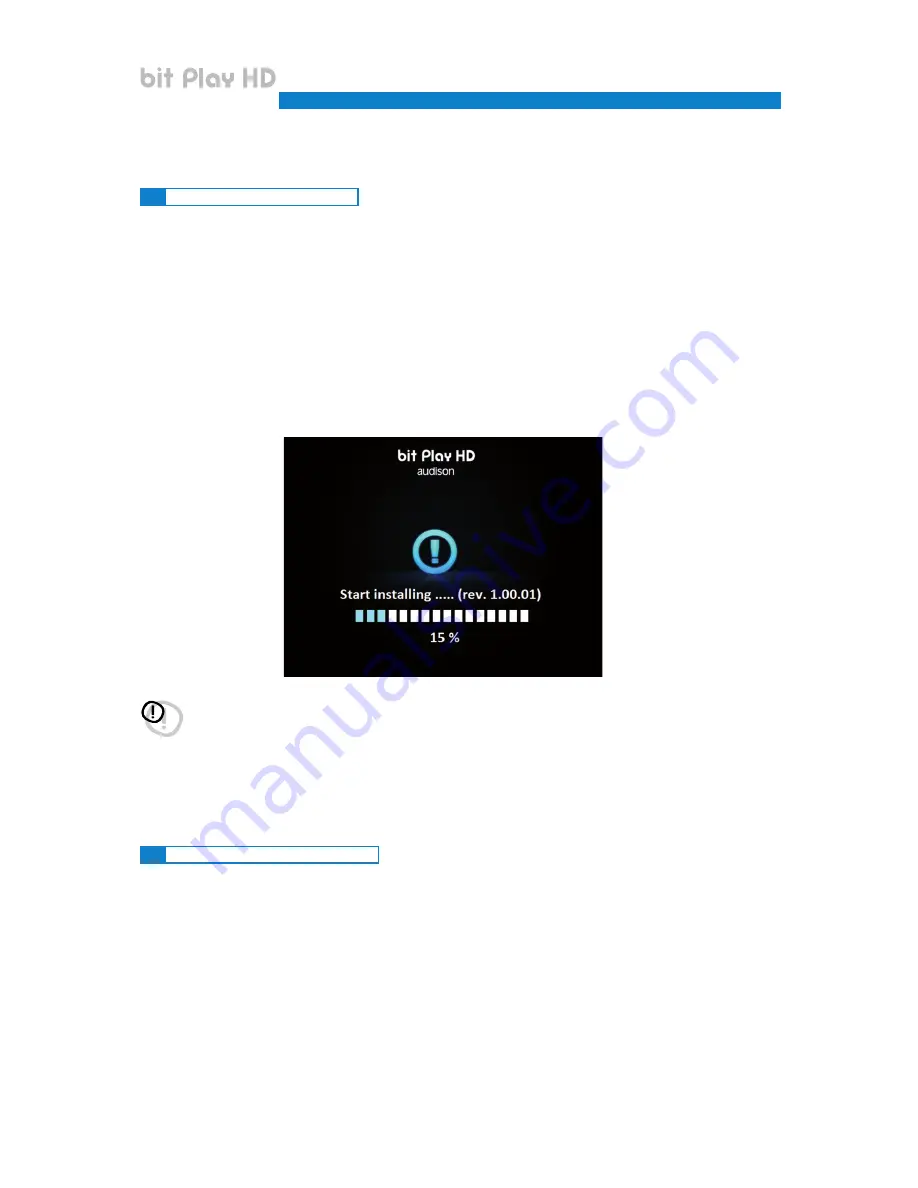
 Release the “PEN DRIVE MEDIA UPGRADE” button when the window shown below is displayed.

  Wait about 2 minutes for the firmware update.

All FIRMWARE updates must be performed in strict accordance with the following procedures.

The FIRMWARE update must be performed with utmost care, following the precautions displayed on the

monitor, to prevent damage to the product.

1.

 Turn off the bit Play HD.

2.

 Go to the bit Drive Portal URL: 

www.bitdrive.it

, and follow the instructions below:


A)

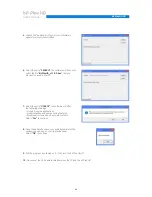
 Download the “Audison bit Play HD control firmware update” file and copy it to the PC Desktop.


B)

 Download the “bitPlayHD_v1.1.0.0.hex” file and copy it to the PC Desktop.

3.

 Connect the PC to bit Play HD “PC” plug, with USB cable.

4.

 Power and turn On the bit Play HD.

WARNING:


do not turn off the bit Play HD or disconnect the USB Flash drive while updating

.

7.

 After the upgrade the product will reboot. Wait for the restart, then shut it down and pull out the USB flash drive

  used to update the device.

USER’S MANUAL

bit Play HD /

8

Содержание bit play hd

Страница 1: ...USER S MANUAL rev 2 0 Valid for any of the below software versions or above Control Firmware 2 0 Media Firmware 2 0 Android APP 2 0 IOS APP 2 0 ...

Страница 2: ...NAL 17 4 3 2 HDMI VIDEO SIGNAL 17 4 4AUX OPTICAL INPUT AUTO SWITCH 18 4 5STORAGE DEVICES EXTERNAL FILE READING 20 4 6INFRARED RECEIVER 21 4 7Wi Fi AND MOBILE DEVICES 21 5 HOW TO USE THE bit Play HD WITH AN EXTERNAL MONITOR 22 6 HOW TO USE THE bit Play HD ON MOBILE DEVICES 24 6 1ANDROID DEVICES 24 6 1 1 DOWNLOAD THE AUDISON bit Play HD APP from PLAY STORE 24 6 1 2 ANDROID DEVICES SETUP 25 6 1 3 AUD...

Страница 3: ...5 from other structures and there must be good air circulation around the chassis 3 Make sure your car has a 12VDC negative ground 4 Make sure the location you choose for the product and its accessories does not affect the vehicle s other mechanical and electrical devices 5 Make sure the power cable does not short circuit during installation and connection 6 Use extreme caution when cutting or dri...

Страница 4: ...HD Input Rem cable with multi pin connector 2 m 79 in USB extension cable 5 m 196 in infrared receiver cable Wi Fi USB dongle ARC remote Advanced Remote Control USR remote User Remote Control 1m 40 in AC LINK RJ12 cable NR 1 3A replacement fuse NR 4 4 2 x 20 mm crosshead self tapping fastening screws Quick Start Guide Warranty USER S MANUAL bit Play HD 3 A 1 ...

Страница 5: ...mm 9 80 in 70 mm 2 76 in 98 mm 3 86 in 41 mm 1 61 in 239 mm 9 4 in ARC Advanced Remote Control USR User Remote Control 47 mm 1 85 in 40 mm 1 57 in 8 mm 0 31 in 85 mm 3 34 in 15 mm 0 59 in 115 mm 4 52 in USER S MANUAL bit Play HD 4 2 x 20 mm 0 16 x 0 78 in 1 ...

Страница 6: ...ke is engaged The 1A MONITOR terminal can be connected to the power consent terminal of the external monitor or directly to the power supply MAX 1 A USER S MANUAL bit Play HD 3 9 8 7 6 4 5 1 1 2 15 12 10 11 16 13 14 A G H I B C D E F STATUS LED Pink Blue White LED 12 Volt Ground REMOTE OUT White DSWC IN White DSWC IN Gray DSWC OUT Gray Orange Green Blue Black Red Brown DSWC OUT REM IN Amplifier Ste...

Страница 7: ...and is not ready If it starts normally the bit Play HD is ready for use FUSE blade 3A protection fuse If you need to replace the fuse use only the same type and value of the original OPTICAL connect a fibre optic cable with a TOSLINK connector to a processor or Audison amplifier with S PDIF optical input In this way you create a Full DA system capable of achieving a new quality benchmark that goes...

Страница 8: ...on 12 SYSTEM UPGRADE switch to enable bit Play HD firmware updates see section 8 2 WARNING Audison assumes no responsibility for the loss of data from USB storage devices connected to the bit Play HD To prevent malfunction or damage please observe the following Do not disconnect USB devices while copying or executing a file Carefully read the manual of the USB mass storage device used Do not touch...

Страница 9: ...le 12 FILE transfer file key 24 STOP stop Audio Video tracks 25 REPEAT repeat Audio Video tracks NOTES ON USING THE REMOTE 1 Point the remote at the bit Play HD control infrared sensor which can receive input at 30 in all directions 2 Remove the batteries if you will not be using the remote for more than a month 3 Do not store the remote in a place subject to direct sunlight or near heat sources 4...

Страница 10: ...ote for more than a month 3 Do not store the remote in a place subject to direct sunlight or near heat sources 4 The remote battery last 6 months under normal use If the remote does not work replace the battery 5 Use only coin CR 2025 3 V batteries 6 Do not recharge disassemble heat or expose the battery to heat 7 Insert the battery in the remote with the correct polarity and 8 Keep the battery an...

Страница 11: ... lack of power supply i e start stop vehicles or similar pausing the tracks being reproduced and starting them again when the ignition is on 3 3 1 NAVI COMMAND 3 3 2 BIT PLAY HD SETTINGS Press to go back to main Menu Press to activate NAVI COMMAND menu Available only with bit Play HD connected 3 sec 3 sec bit Play HD menu active NEXT TRACK PLAY PAUSE STOP PREV TRACK By enabling the Navi Command fu...

Страница 12: ...INK OEM INTERFACE DRC ON OFF MODE SYSTEM UPGRADE PC IR REM CONTROL FUSE 3A OPTICAL VIDEO AUDIO L R HDMI Mp3 WAV FLAC 24 bit 96 kHz Multimedia Player LAN WI FI USB PROVIDED 1 HARD DRIVE USB2 0 2 PEN DRIVE MEDIA UPGRADE 5 6 7 8 3 4 1 2 REM OUT REM IN 12V STATUS LED Pink optional LED 12 Volt Ground Blue Black Red FUSE HOLDER Not provided Suggested fuse 3 A delayed Ground 12V Ground REMOTE IN GROUND B...

Страница 13: ...FLAC 24 bit 96 kHz Multimedia Player LAN WI FI USB PROVIDED 1 HARD DRIVE USB2 0 2 PEN DRIVE MEDIA UPGRADE 5 6 7 8 3 4 1 2 REM OUT REM IN 12V SD AUDISON AC LINK OEM INTERFACE DRC ON OFF MODE SYSTEM UPGRADE PC IR REM CONTROL FUSE 3A OPTICAL VIDEO AUDIO L R HDMI Mp3 WAV FLAC 24 bit 96 kHz Multimedia Player LAN WI FI USB PROVIDED 1 HARD DRIVE USB2 0 2 PEN DRIVE MEDIA UPGRADE 5 6 7 8 3 4 1 2 REM OUT RE...

Страница 14: ...yer LAN WI FI USB PROVIDED 1 HARD DRIVE USB2 0 2 PEN DRIVE MEDIA UPGRADE 5 6 7 8 3 4 1 2 REM OUT REM IN 12V TOSLINK Connector TOSLINK Connector Optical fiber AUDISON AC LINK OEM INTERFACE DRC ON OFF MODE SYSTEM UPGRADE PC IR REM CONTROL FUSE 3A OPTICAL VIDEO AUDIO L R HDMI Mp3 WAV FLAC 24 bit 96 kHz Multimedia Player LAN WI FI USB PROVIDED 1 HARD DRIVE USB2 0 2 PEN DRIVE MEDIA UPGRADE 5 6 7 8 3 4 1...

Страница 15: ...WAV FLAC 24 bit 96 kHz Multimedia Player LAN WI FI USB PROVIDED 1 HARD DRIVE USB2 0 2 PEN DRIVE MEDIA UPGRADE 5 6 7 8 3 4 1 2 REM OUT REM IN 12V AUDISON AC LINK OEM INTERFACE DRC ON OFF MODE SYSTEM UPGRADE PC IR REM CONTROL FUSE 3A OPTICAL VIDEO AUDIO L R HDMI Mp3 WAV FLAC 24 bit 96 kHz Multimedia Player LAN WI FI USB PROVIDED 1 HARD DRIVE USB2 0 2 PEN DRIVE MEDIA UPGRADE 5 6 7 8 3 4 1 2 REM OUT R...

Страница 16: ...TICAL INPUT OPTICALINPUT TOSLINK Connector TOSLINK Connector COAXIAL INPUT COAXIAL OUTPUT TO MOST CHAIN Optical fiber set optical INPUT Digital Most Interface MOST OPTICAL OUT POWER USB TO MOST CHAIN Digital Most Interface MOST OPTICAL OUT POWER USB TO MOST CHAIN Digital Most Interface MOST OPTICAL OUT POWER USB AUDISON AC LINK OEM INTERFACE DRC ON OFF MODE SYSTEM UPGRADE PC IR REM CONTROL FUSE 3A ...

Страница 17: ... UPGRADE 5 6 7 8 3 4 1 2 REM OUT REM IN 12V ORANGE 1A MONITOR Ground BRAKE NOT PROVIDED 75 Ohm Coax Cable GREEN VIDEO IN VIDEO ENABLE 12V AUDISON AC LINK OEM INTERFACE DRC ON OFF MODE SYSTEM UPGRADE PC IR REM CONTROL FUSE 3A OPTICAL VIDEO AUDIO L R HDMI Mp3 WAV FLAC 24 bit 96 kHz Multimedia Player LAN WI FI USB PROVIDED 1 HARD DRIVE USB2 0 2 PEN DRIVE MEDIA UPGRADE 5 6 7 8 3 4 1 2 REM OUT REM IN 1...

Страница 18: ...E DRC ON OFF MODE SYSTEM UPGRADE PC IR REM CONTROL FUSE 3A OPTICAL VIDEO AUDIO L R HDMI Mp3 WAV FLAC 24 bit 96 kHz Multimedia Player LAN WI FI USB PROVIDED 1 HARD DRIVE USB2 0 2 PEN DRIVE MEDIA UPGRADE 5 6 7 8 3 4 1 2 REM OUT REM IN 12V OPTICAL AUX SEL brown OPTICAL SEL Pink Set the terminal with AP Prima PC software to activate AUX IN AUDISON AC LINK OEM INTERFACE DRC ON OFF MODE SYSTEM UPGRADE P...

Страница 19: ... VIDEO AUDIO L R HDMI Mp3 WAV FLAC 24 bit 96 kHz Multimedia Player LAN WI FI USB PROVIDED 1 HARD DRIVE USB2 0 2 PEN DRIVE MEDIA UPGRADE 5 6 7 8 3 4 1 2 REM OUT REM IN 12V TOSLINK Connector TOSLINK Connector Optical fiber OPTICAL AUX SEL brown MUTE IN brown Set the terminal with bit Ten D PC software to activate OPTICAL INPUT PHONE REM IN REM OUT 12 V KEY SW INPUTS MUTE IN FL FR RR RL AD Link AC Lin...

Страница 20: ...EN DRIVE MEDIA UPGRADE 5 6 7 8 3 4 1 2 REM OUT REM IN 12V NOT PROVIDED NOT PROVIDED AUDISON AC LINK OEM INTERFACE DRC ON OFF MODE SYSTEM UPGRADE PC IR REM CONTROL FUSE 3A OPTICAL VIDEO AUDIO L R HDMI Mp3 WAV FLAC 24 bit 96 kHz Multimedia Player LAN WI FI USB PROVIDED 1 HARD DRIVE USB2 0 2 PEN DRIVE MEDIA UPGRADE 5 6 7 8 3 4 1 2 REM OUT REM IN 12V NOT PROVIDED AUDISON AC LINK OEM INTERFACE DRC ON O...

Страница 21: ... VIDEO AUDIO L R HDMI Mp3 WAV FLAC 24 bit 96 kHz Multimedia Player LAN WI FI USB PROVIDED 1 HARD DRIVE USB2 0 2 PEN DRIVE MEDIA UPGRADE 5 6 7 8 3 4 1 2 REM OUT REM IN 12V NO WARNING if you choose to use the bit Play HD using the APP the management via remote control may be disabled USER S MANUAL bit Play HD AUDISON AC LINK OEM INTERFACE DRC ON OFF MODE SYSTEM UPGRADE PC IR REM CONTROL FUSE 3A OPTI...

Страница 22: ... this logo is on USB storage devices are connected to the bit Play HD E When this logo is on an internal HDD is present FILE MANAGER the File Manager menu allows you to navigate the storage directory of the device and open copy delete move or rename multimedia files How to copy your multimedia files in the bit Play HD A Transfer the multimedia audio video photo files to a USB storage device B Conn...

Страница 23: ...g on the Music menu you can navigate the device storage directory only displaying music files It is possible to open copy delete move or rename them see point 3 PHOTO By clicking on the Photo menu you can navigate the device storage directory only displaying photo files It is possible to open copy delete move or rename them see point 3 SETTINGS By clicking on the Settings menu you can select the b...

Страница 24: ... data connection costs might be charged by the mobile network operator The App supports all Android cell phones and tablets provided that an Android 4 2 or higher operating system is installed A list of compatible devices is available in the Play Store To install the App proceed as follows 1 Launch the Play Store App 2 Search for the Audison bit Play HD v 2 0 App 3 Select Install to download and i...

Страница 25: ...000000 To modify them connect an external monitor to the bit Play HD and proceed as described below REMARK to stay connected to external networks for the navigation using the mobile device select the Wi Fi Direct mode see section 6 1 2 2 6 1 2 ANDROID DEVICE SETUP The bit Play HD features three modes to interface with Android devices Wi Fi Client WI Fi Direct Wi Fi Hotspot as described below A bit...

Страница 26: ... and enter the name with the keyboard using the remote The pre set default name is bit Play HD 5 Confirm the entry with the OK button after moving the pointer to the name box 6 To rename the device password select the Password menu and then enter the desired numerical password USER S MANUAL bit Play HD 6 ...

Страница 27: ... dongle is correctly inserted 3 From the Home window of your Android device select in sequence Menu Settings Wireless and Networks 4 Select Wi Fi Settings and then Wi Fi to enable the wireless antenna Select the Wi Fi menu wait for your mobile device to detect the available Wi Fi networks and select the network and the password previously set up in the bit Play HD REMARK if the device user name an...

Страница 28: ...tored in the mobile device and in the Player through Wi Fi while keeping the internet connection enabled through the mobile device WARNING before activating this mode make sure your mobile device supports the Wi Fi Direct connection A bit Play HD Wi Fi Direct mode selection 1 Access the bit Play HD SETUP menu by remote control 2 Select the Wi Fi setup menu ...

Страница 29: ...Direct mode 4 Select the Wi Fi SSID menu to set up the device name and then enter the name chosen 5 Confirm the entry with the OK button after moving the pointer to the name box 6 To rename the device password select the Password menu and then enter the desired numerical password ...

Страница 30: ...eck if the Wi Fi USB dongle is correctly inserted 3 From the Home window of your Android device select in sequence Menu Settings Wireless and Networks 4 Select Wi Fi Settings and then Wi Fi to enable the wireless antenna Select the Wi Fi direct menu wait for your mobile device to detect the available Wi Fi networks and select the network and the password previously set up in the bit Play HD REMARK...

Страница 31: ...lay HD and an existing Wi Fi network installed in the vehicle while keeping the internet connection when provided by the vehicle active to access all the multimedia contents A bit Play HD Wi Fi Client mode selection 1 Access the bit Play HD SETUP menu by remote control 2 Select the Wi Fi setup menu 6 ...

Страница 32: ...t once started a Wi Fi connection is available see section 5 1 If not restart the device and check if the Wi Fi USB dongle is correctly inserted 3 From the Home window of your Android device select in sequence Menu Settings Wireless and Networks 4 Select Wi Fi Settings and then Wi Fi to enable the wireless antenna Wait for your mobile device to detect the available Wi Fi networks and select the ne...

Страница 33: ...f this page is displayed the connection between bit Play HD and the mobile device needs to be verified Select OK to verify the availability of a Wi Fi network and the connection with the bit Play HD Cancel to stop the connection 6 1 3 AUDISON APP FOR ANDROID WARNING each time a new storage device is connected to the bit Play HD for example a USB PEN DRIVE the files may not immediately show in the ...

Страница 34: ...agement window 1 Select PHONE 2 Select a folder 5 Reproduction 1 Play track 2 Pause track 3 Next track 4 Previous track 5 Track progress bar 6 bit Play HD volume adjustment 7 Track title 8 Album or folder cover for the selected track 9 Repeat 10 Shuffle 10 7 6 5 8 4 1 2 3 9 WARNING to end a track reproduction close the APP using the specific function in your Android device called Kill APP 6 ...

Страница 35: ...lay track 2 Pause track 3 Next track 4 Previous track 5 Track progress bar 6 bit Play HD volume adjustment 7 Track title 8 Album or folder cover for the selected track 9 Repeat 10 Shuffle 10 7 6 5 8 4 1 2 3 9 WARNING to end a track reproduction close the APP using the specific function in your Android device called Kill APP WARNING the tag of the file being reproduced may sometimes be unavailable ...

Страница 36: ...he files folders previously selected and then select COPY 5 If the operation is successful the copied files will be displayed in the HDD directory Wait for the progress bar to disappear before starting a new operation WARNING do not turn off or disconnect the device while transferring files in order to avoid possibly damaging them and making them inaccessible During the file transfer performing an...

Страница 37: ...37 USER S MANUAL bit Play HD D SETTINGS E INFO 1 Select the menu icon 1 Select the menu icon 2 Select SETTINGS 2 Selec INFO 3 Select the menu to customize 3 Firmware version of the APP in use 6 ...

Страница 38: ...e network operator The App supports all IOS Iphone Ipad Ipod devices A list of compatible devices is available in the Store App To install the App proceed as follows 1 Launch the App Store 2 Search for the Audison bit Play HD App v 2 0 3 Select Install to start the download and the automatic installation of the App How to connect your IOS mobile device to the bit Play HD 1 Before turning the bit P...

Страница 39: ...rough Wi Fi When using this mode the access to navigation through the mobile device is disabled By default the pre set device user name and password are bit Play HD and 00000000 To modify them connect an external monitor to the bit Play HD and proceed as described below A bit Play HD Wi Fi Hotspot mode selection 1 Access the bit Play HD SETUP menu by remote control 2 Select the Wi Fi setup menu 6 ...

Страница 40: ...select the Wi Fi SSID menu and enter the name with the keyboard using the remote The pre set default name is bit Play HD 5 Confirm the entry with the OK button after moving the pointer to the name box 6 To rename the device password select the Password menu and then enter the desired numerical password 6 ...

Страница 41: ...e see section 5 1 If not restart the device and check if the Wi Fi USB dongle is correctly inserted 3 From the Home window of your IOS device select in sequence Menu Settings Wireless and Networks 4 Select Wi Fi Settings and then Wi Fi to enable the wireless antenna Wait for your mobile device to detect the available Wi Fi networks and select the network and the password previously set up in the b...

Страница 42: ...N DRIVE the files may not immediately show in the App menu Wait the necessary time for the indexing of the files to complete Time varies according to the amount of files and levels of sub folders and the process may require up to one minute Before opening the Audison bit Play HD APP we recommend to first close any unused APPs still active A bit Play HD content 1 Select the bit Play HD device 2 Sel...

Страница 43: ...ick on the folder icon 4 Select the menu icon to access the Player management window 5 Reproduction 1 Play track 2 Pause track 3 Next track 4 Previous track 5 Track progress bar 6 bit Play HD volume adjustment 7 Track title 8 Album or folder cover for the selected track 9 Repeat 10 Shuffle 10 7 6 5 8 4 1 2 3 9 WARNING to end a track reproduction close the APP using the specific function in your IO...

Страница 44: ...lect the menu icon to access the Player management window 5 Reproduction 1 Play track 2 Pause track 3 Next track 4 Previous track 5 Track progress bar 6 bit Play HD volume adjustment 7 Track title 8 Album or folder cover for the selected track 9 Repeat 10 Shuffle 10 7 6 5 8 4 1 2 3 9 WARNING to end a track reproduction close the APP using the specific function in your IOS device called Kill APP 6 ...

Страница 45: ...ECT and after COPY 4 Select the HDD destination directory for the files folders previously selected and then select COPY 5 If the operation is successful the copied files will be displayed in the HDD directory Wait for the progress bar to disappear before starting a new operation WARNING do not turn off or disconnect the device while transferring files in order to avoid possibly damaging them and ...

Страница 46: ...46 USER S MANUAL bit Play HD D SETTINGS E INFO 1 Select the menu icon 1 Select the menu icon 2 Select SETTINGS 2 Select INFO 3 Select the menu to customize 3 Firmware version of the APP in use 6 ...

Страница 47: ... network see section 6 2 2 1 2 To open the Control Panel on a iOS device slide the screen from bottom to top 3 From the Control Panel slide the screen from right to left to access the Player window 4 Select the bit Play Audison Air Play 5 Play the tracks stored in the iOS device using iTunes REMARK The bit Play HD using AirPlay only reproduces audio files and not video WARNING if you want to use t...

Страница 48: ...48 7 1 INTERNAL HDD INSTALLATION 7 MAIN SYSTEM SETTINGS USER S MANUAL bit Play HD 7 STEP 1 STEP 3 STEP 5 STEP 2 Included in the package Max 2TB support STEP 4 STEP 6 2 1 3 ...

Страница 49: ...n the remote control and then turn off the product After installing the hard drive in the bit Play HD see section 7 1 proceed as follows 1 Turn on the bit Play HD SSD 2 Use the remote control to select USER S MANUAL bit Play HD 7 SETUP INTERNAL HD NEXT SYSTEM FORMAT OK OK 1 3 5 2 4 6 ...

Страница 50: ...ible to select the size of the VIDEO depending on the monitor you are using via the remote control button 16 9 Press the button until you get the best possible picture quality Procedure using the Settings Menu Use the remote control to select Select the desired ratio Select the desired resolution Confirm the selected resolution 3 4 5 6 SETUP Video Aspect Ratio VIDEO TV SYSTEM 1 5 2 USER S MANUAL b...

Страница 51: ...AGE Use the remote control to select Use the remote control to select SETUP Select the desired language Advanced Choose the default video language Advanced Choose the default subtitle language 1 2 3 3 SETUP System Menu Language 1 2 USER S MANUAL bit Play HD 7 ...

Страница 52: ... for example a USB PEN DRIVE the files may not immediately show in the App menu Wait the necessary time for the indexing of the files to complete Time varies according to the amount of files and levels of sub folders and the process may require up to one minute Before opening the Audison bit Play HD APP we recommend to first close any unused APPs still active USER S MANUAL bit Play HD 7 ...

Страница 53: ...the window shown below is displayed Wait about 2 minutes for the firmware update All FIRMWARE updates must be performed in strict accordance with the following procedures The FIRMWARE update must be performed with utmost care following the precautions displayed on the monitor to prevent damage to the product 1 Turn off the bit Play HD 2 Go to the bit Drive Portal URL www bitdrive it and follow the...

Страница 54: ...l offer the following warnings close all running applications disable standby and energy saving features disable anti virus and anti spyware systems Select Yes to continue 8 Once the update has been successfully completed the window you can see on your right will appear Select OK to continue 9 Exit the program by clicking on X then turn the bit Play HD off 10 Disconnect the USB cable located betwe...

Страница 55: ...at kind of USB ports are available on the bit Play HD USB 2 0 plugs are available with type A connectors Compatibility is also guaranteed for USB 3 0 devices with type A connectors How many external USB devices can I connect to the bit Play HD The bit Play HD has 2 USB ports An external USB HUB can increase the number of ports but may occasionally result in errors Can I connect an external USB HDD...

Страница 56: ...ual Through the official Audison bit Play HD Android App without the need to connect an external monitor as a video interface Connect the USB device USB pen drive USB external HDD etc containing the files folders you want to copy to the bit Play HD Select the Option menu in the Audison bit Play HD App Use the controls for managing files folders Copy Delete Move Rename Multi Select see section 6 1 ...

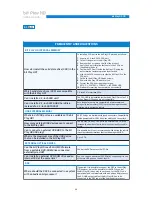
Страница 57: ...le video resolution for the monitor used AUDIO You cannot hear the audio signal Verify that the volume of the sound system is set correctly If you use the TOSLINK optical connection the S PDIF LPCM setting from the main menu SETTING AUDIO SPDIF OUTPUT must be active Noise is heard while playing songs using the bit One with TOSLINK input Check the integrity of the optical cable and connections If y...

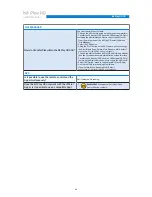
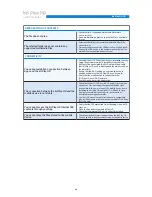
Страница 58: ...it Play HD_xxxx network Verify that the mobile device is connected to the bit Play HD_xxxx Wi Fi network Shut down and restart the application The connection between the bit Play HD and the mobile device is not stable Check that the Wi Fi USB key Wi Fi Dongle is placed in an open area of the passenger compartment and as close as possible to the point of use of the mobile device Avoid installing th...

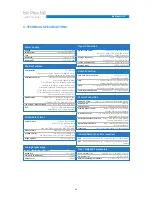
Страница 59: ...t Level 1 VRMS Signal Connection Digital Video Output 1 x HDMI v1 3 type A receptacle Resolution 480p 576p 720p 50Hz 60Hz 1080i 50Hz 60Hz 1080p 50Hz 60Hz Analog Video Ouput 1 x RCA Composite video Resolution 576i PAL 480i NTSC Toslink Optical Output 1 x S P DIF PCM 96 kHz 24 bit Analog Pre Out 2 x RCA Left Right Data Connection USB Hard Drive Pen Drive 2 x USB A 1 1 2 0 USB extension supplied LAN ...

Страница 60: ...All specifications subject to change without notice PART OF ELETTROMEDIA 62018 Potenza Picena MC Italy T 39 0733 870 870 F 39 0733 870 880 www elettromedia it ...

Отзывы: