Audiomedia GDF879 Скачать руководство пользователя страница 16


USB Device/Map Card Operation

Bluetooth 

EN - 14 


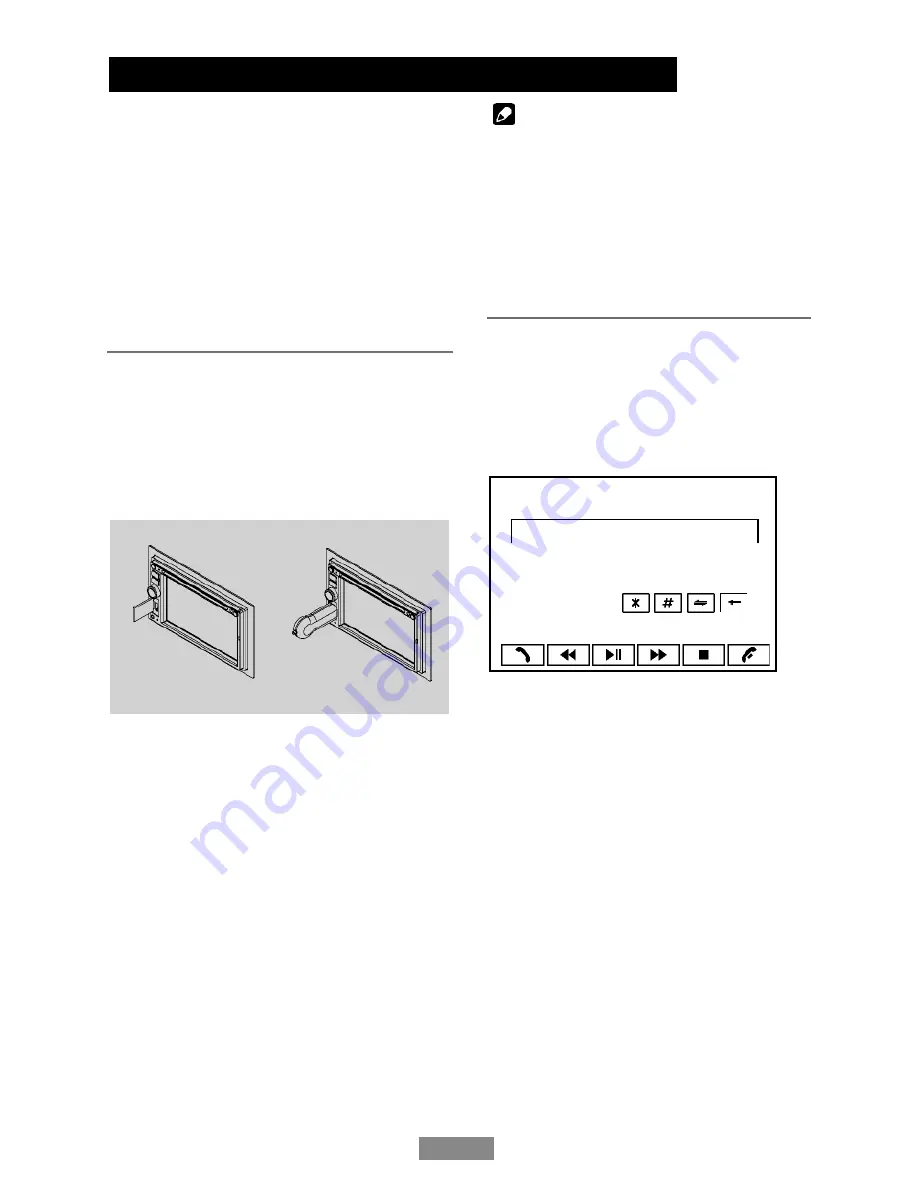
Using Map Card (SD/MMC Card) 

1. Insert a map card (SD/MMC Card) into the 

corresponding slot, the unit will load the map 
and switch to navigation mode automatically, 
then navigating by the touch screen. 

2. To remove the card, you should first select 

another source, in order to avoid damaging 
the card, then press the card slightly, and 
take off the card after it popped out. 

Note: You can control the panel using the 
touch panel control, refer to previous section: 
“Panel Control”. 

Using USB device 

1. Insert a USB device into the USB connector. 

When connecting a USB device, the unit will 
read the files automatically. 

2. To remove the USB device, you should 

first select another source, in order to avoid 
damaging the USB device. Then take off the 
USB device. 


USB Notes 

USB functions (flash memory type) MP3 music 
play 

1.  USB flash memory 2 in 1 support 
2.  Fat 1 2/fat 1 6/fat 32 is possible 

- Fat 12/16 (dir: 200 support, file: 500 

support) 

- Fat 32 (dir: 200 support, file: 500 support) 

3.  File name: 32 byte/dir name: 32 byte /tag 

name: 32 byte 

4.  Tag (ID3 tag ver 2.0) 

- Title/artist/album: 32 byte support 

5.  USB 1.1 support 

USB 2.0 support 
(It can not support USB 2.0 speed. Just, get 
the same speed with USB 1.1) 

Not all kinds of USB devices are compatible 
with the unit. 

Note: 

For your safety, avoid talking on the phone 
as much as possible while driving. 

Bluetooth is a wireless transmission way 
for short distance. The built-in Bluetooth 
can connect with the mobile phones having 
Bluetooth function. 
After connecting, you can control your 
mobile phone through the unit. 

Pairing 

Use this function to establish a connection 
between the unit and your mobile phone. 
Press the 

SRC

 button repeatedly on the 

panel or touch BT on the SOURCE menu to 
enter BlueTooth mode. 

SRC  P A I R  

S E L  

1 2 3 45 

6 7 

8 9  

0

+  

T o u c h   P A I R ,   t h e n   “ W A I T I N G   F O R  
PAIRING“ appears on the TFT . 

Turn on Bluetooth function of your mobile 
phone, keep phone within 3 meters to 
the unit and start to search for Bluetooth 
devices. 
After the name of the Bluetooth module 
“SUN-BMA19” appears on the pairing list 
of your mobile phone, select it. At this 
time, a pairing code is required. Enter the 
pairing code (“0000” by default) and the 
Bluetooth pairing will process automatically. 
Some mobile phones may instruct you to 
select connect or disconnect, please select 
connecting. 
After pairing successfully, the Bluetooth icon 
stops to blink, “PAIR OK” will appear on the 
screen. 

To stop pairing, press PAIR during pairing. 


Содержание GDF879

Страница 1: ...GDF879 D V D V C D C D M P 3 M P 4 U S B P L A Y E R W I T H F M M W T U N E R B L U E T O O T H A N D G P S N A V I G A T I O N S Y S T E M I n s t r u c t i o n M a n u a l...

Страница 2: ......

Страница 3: ...center or the dealer distributor you purchased from if one of the following symptoms is found Never use the video display function in the front when driving to prevent the violation of laws regulatio...

Страница 4: ...herein may result in hazardous radiation exposure Do not open covers and do not repair yourself Refer servicing to qualified personnel Two laser products Wave length CD 780nm DVD 650nm Laser power No...

Страница 5: ...operate correctly depending on the application used to encode WMA files About MP3 Supply of this product only conveys a license for private non commercial use and does not convey a license or imply an...

Страница 6: ...5 Map card slot 6 USB connector 7 Reset 8 AV in jack 9 Touch panel 10 Remote sensor 11 Eject disc when disc inserted Reset the mechanism long press 12 Disc slot Safety Notes The DVD video display of...

Страница 7: ...lay setting Setting menu press 2 sec 8 System setup 9 Fast reverse forward playback 10 Zoom DVD VCD Dial Receive call 11 Enter 12 Menu cursor 13 Stop Return 14 Digit area 15 Enter source menu 16 Power...

Страница 8: ...battery with the stamped mark facing upward Close the back cover Warning Store the battery where children cannot reach If a child accidentally swallowed the battery consult a doctor immediately Do not...

Страница 9: ...or select the option by moving the cursor and then confirm Note When some devices are not ready they cannot be selected You should stop switching when the playing source you desired has been selected...

Страница 10: ...rol menu Disc Playback 1 When disc inserted display shows READ For MP3 or disc with mixed files reading time may exceed 1 minute 2 ERROR will be displayed if error found in disc operation 3 For VCD CD...

Страница 11: ...rrent track Random track playback for CD VCD MP3 Only You can play all the tracks in random order 1 During playback press RDM once or more RDM icon will appear on the display 2 Press RDM again to sele...

Страница 12: ...rogram play EN 10 DVD Audio Select Press AUDIO or R L to select audio language to listen if the DVD has multiple audio languages VCD Audio Select Press R L to select audio channel to listen L R Stereo...

Страница 13: ...t right 5 Display Select Menu 6 Audio select 7 Subtitle select 8 Play Pause Enter Video CD Playback Menu While playback touch the center of the screen Touch the icon to access desired function 1 Displ...

Страница 14: ...station 3 Touch to tune automatically Press more than 2 seconds to tune manually 4 Touch to select preset station 1 6 5 Display select menu 6 Hold it to scan preset stations 7 Auto search and store st...

Страница 15: ...u SETTING menu RDS Setting menu TA VOL RETUNE Mode Source menu SETTING menu RDS Setting menu RETUNE L S RETUNE S or RETUNE L is time length selection of TA SEEK retune interval RETUNE S Short TA SEEK...

Страница 16: ...t USB 2 0 support It can not support USB 2 0 speed Just get the same speed with USB 1 1 Not all kinds of USB devices are compatible with the unit Note For your safety avoid talking on the phone as muc...

Страница 17: ...ng up Voice Transfer During talking touch to transfer audio from the unit to your mobile phone and touch again to transfer audio from your mobile phone to the unit Note Some mobile phones will transfe...

Страница 18: ...ll appear on the screen 2 CONNECT ON OFF Set the automatic connection on or off When CONNECT AUTO and Paired OK if the distance is over 10 metres the connection will exit The Bluetooth technology will...

Страница 19: ...the TFT screen will appear MUSIC PLAYING Some mobile phone may instruct whether resume to playback If there is an incoming phone call the music player will stop and the TFT screen will appear PHONE N...

Страница 20: ...e remote control then press the ENTER button to confirm 2 Press the desired 4 digit password and then press ENTER button to confirm 3 Record the password and keep it in a safe place for future referen...

Страница 21: ...selected language If the DVD disc does not contain the subtitle file in the selected language the subtitle will be displayed in the default language You can change the language by pressing Subtitle k...

Страница 22: ...Adjust LOUD ON OFF Press to turn loudness on off BEEP ON OFF Press to turn button EN 20 beep sound on off 12 24 HOURS Press to select 12 hours or 24 hours mode AM PM Press to set hours and press to s...

Страница 23: ...nd connect to the car battery Otherwise a high possibility of serious short circuit to the electrical system may be occurred Replacing a new fuse with 1 5A rating when the old one is broken using no f...

Страница 24: ...Device Connections continued Parking Brake Cable Connections Reverse Driving Cable Connections EN 22...

Страница 25: ...O OUT R Red FRONT AUDIO OUT L White External Microphone CAMERA Pink VIDEO OUT 1 Yellow VIDEO 1 IN Yellow CAMERA IN Yellow VIDEO OUT 2 Yellow AUX 1 IN L White AUX 1 IN R Red Telephone mute active low l...

Страница 26: ...ur reversing camera to the car radio s reversing camera input using a video cable not supplied Ensure that you now place the USB cable located at the back of the unit in such a way that it comes out o...

Страница 27: ...tion Mounting angle is over 30 Mounting is unstable Adjust mounting angle to less than 30 Mount the unit securely with the supplied parts TUNER mode Unable to receive stations The antenna is not conne...

Страница 28: ...el 1 0 2V Video signal input NTSC PAL FM Stereo Radio Frequency range 87 5 108 0MHz Usable sensitivity 8dB Frequency response 30Hz 1 5KHz Stereo separation 30dB 1KHz Image response ratio 50dB IF respo...

Страница 29: ...CLASS 1 LASER PRODUCT...

Отзывы: