background image

User's Manual 


12. Network Connections 

Version 4.4.0 

179 

MP26x/MP27x 

12.2.1.2  Configuring Wireless Properties under the Settings Tab 

The procedure below describes the configurations under the 

Settings

  tab of the ‘LAN 

Wireless 802.11 Access Point Properties’ screen.  


Note: 

Since  the device's  wireless network is configured to operate with default 
settings, it is recommended to leave the settings in this screen at their default 
values. 


To configure the wireless parameters under the Settings tab: 

1. 

Click the 

Settings

 tab. 

Figure 


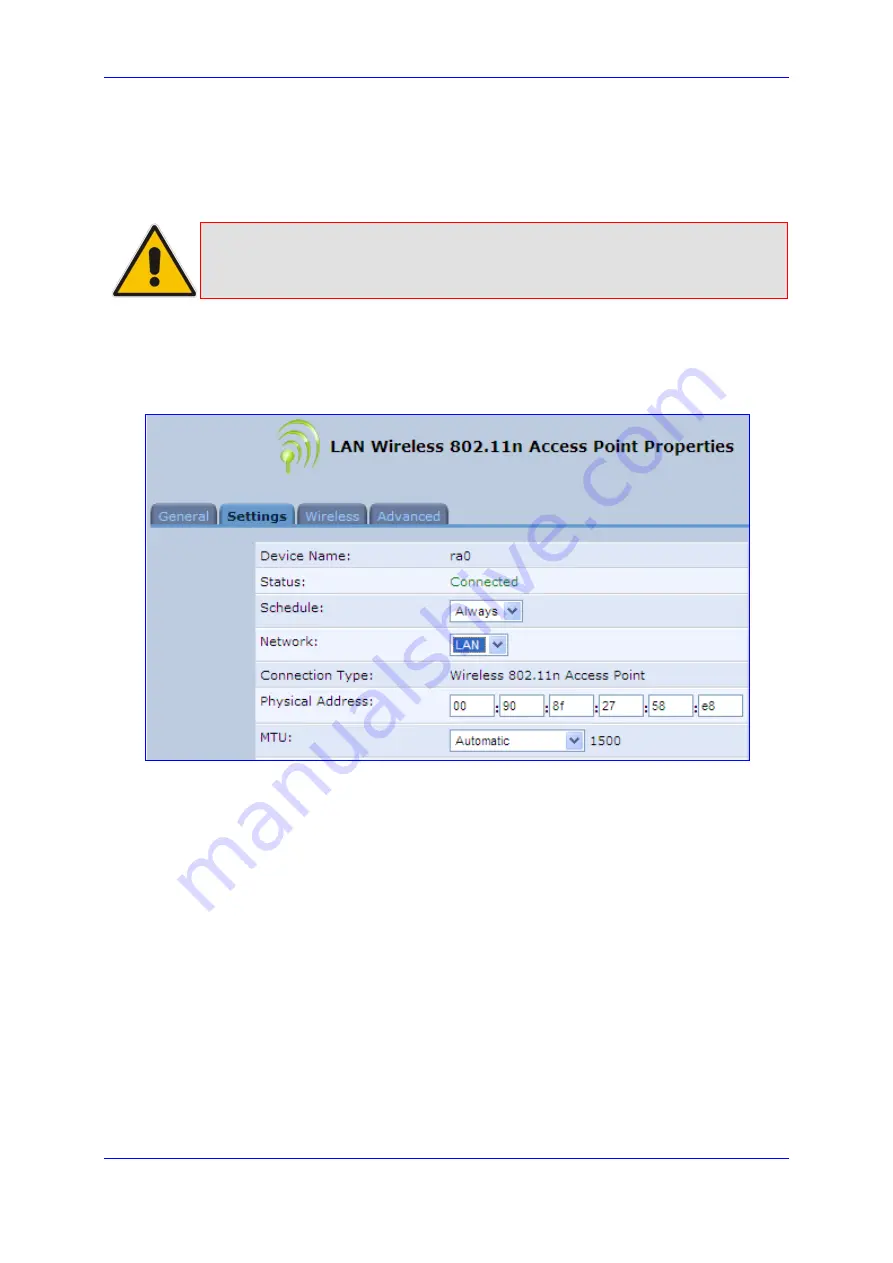
12-42: LAN Wireless 802.11 Access Point Properties (Settings Tab) Screen 


2. 

From the ‘Scheduler’ drop-down list, select the Scheduler rule during which this 
network connection is active. To ensure that the network is always active, select 
‘Always’. To define Scheduler rules, see Sectio


5.5.1 

on page

 59.


3. 

From the ‘Network’


drop-down list, select the network (LAN, WAN, or DMZ)  to which 

this new network is related. 

4. 

In the ‘Physical Address’ field, define the physical address of the network card used 
for your network. 

5. 

From the ‘MTU’


drop-down list, select the largest packet size permitted for Internet 

transmission  (i.e.,  MTU  /  Maximum Transmission Unit). By default, it is set to 
'Automatic', whereby the device selects the best MTU for your Internet connection. If 
you modify this field, ensure that the range is 1200 to 1500. 

6. 

Click 

OK

 to save your settings. 


Содержание MP-26 series

Страница 1: ...AudioCodes CPE Access Gateway Products MP 26x MP 27x Multimedia Home Gateway User s Manual MP 26x MP 27x Multimedia Home Gateway Version 4 4 0 Document LTRT 23510...

Страница 2: ......

Страница 3: ...net 45 4 2 3 Configuring 3G USB Modem 46 4 3 Configuring Wireless LAN Wi Fi 47 4 4 Configuring SIP Signaling Protocol 48 4 5 Registering the Handset to the Base Unit 50 5 Getting Started with the Web...

Страница 4: ...guring Proxy Redundancy 95 9 2 Configuring Dialing Parameters 97 9 2 1 Syntax for Digit Maps and Dial Plans 100 9 3 Configuring Media Streaming 102 9 3 1 Configuring Codecs 103 9 3 1 1 Supported Codec...

Страница 5: ...PPPoA 160 12 1 1 4 Routed ETHoA or Bridged ETHoA 161 12 1 1 5 IPoA 163 12 1 2 WAN Ethernet Connections 165 12 1 2 1 External DSL Modem using PPPoE 165 12 1 2 2 External Cable Modem without Authentica...

Страница 6: ...a TR 069 and TR 104 246 13 4 2 3 Security Concerns and Measures 250 13 4 3 Syslog 251 13 4 4 Automatic File Download 251 13 4 4 1 Firmware File Download 251 13 4 4 2 Configuration File Download 251 13...

Страница 7: ...RAID Underlying Devices 315 17 3 Print Server 317 17 3 1 Connecting and Setting up a Printer on Windows 318 17 3 2 Print Protocols 319 17 3 2 1 Internet Printing Protocol 320 17 3 2 2 Microsoft Share...

Страница 8: ...andset 394 24 2 1 Charging the Handset 394 24 2 2 Checking the Battery Level 395 24 2 3 Switching the Base Unit On or Off 395 24 2 4 Switching the Handset On or Off 395 24 2 5 Replacing the Batteries...

Страница 9: ...s 418 25 13 5 Three Way Conference Calls 419 25 13 5 1Making a Three Way Conference Call with another Handset and an External Party 419 25 13 5 2Making a Three Way Conference Call with your Handset an...

Страница 10: ...guage 439 30 5 Selecting a Wallpaper 439 30 6 Setting the Contrast Level 439 30 7 Activating or Deactivating Automatic Answer 440 30 8 Selecting a Base Station 440 30 9 Resetting Handset to Factory De...

Страница 11: ...Screen 62 Figure 5 13 Advanced Protocols 63 Figure 5 14 Advanced Protocols Edit Service 64 Figure 5 15 Advanced Protocols Edit Service Server Ports 64 Figure 6 1 Map View Screen e g MP 264 65 Figure...

Страница 12: ...2 Quality of Service Traffic Shaping Screen 138 Figure 11 3 Add Device Traffic Shaping Screen 138 Figure 11 4 Edit Device Traffic Shaping Screen 139 Figure 11 5 Add Shaping Class Screen 140 Figure 11...

Страница 13: ...2 44 Wireless Network Group in Wireless Tab Screen 181 Figure 12 45 MAC Filtering 182 Figure 12 46 MAC Filtering Settings 182 Figure 12 47 MAC Address Added to MAC Filtering Table 182 Figure 12 48 Net...

Страница 14: ...231 Figure 13 3 New Certificates Screen e g MP 264 232 Figure 13 4 Create Self Signed X509 Certificate Screen 233 Figure 13 5 New Self Signed X509 Certificate Screen e g MP 264 233 Figure 13 6 Newly C...

Страница 15: ...ice Settings Add Service 300 Figure 17 1 File Server Screen 301 Figure 17 2 File Server Share Settings Screen 302 Figure 17 3 User Screen 303 Figure 17 4 File Server Screen with the Share 303 Figure 1...

Страница 16: ...Figure 19 5 Time Server Settings Screen 349 Figure 19 6 Backup and Restore Screen 350 Figure 19 7 Edit Backup Screen 351 Figure 19 8 Restore Screen 352 Figure 19 9 Configuration File Screen 353 Figur...

Страница 17: ...ing Handset Cradle to Base Unit e g MP 264 393 Figure 24 3 Handset Charging in Cradle 394 Figure 24 4 Installing Batteries 396 Figure 24 5 Areas of the Handset 397 Figure 24 6 Areas of the Handset LCD...

Страница 18: ...Table 13 3 Notifications and Logged Events 229 Table 13 4 Severity of Logged Events 229 Table 13 5 Operations per Configuration Management Interface 236 Table 13 6 InternetGatewayDevice WANDevice i W...

Страница 19: ...User s Manual Contents Version 4 4 0 19 MP26x MP27x Table B 1 Router and VoIP Software Specifications e g MP 264 459 Table B 2 DECT Phone Specifications e g MP 264 463...

Страница 20: ...User s Manual 20 Document LTRT 23510 MP 26x MP 27x Multimedia Home Gateway Reader s Notes...

Страница 21: ...N Stretto TrunkPack VMAS VoicePacketizer VoIPerfect VoIPerfectHD What s Inside Matters Your Gateway To VoIP and 3GX are trademarks or registered trademarks of AudioCodes Limited All other products or...

Страница 22: ...in Canada This Class B digital apparatus complies with Canadian ICES 003 Cet appareil num rique de la classe B est conforme la norme NMB 003 du Canada Operation is subject to the following two condit...

Страница 23: ...ection to cable modem or FTTH ONU Optional xDSL WAN backup using 3G USB dongles HD VoIP telephony and PBX capabilities including flexible configuration of individual SIP accounts per DECT extension Fo...

Страница 24: ...P 263 MP 272 It automatically turns into a LAN port when the DSL is in use Model WAN Access LAN Wi Fi FXS DECT USB 2 0 Bluetooth MP 262 VDSL2 ADSL2 Eth WAN 4 x FE 802 11b g n 2 2 MP 262 DB VDSL2 ADSL2...

Страница 25: ...User s Manual 1 Introduction Version 4 4 0 25 MP26x MP27x The figure below illustrates the typical applications supported by the device Figure 1 1 Device Typical Application e g MP 264...

Страница 26: ...User s Manual 26 Document LTRT 23510 MP 26x MP 27x Multimedia Home Gateway Reader s Notes...

Страница 27: ...DC power adaptor use only supplied DECT handset and cradle Make sure that all these items are included If any items are missing contact your sales representative The following prerequisites are requir...

Страница 28: ...User s Manual 28 Document LTRT 23510 MP 26x MP 27x Multimedia Home Gateway Reader s Notes...

Страница 29: ...1 1 Front Panel The front panel provides LEDs for displaying various operating status and button s for activating various features such as Wi Fi The type of LEDs and buttons depend on the model For mo...

Страница 30: ...iFi Enables disables Wi Fi connectivity 802 11 b g n Activates Wi Fi Protected Setup WPS DECT 1 Registers the handset to the device base unit Activates Paging mode Enables disables DECT Bluetooth 2 En...

Страница 31: ...ired successfully Blinking Software upgrade in progress Red On WAN IP address has not yet been acquired from the ISP i e in the process of acquiring or has failed to acquire Off WAN Ethernet cable is...

Страница 32: ...25 12 on page 416 Off DECT is disabled Bluetooth Red Solid Bluetooth is enabled but no device is connected Red Flashing Malfunction in device Green Solid Bluetooth is enabled and a mobile device is c...

Страница 33: ...EDs behavior when the Automatic Dialer feature is used described in detail in Section 8 1 3 Table 3 3 Front Panel LED Descriptions for Automatic Dialer Feature Stage LED Status Broadband Phone Before...

Страница 34: ...23510 MP 26x MP 27x Multimedia Home Gateway 3 1 2 Rear Panel The rear panel provides the ports for connecting the various interfaces The figure below displays the rear panel of the device Figure 3 3...

Страница 35: ...machines 5 USB2F 3 USB Type A port for print or file servers or for optional WAN backup using a 3G USB dongle Note The device provides only one USB port in this location 6 Power Power plug for connect...

Страница 36: ...empting to train establishing a connection with the Internet Service Provider Off No physical xDSL link LAN WAN Yellow Slow Blinking Connected at 10 Mbps Fast Blinking Connected at 100 Mbps Steady On...

Страница 37: ...ure that the VAC ratings match Ensure that you have read the device s Regulatory Information obtained from www audiocodes com library Note The cabling procedures for the device models are identical an...

Страница 38: ...Use minimum 26 AWG wire for cabling the xDSL port to the public switched telephone network PSTN 2 Connect the LAN Ethernet ports labeled LAN 1 4 to your LAN computers using RJ 45 CAT 5 Ethernet cables...

Страница 39: ...he mounting bracket Before you begin ensure that you have the following items Wall mounting bracket supplied 2 x screws 2 x wall anchors Screwdriver Note When choosing a wall on which to mount the dev...

Страница 40: ...by rubber caps Remove these caps b With its rear panel facing the mounting bracket hold the device at an angle and slide the base of the device under the two latches located on the mounting bracket c...

Страница 41: ...Part I Device Gateway Part I describes the configuration of the device router and VoIP gateway functionality...

Страница 42: ...Reader s Notes...

Страница 43: ...ration 1 Connect the cables as shown in Section 3 2 on page 37 2 Power on the device 3 From your browser enter the device s default IP address 192 168 2 1 the following screen appears Figure 4 1 Langu...

Страница 44: ...e For more configuration information refer to Section 8 on page 73 and Section 12 on page 153 4 2 1 1 Configuring WAN ATM over DSL ADSL 1 In the Quick Setup page under the WAN ATM over DSL group from...

Страница 45: ...nt Protocol over Ethernet PPPoE Point to Point Tunneling Protocol PPTP Layer 2 Tunneling Protocol L2TP 3 Click OK 4 2 2 Configuring WAN Ethernet 1 In the Quick Setup page under the WAN Ethernet group...

Страница 46: ...nder the WAN 3G USB Modem group select the required connection type from the Connection Type drop down list Figure 4 5 WAN 3G USB Modem 2 Enter your login user name and password 3 Click OK 4 In the Ad...

Страница 47: ...elow describes how to configure Wi Fi To configure Wi Fi 1 In the Quick Setup page under the Wireless group in the Wireless Network SSID field enter your preferred SSID 2 From the Security field drop...

Страница 48: ...naling Protocol To configure the SIP Signaling Protocol 1 Click the Voice Over IP menu in the side menu bar the Voice Over IP screen appears 2 On the Signaling Protocol page enter the Gateway Name and...

Страница 49: ...dit icon to configure the line the following screen appears Figure 4 10 Line Settings 6 In the User ID field enter the phone s VoIP user ID used for identification to initiate and accept calls 7 In th...

Страница 50: ...on keys to scroll to the Registration icon and then press the Select softkey 3 On the device base unit press the DECT LED button until 2 5 seconds it starts flashing green the base unit enters registr...

Страница 51: ...enter its IP address instead The Login screen appears Figure 5 1 Login Screen 3 From the Language drop down list select the desired language for the Web graphical user interface GUI display 4 In the...

Страница 52: ...oice Over IP screen for configuring the VoIP parameters to use the device s VoIP functionality to place and receive calls over the Internet using a standard telephone set and DECT handset see Chapter...

Страница 53: ...see Section 19 1 on page 345 File Server Creates a file server on the device see Section 17 1 on page 301 Firmware Upgrade Upgrades the device s firmware see Section 19 6 on page 361 IP Address Distri...

Страница 54: ...ler Defines time segments for system rules see Section 5 5 1 on page 59 System Settings Modifies administrator settings including the device s host name see Section 15 5 on page 293 Time Settings Conf...

Страница 55: ...in the Web interface Figure 5 2 Typical Table Structure Each table row denotes an entry in the table The table also provides Action icons for performing various tasks These icons are described in the...

Страница 56: ...you to add new users and assign login usernames and passwords You may also group users according to your preferences The default user is Administrator with admin case sensitive as the username and pa...

Страница 57: ...mote user If you do not want to change the remote user s password leave this field empty d Retype New Password If a new password was assigned enter it again to verify correctness e Role User s role in...

Страница 58: ...Section 15 5 on page 293 where you can define an outgoing mail server Notification Address user s email address System Notify Level By default the None option is selected which means that the device d...

Страница 59: ...5 5 2 on page 61 Protocols see Section 5 5 3 on page 63 5 5 1 Configuring Scheduler Rules Scheduler rules are used for limiting the activation of firewall rules to specific time periods specified in...

Страница 60: ...t Screen a Under the Days of Week group select the days of the week for which you want the rule to be active b In the Hours Range table click the New icon to define an active or inactive hourly range...

Страница 61: ...rk objects to apply security rules based on host names instead of IP addresses This may be useful since IP addresses change from time to time Moreover it is possible to define network objects accordin...

Страница 62: ...re 5 12 Edit Item Screen 4 From the Network Object Type drop down lists select a source address type IP Address IP Subnet IP Range MAC Address Host Name DHCP Option supporting options 60 61 and 77 All...

Страница 63: ...defined applications and common port settings You can use protocols in various security features such as Access Control and Port Forwarding You may add new protocols to support new applications or ed...

Страница 64: ...r Ports 4 You may choose any of the protocols available in the drop down list or add a new one by selecting Other When selecting a protocol from the drop down list the screen refreshes presenting the...

Страница 65: ...view a graphical display of the network elements connected to the device This is displayed in the Map View screen accessed by clicking the Home menu in the menu bar You can click a displayed network e...

Страница 66: ...mbol of the network through which it is connected This host is either a DHCP client that has received an IP lease from the device or a host with a static IP address auto detected by the device Click t...

Страница 67: ...al 6 Viewing a Graphical Display of the Device s Network Version 4 4 0 67 MP26x MP27x Icon Description Depicts a USB driver Depicts a USB disk on key that is connected to the device Depicts a disconne...

Страница 68: ...User s Manual 68 Document LTRT 23510 MP 26x MP 27x Multimedia Home Gateway Reader s Notes...

Страница 69: ...s XP see Section 7 1 1 on page 69 Linux see Section 7 1 2 on page 70 Note It is recommended to set the computers to automatically obtain their IP addresses from a DHCP server 7 1 1 Configuring Compute...

Страница 70: ...operating system to automatically obtain its IP address from a DHCP server The DHCP server can be the device s embedded DHCP server To configure a computer running Linux for dynamic IP addressing 1 Lo...

Страница 71: ...es a wireless connection Notes To configure the device s LAN wireless connection see Section 12 2 1 on page 177 This section is based on computers running Microsoft Windows 7 To configure a computer t...

Страница 72: ...User s Manual 72 Document LTRT 23510 MP 26x MP 27x Multimedia Home Gateway 3 Enter your PIN code as supplied by your Service Provider Figure 7 3 Connect to a Network PIN Code...

Страница 73: ...detects the Internet dialer type and therefore Internet connection configuration is unnecessary However it is recommended to manually configure the Internet connection after the Automatic Dialer proc...

Страница 74: ...Multimedia Home Gateway Figure 8 1 Quick Setup Screen You can configure one of three main Internet connection types WAN ATM over DSL see Section 8 1 1 on page 75 WAN PTM over DSL see Section 8 1 2 on...

Страница 75: ...ternet Connection By default the Automatic PVC Scan check box is selected This means that the device configures the VPI VCI and encapsulation parameters automatically To configure these parameters man...

Страница 76: ...uted ETHoA The procedure below describes how to connect to the Internet by ETHoA To configure routed ETHoA connection 1 Under the WAN ATM over DSL group from the Connection Type drop down list select...

Страница 77: ...ox is selected This means that the device configures the VPI VCI and encapsulation parameters automatically To configure these parameters manually clear this check box for more information see Section...

Страница 78: ...screen appears Figure 8 7 PTM Automatic IP Address Ethernet Connection 2 See Section 12 on page 153 for additional configuration information 8 1 2 3 Point to Point Protocol over Ethernet PPPoE The pro...

Страница 79: ...in password 3 From the Internet Protocol drop down lists select the method for assigning an IP address provided by your ITSP 4 Click OK 8 1 2 5 Layer 2 Tunneling Protocol L2TP The procedure below desc...

Страница 80: ...et connection then in the Quick Setup screen from the Connection Type drop down list select No Internet Connection 8 1 3 1 Manual IP Address Ethernet Connection The procedure below describes how to co...

Страница 81: ...ddress connection Under the WAN Ethernet group from the Connection Type drop down list select Automatic IP Address Ethernet Connection Figure 8 12 Automatic IP Address WAN Ethernet Connection 8 1 3 3...

Страница 82: ...1 Under the WAN Ethernet group from the Connection Type drop down list select Point to Point Tunneling Protocol PPTP Figure 8 14 PPTP WAN Ethernet Connection 2 Configure the following provided by your...

Страница 83: ...1 Under the WAN Ethernet group from the Connection Type drop down list select Layer 2 Tunneling Protocol L2TP Figure 8 15 L2TP WAN Ethernet Connection 2 Configure the following provided by your ITSP L...

Страница 84: ...physical WAN type xDSL or Ethernet and then attempts the relevant WAN connection methods The indication for a successful result is connection i e receipt of an IP address and a ping test This section...

Страница 85: ...g_retries_timeout 2 xDSL vpi 8 vci 48 encap LLC system network internet_url Address or Domain Name for Ping Test Note If the xDSL section in the factory settings is omitted the device performs an auto...

Страница 86: ...is port causes the Automatic Dialer to fail 3 Power on the device the Automatic Dialer begins its operation and you can view the progress status by checking the device s LEDs see Section 3 1 1 2 1 on...

Страница 87: ...cable 3 Power on the device 4 Wait for the Automatic Dialer process to end i e the Broadband LED stops blinking 5 Log in to the device s Web interface 6 Manually configure the Internet connection usi...

Страница 88: ...ss the Quick Setup screen The Wireless group in the screen is shown below Figure 8 16 Wireless Group in Quick Setup Screen 2 Select the Enable Wireless check box to enable the wireless network 3 In th...

Страница 89: ...08 Line settings see Section 9 6 on page 110 Line extensions see Section 9 7 on page 119 Speed dials see Section 9 8 on page 121 Telephone interfaces see Section 9 9 on page 123 Bluetooth see Section...

Страница 90: ...e Gateway 9 1 Configuring the SIP Signaling Protocol The procedure below describes how to configure the SIP parameters To configure SIP parameters 1 From the menu bar click the Voice Over IP menu the...

Страница 91: ...oing INVITE messages Note This parameter appears only in Advanced mode Enable PRACK When enabled the device replies with a PRACK message upon receipt of a reliable provisional response The device does...

Страница 92: ...er is available only if the Use SIP Proxy check box is selected Use SIP Proxy IP and Port for Registration When selected default the SIP proxy s IP address and port is also used for registration When...

Страница 93: ...ed Register Expires Defines the registration timeout in seconds Note This parameter is available only if the Use SIP Registrar or Use SIP Proxy IP and Port for Registration check box is selected Regis...

Страница 94: ...only in Advanced mode STUN Server Address Defines the IP address of the STUN server used to resolve private addresses Note This parameter is available only if Enable STUN is selected STUN Server Port...

Страница 95: ...s registered to a proxy primary or redundant it sends keep alive messages to this proxy The device switches proxies only once the proxy to which it has registered does not respond In both modes the fo...

Страница 96: ...proxy The valid range is 10 to 86 400 seconds i e 24 hours The default value is 60 sec e To toggle between Symmetric and Asymmetric modes use the Switch back to Primary SIP proxy when available check...

Страница 97: ...bes how to configure the dialing parameters To configure dialing parameters 1 In the Voice Over IP screen click the Dialing tab the following screen appears Figure 9 3 Dialing Tab Screen 2 Configure t...

Страница 98: ...nds If the limit is exceeded the dial tone stops and you a reorder tone is played Reorder Tone Timeout Defines the duration in seconds of the reorder tone The reorder tone is played for example when t...

Страница 99: ...is heard The user can initiate a second call and establish a 3 way conference by again pressing Flash after the second call is initiated During an existing call if a call comes in call waiting pressin...

Страница 100: ...test possible match The syntax that can be used in each numbering scheme is described in the table below Dial Plans A dial plan translates specific patterns into specific SIP destination addresses For...

Страница 101: ...101 101 1 2 9 xxxxxxxxx Received dialed number that begins with digit 1 followed by any digit from 2 through 9 and then followed by any nine digits 19222244445 xx Received dialed number that begins w...

Страница 102: ...media streaming parameters 1 In the Voice Over IP screen click the Media Streaming tab following screen appears Figure 9 4 Media Streaming Tab Screen 2 Select the Enabled check box under Wide Band Res...

Страница 103: ...g voice data Different codecs have different characteristics such as data compression and voice quality For example G 723 is a codec that uses compression so it is good for use where bandwidth is limi...

Страница 104: ...describes how to configure the voice and fax parameters To configure voice and fax parameters 1 In the Voice Over IP screen click the Voice and Fax tab and then click Advanced the following screen ap...

Страница 105: ...average jitter in the network in milliseconds The default is 35 msec Optimization Factor Defines the adaptation rate of the jitter buffer mechanism Higher values cause the jitter buffer to respond fa...

Страница 106: ...ncy 1 to 7 Redundancy level Note This parameter appears only if Fax Transport Mode is set to T 38 Relay Fax Relay Jitter Buffer Delay Defines the Fax Relay Jitter Buffer 0 Adaptive Jitter Buffer The d...

Страница 107: ...ns in voice mode depends on the Modem Transport Mode the device switches to FoIP later when it defines exactly that a monitored call is the fax call CED and CND or V 21 Preamble Enable CNG Detection E...

Страница 108: ...Gateway 9 5 Configuring Supplementary Services The procedure below describes how to configure the services parameters To configure supplementary services 1 In the Voice Over IP screen click the Servi...

Страница 109: ...Busy Incoming calls are forwarded only if the endpoint is busy i e if all lines are active No Reply Incoming calls are forwarded only if the endpoint does not answer before a user defined timeout see...

Страница 110: ...cted MWI Subscribe Expiration Time Defines the interval between registrations Note This parameter is available only when the check box Subscribe to MWI is selected Auto Attendant Enabled Enables Disab...

Страница 111: ...en calling an Auto Attendant configured line The Auto Attendant message can be created using Windows XP Windows 7 9 5 1 1 1 Windows XP The procedure below describes how to create an Auto Attendant mes...

Страница 112: ...e As dialog box appears Figure 9 8 Save As Dialog Box 4 Click Change the Sound Selection dialog box appears 5 From the Format drop down list select CCITT u Law 6 From the Attributes drop down list sel...

Страница 113: ...lect 8000 4 Click the red Record icon to start the recording The recording should be made using the following example Hello you ve reached ________ For __ User allocated to phone connected to FXS2 __...

Страница 114: ...k appears on the screen 7 From the Audio Track drop down list select Set Sample Format 16 bit PCM 8 From the Audio Track drop down list select Set Rate 8000 Hz 9 Click File Export the Export File dial...

Страница 115: ...cordings on USB can be performed as described below To save Auto Attendant recordings on USB 1 Record an Auto Attendant message as described is Section 9 5 1 1 2 Copy the file to the main directory in...

Страница 116: ...o Attendant fields as shown below Figure 9 13 Auto Attendant Web Fields Enabled Enables Disables the Auto Attendant feature Line Enables line numbers as they appear in the Line Settings tab Figure 9 1...

Страница 117: ...If you receive another incoming call when you already have an established call on one extension all the idle extensions ring and the busy extension hears a call waiting tone You can make outgoing call...

Страница 118: ...ntication Requested 401 407 b In the Authentication Password field enter the password received from your VoIP service provider This is used when sending a response to Unauthorized or Proxy Authenticat...

Страница 119: ...ation of the DECT handset with the device base unit Notes You can also register the DECT handset with the base unit by pressing the DECT button on the device front panel as described in Section 24 6 o...

Страница 120: ...or each line extension click the corresponding Edit icon to define a name for the extension the following screen appears Figure 9 18 Extension Settings Screen 3 Click OK to save your settings To regis...

Страница 121: ...ed to configure Speed Dial Settings To configure speed dialing 1 In the Voice Over IP screen click the Speed Dial tab the following screen appears Figure 9 19 Speed Dial Tab Screen 2 Click the New ico...

Страница 122: ...ou select this option then configure the following a In the User ID field enter the user ID to call b In the IP Address or Host Name field enter the remote party s IP address or host name c In the Por...

Страница 123: ...alog port FXS interface polarity is reversed to indicate the start of a VoIP session and is reversed back when the VoIP session ends To enable polarity reversal 1 In the Voice Over IP screen click the...

Страница 124: ...han four meters line of sight from the device The mobile device and the device should be placed in areas where mobile coverage is reasonable for regular mobile calls without call failures or voice int...

Страница 125: ...en or On the Web interface click Discoverable the paired mobile phone name appears under the Devices group as shown in the figure below Figure 9 25 Device Names Screen Note If the Bluetooth LED on the...

Страница 126: ...by the device when it is in range When your mobile device connects to the device via Bluetooth the first time it remembers the mobile device When you turn on your mobile device and bring it within ra...

Страница 127: ...e Phonebook using the Device 1 Pair the mobile device to the device as shown in Section 9 10 1 on page 124 2 When the mobile device is connected and the Bluetooth LED is solid green short press the Bl...

Страница 128: ...ws the number of entries ported from your device the Bluetooth LED on the device stops blinking green 4 Select any handset to associate with this Phonebook Note There may be a situation where there is...

Страница 129: ...t with a synchronized Phonebook To associate a DECT Handset with a Synchronized Phonebook 1 In the Voice Over IP screen access the Bluetooth tab the following screen appears Figure 9 30 Bluetooth Init...

Страница 130: ...on 9 10 5 on page 129 3 Click the Remove icon corresponding to the phonebook that you want to delete the phonebook is removed 9 10 7 Routing an Incoming Call The procedure below describes how to route...

Страница 131: ...Answering a Waiting Call The procedure below describes how to answer a waiting call This depends on how you configured the flash hook functionality using the Flash keys sequence style parameter in Sec...

Страница 132: ...tone At this point you can initiate a second call by dialing another party s number 2 To cancel the hold state and resume the previous phone call press the flash key button and then press 1 10 4 Trans...

Страница 133: ...ure that you can hear a dial tone 2 Dial the call forward key sequence according to your configuration for example 32 a dial tone is heard 3 Dial the number of the phone to where you want calls forwar...

Страница 134: ...nd a dial tone is heard 2 Dial party C s number and wait until the call is established 3 Press the flash key button again to add parties B and C to a 3 way conference call 4 To end the 3 way conferenc...

Страница 135: ...a large number of network attached devices can lead to congestion The need for QoS mechanisms is more apparent in wireless LANs where bandwidth is even more limited typically no more than 20 Mbps on...

Страница 136: ...ne the WAN bandwidth To use the QoS Wizard 1 From the menu bar click the QoS menu link the Quality of Service screen appears with the QoS Wizard tab selected by default Figure 11 1 QoS Wizard Tab Scre...

Страница 137: ...vice You can also de ne QoS traf c shaping rules for a default device These rules are used on a device that has no definitions of its own This enables the de nition of QoS rules on Default WAN for exa...

Страница 138: ...aping tab Figure 11 2 Quality of Service Traffic Shaping Screen 2 Click the New icon the Add Device Traf c Shaping screen appears Figure 11 3 Add Device Traffic Shaping Screen 3 From the Device drop d...

Страница 139: ...aximum receive bandwidth rate in the corresponding field This limits the device s bandwidth receipt rate to that of the DSL modem 6 From the TCP Serialization drop down list select whether to enable T...

Страница 140: ...at do not match the de ned shaping class or any other classes that may be de ned on the device This can be viewed in the Class Statistics screen To add a shaping class 1 From the menu bar click the Qo...

Страница 141: ...ich the class can be active By default the class is always active 11 Click OK to save your settings 11 2 2 1 Class Rules Class rules de ne which packets belong to the class Without class rules the sha...

Страница 142: ...s This may result in blocking HTML traf c at the ISP A solution for such a scenario is limiting the bandwidth of low priority TCP connections such as le download To add outbound and inbound class rule...

Страница 143: ...e same connection tracking mechanism used by the rewall Once a packet matches a rule all subsequent packets with the same attributes receive the same QoS parameters both inbound and outbound A packet...

Страница 144: ...y tab the Traf c Priority screen appears Figure 11 7 Traffic Priority Screen This screen is divided into two identical groups QoS Input Rules and QoS Output Rules for prioritizing inbound and outbound...

Страница 145: ...ecting User Defined b From the Destination Address drop down list select the network object for the destination address of the packets sent to or received from the network object See Step 3 above for...

Страница 146: ...ority to the rule and then select the priority level where 0 is the lowest and 7 the highest This sets the priority of a packet on the connection matching the rule while routing the packet c Select th...

Страница 147: ...uing or bandwidth allocation or by choosing dedicated routes for speci c traf c ows DiffServ de nes a eld in IP packet headers referred to as DSCP Hosts or routers passing traf c to a DiffServ enabled...

Страница 148: ...ex field enter a hexadecimal number for the DSCP value 4 In the 802 1p Priority drop down list select an 802 1p priority level each priority level is mapped to low medium or high priority 5 Click OK t...

Страница 149: ...ed to network critical traf c Values four and ve are mapped to medium priority which may be applied to delay sensitive applications such as interactive video and voice Values three to zero are mapped...

Страница 150: ...ample the amount of packets sent dropped or delayed are just a few of the parameters that you can monitor per each shaping class Note Class statistics are available only if you have de ned at least on...

Страница 151: ...ited according to the modem s uplink bandwidth Since the device automatically gives higher priority to VoIP packets in its internal queues it is not necessary to define traffic shaping classes To conf...

Страница 152: ...r s Manual 152 Document LTRT 23510 MP 26x MP 27x Multimedia Home Gateway 6 Click OK to apply the new definition Figure 11 14 QoS Edit Device Traffic Shaping Submitting the Configuration 7 Click OK aga...

Страница 153: ...nternet connection type from your Internet Telephony Service Provider ITSP For example whether you are connected to the Internet using a static or dynamic IP address or what protocols such as PPTP or...

Страница 154: ...the required network connection group Internet DSL Connection configures an Internet connection when using the device integrated DSL modem see Section 12 1 1 on page 155 Internet Connection configure...

Страница 155: ...ed Ethernet Connection over ATM Routed ETHoA see Section 12 1 1 4 on page 161 LAN WAN Bridged Ethernet Connection over ATM Bridged ETHoA see Section 12 1 1 4 on page 161 Routed IP over ATM IPoA see Se...

Страница 156: ...L connection you can view the properties of this connection as described below To view the WAN PTM over DSL properties In the Network Connections screen click the Edit icon corresponding to the WAN PT...

Страница 157: ...click Next the Internet DSL Connection screen appears Note You can also create a PVC connection using the Advanced Connection option 3 Select the Determine Protocol Type Automatically PVC Scan option...

Страница 158: ...sion To create a PPPoE connection 1 In the Network Connections screen click the New icon the Connection Wizard screen appears 2 Select the Internet DSL Connection option and then click Next the Intern...

Страница 159: ...d to units used with other technologies The small constant cell size allows the transmission of video audio and computer data assuring that no single type of data consumes the connection ATM addressin...

Страница 160: ...d screen appears 2 Select the Internet DSL Connection option and then click Next the Internet DSL Connection screen appears 3 Select the Point to Point Protocol over ATM PPPoA option and then click Ne...

Страница 161: ...A virtual path consists of multiple virtual channels to the same endpoint 8 Click Next the Connection Summary screen appears Figure 12 12 Connection Summary Screen 9 Select the Edit the Newly Created...

Страница 162: ...ATM ETHoA screen appears Figure 12 14 Ethernet Connection over ATM ETHoA Screen 4 If you selected the Manual PVC Settings option you also need to configure the following VPI and VCI pair of identifier...

Страница 163: ...ETHoA connection is added to the Network Connections screen 12 1 1 5 IPoA Routed IP over ATM IPoA is a standard for transmitting IP traffic in an ATM network To create an IPoA connection 1 In the Netw...

Страница 164: ...ant cell size allows the transmission of video audio and computer data assuring that no single type of data consumes the connection ATM addressing consists of two identifiers that identify the virtual...

Страница 165: ...using PPPoE The procedure below describes how to configure an Internet connection using PPPoE when the device is connected to an external DSL modem To create a PPPoE connection for external DSL modem...

Страница 166: ...out Authentication The procedure below describes how to configure an Internet connection when the device is connected to an external Cable modem and the ITSP does not require a username nor password t...

Страница 167: ...tion and then click Next Figure 12 22 Internet Connection External Cable Modem The Internet Cable Modem Connection screen appears Figure 12 23 Internet Cable Modem Connection Ethernet 5 Select the Eth...

Страница 168: ...ltimedia Home Gateway 6 Select the Edit the Connection check box if you wish to be routed to the new connection s configuration screen after clicking Finish 7 Click Finish to save the settings the new...

Страница 169: ...at an ISP that has an L2TP Remote Access Concentrator LAC The LAC transmits the L2TP packets over the network to the L2TP Network Server LNS at the corporate side To create L2RP for external Cable mod...

Страница 170: ...ername and Password Authentication option the Layer 2 Tunneling Protocol L2TP screen appears Figure 12 28 Layer 2 Tunneling Protocol L2TP Screen 7 Enter the L2TP server host name or IP address provide...

Страница 171: ...n Summary opens Figure 12 29 L2TP Connection Summary 11 Select the Edit the Newly Created Connection check box if you wish to be routed to the new connection s configuration screen after clicking Fini...

Страница 172: ...ternet To create a DHCP connection 1 In the Network Connections screen click the New icon the Connection Wizard screen appears 2 Select the Internet Connection option and then click Next the Internet...

Страница 173: ...net Connection screen appears Figure 12 33 Ethernet Connection Screen 6 Select the Dynamic Negotiation DHCP option and then click Next the screen Connection Summary opens Figure 12 34 DHCP Connection...

Страница 174: ...ork Connections screen click the New icon the Connection Wizard screen appears 2 Select the Internet Connection option and then click Next the Internet Connection screen appears Figure 12 35 Internet...

Страница 175: ...Connection option and then click Next the Ethernet Connection screen appears Figure 12 37 Ethernet Connection Screen 6 Select the Manual IP Address Configuration option and then click Next the screen...

Страница 176: ...al IP Address Configuration option and then click Next the Connection Summary screen appears Figure 12 39 Manual IP Connection Summary 8 Select the Edit the Connection check box if you wish to be rout...

Страница 177: ...device you must also configure the PC for wireless connectivity see Section 7 2 on page 71 You can also configure and enable the wireless LAN in the Quick Setup screen To configure the Wireless LAN 1...

Страница 178: ...ed These parameters can be configured using the other tabs as described in the subsequent sections 12 2 1 1 Enabling and Disabling the Wireless Network Once you have configured the device wireless net...

Страница 179: ...ings Tab Screen 2 From the Scheduler drop down list select the Scheduler rule during which this network connection is active To ensure that the network is always active select Always To define Schedul...

Страница 180: ...describes the configurations under the Wireless tab of the LAN Wireless 802 11 Access Point Properties screen To configure the wireless parameters under the Wireless tab 1 Click the Wireless tab Figu...

Страница 181: ...b Only 802 11b g n 802 11g n 802 11n Only Country Region Select the Wi Fi country region for allowing only permitted channels frequencies for the region Note This parameter determines the available ch...

Страница 182: ...m the MAC Filtering Mode drop down list select either Allow or Deny or Disable if you do not want use MAC filtering Figure 12 45 MAC Filtering 2 In the MAC Filtering Table click the New MAC Address ic...

Страница 183: ...ault By enabling it you can control the setup of your wireless security which is defined under the Security group see Section 12 2 1 3 4 on page 189 To enable WPS 1 From the menu bar click the Network...

Страница 184: ...User s Manual 184 Document LTRT 23510 MP 26x MP 27x Multimedia Home Gateway Figure 12 49 LAN Wireless 802 11n Access Point Properties...

Страница 185: ...ation Method drop down list select Pre Shared Key 6 There are three ways that a client can connect using WPS to the device s wireless network Push Button a Invoke a connection to the access point from...

Страница 186: ...edia Home Gateway Figure 12 51 Click Go Button 7 An Enrollee Registration has been successfully completed message appears in the Status field Figure 12 52 Registration Successfully Completed Note You...

Страница 187: ...b interface from the Protected Setup Method drop down list select Client PIN Code the following screen appears Figure 12 53 Client Pin Code b Enter the PIN generated by the client into Client Pin Code...

Страница 188: ...a Client Using an Access Point PIN a From the client invoke a connection to the access point using the Access Point PIN b From the Web interface enter the Access Point Pin Code from the screen below...

Страница 189: ...Wi Fi Protected Access 2 provides stronger data protection and network access control It provides enterprise and consumer Wi Fi users with a high level of assurance that only authorized users can acce...

Страница 190: ...onnected to other access points This enables roaming from one wireless network to another d PMK Cache Period This field appears only when selecting the 802 1x authentication method This field defines...

Страница 191: ...Note The encryption key must be defined in the wireless Windows client as well This is done in the Connection Properties Configuration window your encryption key is entered in both the Network key an...

Страница 192: ...User s Manual 192 Document LTRT 23510 MP 26x MP 27x Multimedia Home Gateway Figure 12 59 Configuring Authentication Only Security...

Страница 193: ...how often the beacon packet is sent A beacon is a packet broadcast by the device to synchronize the wireless network 4 In the DTIM Interval field enter the Delivery Traffic Indication Message DTIM cou...

Страница 194: ...nection 1 In the Wireless tab s screen under the section Virtual APs section click the New Virtual AP link the screen refreshes displaying the new virtual connection Figure 12 62 New Virtual AP The ne...

Страница 195: ...screen click the Edit icon corresponding to the Virtual AP to open the virtual connection s LAN Wireless 802 11n Access Point Virtual AP Properties screen a In the Internet Protocol section under the...

Страница 196: ...MP 27x Multimedia Home Gateway Figure 12 64 Example Virtual AP After performing this procedure you have secured all of your wireless connections A guest is only able to connect to the Guests wireless...

Страница 197: ...ugh a network such as the Internet The firewall can be activated per network connection To enable the firewall on this network connection select the Enabled check box Internet Connection Fastpath Sele...

Страница 198: ...the physical ports on the device To configure the LAN hardware Ethernet switch 1 From the menu bar click the Network Connections menu the Network Connections screen appears Figure 12 66 Network Connec...

Страница 199: ...to define time segments during which the connection is active Once a scheduler rule s is defined the drop down list allows you to choose between the available rules Network Select whether the paramet...

Страница 200: ...e ports their status and the VLANs of which they are members Untagged packets packets without a VLAN tag that arrive at a port are tagged with the VLAN number that appears under the Port VLAN Identifi...

Страница 201: ...t your computer by preventing unauthorized users from gaining access to it through a network such as the Internet The firewall can be activated per network connection To enable the firewall on this ne...

Страница 202: ...different network connections this section only provides a general description of the screens provided when the connection s Edit icon is clicked 12 3 1 General Tab The General tab displays mainly re...

Страница 203: ...eral communication parameters It is recommended not to change the default values in this screen unless you are familiar with the networking concepts they represent Since your device is configured to o...

Страница 204: ...ission Unit MTU species the largest packet size permitted for Internet transmission In the default setting Automatic the device selects the best MTU for your Internet connection Select Automatic by DH...

Страница 205: ...lect one of the following methods Obtain DNS Server Address Automatically the connection automatically obtains a DNS server address Use the Following DNS Server Addresses manually configure DNS server...

Страница 206: ...f the computer has disconnected from the network If it has the server may reassign this IP address to a newly connected computer This feature ensures that IP addresses that are not in use become avail...

Страница 207: ...allowing multiple machines to share a single IP address Use NAPT if your LAN encompasses multiple devices a topology that necessitates port translation in addition to address translation Device Metric...

Страница 208: ...Gateway Enter the device s IP address Metric A measurement of the preference of a route Typically the lowest metric is the most preferred route If multiple routes exist to a given destination network...

Страница 209: ...ab For a description of the Bridging tab see Section 12 5 1 on page 223 Note This tab is applicable only to LAN WAN Bridging connections 12 3 7 PPP Tab The PPT tab displays the PPPoE settings Note Thi...

Страница 210: ...authentication scheme The username and password are requested by your networking peer in plain text PAP however is not a secure authentication protocol Man in the middle attacks can easily determine...

Страница 211: ...PPTP tab displays the PPTP settings Note This tab is applicable only to PPTP connections Figure 12 82 Editing Connection PPTP Tab Table 12 5 PPTP Tab Parameter Descriptions Parameter Description PPTP...

Страница 212: ...s to it through a network such as the Internet The firewall can be activated per network connection To enable the firewall on this network connection select the Enabled check box You can click the Int...

Страница 213: ...terfaces To create a new VLAN interface 1 From the menu bar click the Network Connections menu and then in the screen Network Connections click the New icon the Connection Wizard screen appears Figure...

Страница 214: ...y Figure 12 86 Advanced Connection 3 Select the VLAN Interface option and then click Next the VLAN Interface screen appears Figure 12 87 VLAN Interface 4 From the Underlying Device drop down list sele...

Страница 215: ...he Connection Summary screen appears Figure 12 88 Connection Summary 6 Check the Edit the Newly Created Connection check box to be routed to the new connection s configuration screen after clicking Fi...

Страница 216: ...nection In case you change to manual you can enter the largest packet size you should leave this value in the 1200 to 1500 range Underlying Connection The Ethernet device that the connection is implem...

Страница 217: ...osts Subnet Mask A mask used to determine to what subnet an IP address belongs An example of a subnet mask value is 255 255 0 0 Lease Time In Minutes Each device is assigned an IP address by the DHCP...

Страница 218: ...w IP Address link the DHCP Relay Server Address screen appears Figure 12 91 DHCP Relay Server Address 3 Specify the IP address of the DHCP server 4 Click OK to save the settings Table 12 9 Assigning S...

Страница 219: ...ernet This adds security since internal LAN addresses are not transmitted over the Internet In addition NAT allows many addresses to exist behind a single valid address Use the NAT routing mode if you...

Страница 220: ...evice is active Use the New Route button to add a route or edit existing routes 12 4 3 Advanced Tab Your Telephone Adapter s firewall helps protect your computer by preventing unauthorized users from...

Страница 221: ...the Connection Wizard screen appears 2 Select the Advanced Connection option and then click Next the Advanced Connection screen appears 3 Select the Network Bridging option and then click Next the scr...

Страница 222: ...ding New Network Bridging Important notes The same connections cannot be shared by two bridges A bridge cannot be bridged Bridged connections lose their IP settings 5 Click Next the screen Connection...

Страница 223: ...e Bridge tab the LAN Bridge Properties screen appears Figure 12 99 Bridging Tab 3 Select the check boxes corresponding to the connection names that you want to bridge or clear the check boxes of conne...

Страница 224: ...g the New icon and then enter another VLAN ID 7 To create a traffic filtering rule on the bridge to enable direct packet flow between the WAN and the LAN i e Bridge Filtering a In the Bridge Filter ta...

Страница 225: ...oblems in the service 13 1 1 Remote Configuration By default the device is provided with factory default settings which are common to all gateway devices except for the MAC address The factory setting...

Страница 226: ...wered up The table below lists the main device configuration parameter groups Table 13 1 Main Configuration Parameter Groups Group Description VoIP Parameters relating to the VoIP functionality e g an...

Страница 227: ...he user unplugs the power during the firmware burning process The device s firmware can be upgraded using one of the following mechanisms The new firmware can be pushed uploaded to the device using th...

Страница 228: ...tains a set of status and performance information internally This information or parts of it can be retrieved via the different management interfaces e g Web or TR 069 The table below describes the st...

Страница 229: ...cations System restart Firmware configuration update Logged Events Debug level logging optional Note that the terms Alarm and Notification represent the same thing The difference between alarm notific...

Страница 230: ...odify the settings of the firewall or to disable it You can also change local IP addresses and other settings making it difficult or impossible to access the device from the home network Therefore rem...

Страница 231: ...to all system settings and parameters Both secure HTTPS and non secure HTTP access is available Allow Incoming WAN Access to the Telnet Server Allows access to the command line session and to all sys...

Страница 232: ...ormed by using a certification validation process client server There are two types of certificates Self signed certificates Certificate Authority CA signed certificates The procedure below describes...

Страница 233: ...Generate a message appears notifying you that the device is generating the certificate d After a few moments click Refresh the New Self Signed X509 Certificate screen appears Figure 13 5 New Self Sig...

Страница 234: ...le is saved as a crt file 3 Configure the Apache server by configuring the SSLCACertificateFile parameter to point to the location where the certificate file is located Since this is a self signed cer...

Страница 235: ...icon the Load CA s Certificate screen appears Figure 13 10 Load CA s Certificate Page c Click Browse locate the CA certification file that you created and then click Upload to load the file 6 Configur...

Страница 236: ...eb GUI provides easy and intuitive configuration of all the device parameters i e VoIP network interfaces security QoS and advanced system settings In addition the Web GUI provides status monitoring p...

Страница 237: ...by the DSL forum TR 069 http www broadband forum org technical download TR 069 pdf TR 104 http www broadband forum org technical download TR 104 pdf Figure 13 11 TR 069 CPE WAN Management Protocol e...

Страница 238: ...ured IP_Routed DHCP_Spoofed PPPoE_Bridged PPPoE_Relay PPTP_Relay L2TP_Relay DefaultGateway mt_cwmp_param_wan_con n_ip_default_gateway_get set The IP address of the default gateway for this connection...

Страница 239: ...ridged RouteProtocolRx mt_cwmp_param_wan_con n_xxx_route_protocol_rx_ get set Defines the Rx protocol to be used Off RIPv1 Optional RIPv2 Optional OSPF Optional RSIPAvailable mt_cwmp_param_wan_con n_x...

Страница 240: ...et set Represents a comma separated list of hardware addresses that are allowed to connect to this connection if MACAddressControlEnabled is 1 for a given interface DHCPLeaseTime dhcp_lease_time_get...

Страница 241: ...ton map via the VoiceService i VoiceProfile i ButtonMap object DSCPCoupled A true value indicates that the CPE is constrained such that transmitted call control packets use the same DSCP marking as tr...

Страница 242: ...an A true value indicates support for a configurable numbering plan via the VoiceService i VoiceProfile i NumberingPla n object PSTNSoftSwitch Over A true value indicates the device is capable of supp...

Страница 243: ...th a version indicator in the form X Y For example SIP 2 0 Note Only one protocol is supported at a time SRTP Support for SRTP Note Currently SRTP is not supported ToneGeneration Support for tone gene...

Страница 244: ...dition to a set of discrete values A range must only be indicated if all values within the range are supported Note Currently only a single ptime per codec is supported Table 13 11 InternetGatewayDevi...

Страница 245: ...f any requests OutboundProxyPort voip signalling sip sip_outbou nd_proxy proxy Destination port for connecting to the outbound proxy This parameter must be ignored unless the value of the OutboundProx...

Страница 246: ...Represented as a six hexadecimal digit value using all upper case letters and including any leading zeros ModelName manufacturer model_num ber A string identifying the model name of the device Produc...

Страница 247: ...tion EthernetBytes Received mt_cwmp_param_wan_ conn_ip_stats_get STAT_RX_BYTES Total number of bytes received over all connections within the same WANConnectionDevice that share a common MAC address s...

Страница 248: ...File Parameter Description ResetStatistics When set to one it resets the statistics for this voice line Always False when read PacketsSent mt_voip_get_state line state Total number of RTP packets sen...

Страница 249: ...nection to the server Applies only to SIP ReceivePacketLoss Rate mt_voip_get_state line state Current receive packet loss rate in percentage FarEndPacketLoss Rate Current far end receive packet lost r...

Страница 250: ...tions that take place between a CPE and ACS provide confidentiality for these transactions and allow various levels of authentication The following security mechanisms are incorporated in this protoco...

Страница 251: ...a remote file server via HTTP FTP or TFTP This method is used by many service providers 13 4 4 1 Firmware File Download The device s firmware files contain information about the target product type a...

Страница 252: ...cker is sniffing the network The following security measures are available to prevent this The configuration file can be encrypted using 3DES with pre configured key This prevents the user from learni...

Страница 253: ...vior You can define specific input and output rules control the order of logically similar sets of rules and make a distinction between rules that apply to WAN and LAN network devices The Web based ma...

Страница 254: ...nternet or from a computer in the home network is checked against the set of firewall rules to determine whether the request should be allowed to pass through the firewall If the request is permitted...

Страница 255: ...TTP HTTPS DNS IMAP POP3 and SMTP The list of allowed services at Maximum Security mode can be edited in the screen s Access Control on page 256 Some applications such as some Internet messengers and P...

Страница 256: ...services you should consider blocking such as popular game and file sharing servers For example to ensure that your employees do not put your business at risk from illegally traded copyright files yo...

Страница 257: ...summary of the rule that you just added Click the Edit icon to edit the access control rule for the service the screen Edit Service opens 7 Select the network group to which you would like to apply th...

Страница 258: ...otocols and enter the local IP address or host name of the computer that hosts the Web server When an Internet user points her browser to the external IP address of the device it forwards the incoming...

Страница 259: ...ule 3 From the Local Host drop down list select the network object defined in Section 5 5 2 on page 61 or define one now by selecting the User Defined option This is the IP address or host name of the...

Страница 260: ...Figure 14 8 Specifying Public IP Address b By default the device forwards traffic to the same port as the incoming port If you wish to redirect traffic to a different port then from the Forward to Po...

Страница 261: ...Forwarding This can be useful when making the service temporarily unavailable and when expecting to reinstate it in the future Figure 14 9 Select Check Box of Port Forwarding Rule Active To temporari...

Страница 262: ...he device The device forwards this request to the DMZ host if one is designated unless the service is being provided by another PC in the home network assigned in Local Servers in which case that PC r...

Страница 263: ...you must use port triggering since this scenario conflicts with the following default firewall settings The firewall blocks inbound traffic by default The server replies to the device s IP and the con...

Страница 264: ...the link New Trigger Ports the screen Edit Service Server Ports opens Figure 14 13 Edit Service Server Ports 3 In the Protocol drop down list select UDP the screen refreshes providing source and dest...

Страница 265: ...o save the port triggering rule the screen Port Triggering now includes the new port triggering entry Figure 14 16 New Port Triggering Rule You can disable a port triggering rule without having to rem...

Страница 266: ...ess to a website 1 From the menu bar click the Security menu and in the screen Security click the Website Restrictions tab the screen Website Restrictions opens Figure 14 17 Website Restrictions 2 Cli...

Страница 267: ...Object 6 The parameter Schedule allows you to define the time period during which this rule takes effect You can select between Always or a specific schedule If you choose the option User Defined the...

Страница 268: ...ss group or schedule as required 2 Click OK to save your changes and return to the screen Website Restrictions To ensure that all current IP addresses corresponding to the restricted websites are bloc...

Страница 269: ...you can assign your primary LAN computer with a single NAT IP address in order to assure its permanent connection to the Internet Another example is when an application server with which you wish to c...

Страница 270: ...which you would like to apply the rule To apply the rule on all the LAN hosts select Any If you would like to add a new address select the User Defined This commences a sequence to add a new Network O...

Страница 271: ...our available NAPT addresses ranges from which you can select an entry If you would like to add a single address or a sub range from the given pool range select the User Defined option This commences...

Страница 272: ...hich the connection was initiated To view currently open connections 1 From the menu bar click the Security menu and in the screen Security click the Connections tab the screen Connections opens 2 Fro...

Страница 273: ...You can define specific input and output rules control the order of logically similar sets of rules and make a distinction between rules that apply to WAN and LAN devices To view the device s advance...

Страница 274: ...rst on all devices 2 Network devices rules rules can be defined per the device 3 Final rules rules defined here are applied last on all devices Numerous rules are automatically inserted by the firewal...

Страница 275: ...ule the screen refreshes allowing you to enter the hexadecimal value of the DSCP 4 Select the check box Priority to add a priority to the rule the screen refreshes allowing you to select between one o...

Страница 276: ...g that other packets that match this rule are not automatically allowed access For example this can useful when creating rules that allow broadcasting 7 Under the section Logging select the parameter...

Страница 277: ...attempts to establish inbound and outbound connections attempts to authenticate at an administrative interface Web based management or Telnet terminal firewall configuration and system start up To vi...

Страница 278: ...l Setup Configuration message WBM Login Indicates that a user has logged in to WBM CLI Login Indicates that a user has logged in to CLI via Telnet Event Type textual description of the event Blocked T...

Страница 279: ...by disabling this option and enabling some of the more specific options below it Specific Events Specify the blocked events that should be monitored Use this to monitor specific event such as SynFlood...

Страница 280: ...User s Manual 280 Document LTRT 23510 MP 26x MP 27x Multimedia Home Gateway Reader s Notes...

Страница 281: ...it can send a release message to the DHCP server which then makes the IP address available for use by others The device embedded DHCP server provides the following features Displays a list of all DHC...

Страница 282: ...vice does not assign IP addresses to these computers which is useful if you wish to work with static IP addresses only 15 1 1 Configuring the DHCP Server The procedure below describes how to edit a se...

Страница 283: ...ures that IP addresses that are not in use become available for other computers on the network 6 Select the Provide Host Name If Not Specified by Client check box to enable the device to assign client...

Страница 284: ...tings 15 1 3 Viewing DHCP Clients The procedure below describes how to view a list of hosts computers that are allocated IP addresses by the DHCP server To view a list of computers currently recognize...

Страница 285: ...field enter the MAC address of the computer s network card Note The device s fixed IP address is actually assigned to the specific network card s NIC MAC address installed on the LAN computer If you...

Страница 286: ...Other network users may immediately communicate with this computer using either its name or its IP address The device s DNS server also provides the following functionalities Shares a common database...

Страница 287: ...that you want to edit the DNS Entry screen appears 2 If the host was manually added to the DNS Table you can modify its host name and or IP address If it wasn t you can only modify its host name 3 Cl...

Страница 288: ...address provided by your ITSP changes the DNS database changes accordingly to reflect the change In this way even though your IP address changes often your domain name remains constant and accessible...

Страница 289: ...applicable if you have multiple WAN devices 5 From the Provider drop down list select your DDNS service provider and then click the link Click here to initiate and manage your subscription to open th...

Страница 290: ...ed by the device to validate the DDNS server s certificate upon secured connection to DDNS using HTTPS None The server s certificate is not validated Chain Validates the entire certificate chain When...

Страница 291: ...he Routing screen In the Advanced screen click the Routing icon the Routing screen appears Figure 15 11 Routing Rules 15 4 1 Managing Routing Table Rules The procedure below describes how to add routi...

Страница 292: ...When an application running on a computer in the home network sends out a request to join a multicast group the device intercepts and processes the request If the device is set to Minimum Security no...

Страница 293: ...y enables the device to relay packets on PPPoE connections while keeping its designated functionality for any additional connections To enable PPPoE relay 1 In the Advanced screen click the PPPoE Rela...

Страница 294: ...are all location specific The device enables users to select the country they reside in and the device automatically selects the correct regional settings To select your present location 1 In the Adva...

Страница 295: ...the network They can subsequently communicate with each other directly thereby further enabling peer to peer networking And this all happens automatically providing a truly zero configuration network...

Страница 296: ...adds to the home network The device is added to My Network Places as the Internet Gateway Device and allows configuration via a standard Windows interface A message appears on the notification area o...

Страница 297: ...describes how to monitor the status of the connection between the device and the Internet To monitor the status of the connection between the device and the Internet 1 Open the Network Connections con...

Страница 298: ...t as a Web server allowing computers on the Internet to request pages from it Or a game that you want to play over the Internet may require that specific ports be opened to allow communication between...

Страница 299: ...local service that you would like to make available to computers on the Internet the Service Settings window automatically appears Figure 16 6 Service Settings 5 Enter the local IP address of the com...

Страница 300: ...vanced Settings window 1 Follow steps 1 3 above 2 Click the Add button the Service Settings window appears Figure 16 7 Service Settings Add Service 3 Complete the fields as indicated in the window 4 C...

Страница 301: ...isk management To configure the file server 1 In the Advanced screen click the File Server icon the screen File Server opens Figure 17 1 File Server Screen 2 Configure the following Enabled Select or...

Страница 302: ...ile shares on your disk partitions as described in the following sections 17 1 1 Automatic File Sharing By default all partitions are automatically shared and displayed To share specific directories o...

Страница 303: ...of this screen you can modify your file share by adding files or directories to it Use the drop down list to select an action Upload a File Uploads a file to the share The screen refreshes enter the l...

Страница 304: ...5 You can view information about the disk by clicking its icon The device supports storage devices with FAT32 NTFS and Linux EXT2 3 file systems These file systems have different sharing and security...

Страница 305: ...ng the System Storage Area field in which you must enter the partition s letter In this scenario the setting remains permanent even after the storage device is disconnected and reconnected afterwards...

Страница 306: ...nect a mass storage device e g disk on key or hard drive to the USB port on the device A mass storage device must first be partitioned and formatted If your device is already partitioned it is recomme...

Страница 307: ...w Partition icon the Partition Type screen appears Figure 17 8 Partition Type 3 Select Primary Partition and then click Next the Partition Size screen appears Figure 17 9 Partition Size 4 Enter a volu...

Страница 308: ...le system for the partition and then click Next the Partition Summary screen appears Figure 17 12 Partition Summary 7 Click Finish to create the new partition the Disk Information screen reappears ref...

Страница 309: ...ble click the Edit Partition icon of the partition you would like to edit the Partition Properties screen appears Figure 17 14 Partition Properties 3 Click Format Partition the Partition Format screen...

Страница 310: ...ick Check Partition a warning screen appears alerting you that the partition will be set to offline 4 Click OK the screen refreshes as the partition checking progresses When the check is complete the...

Страница 311: ...ice mail auto attendants and music on hold FTP server Mail boxes information Users home directories Web server content Prior to enabling these services you should create either EXT2 3 recommended or F...

Страница 312: ...Storage Area check box the screen refreshes displaying the System Storage Area field in which you must enter the partition s letter Figure 17 17 Disk Management Screen Check Box Cleared 2 Click OK to...

Страница 313: ...k in the array Before creating the RAID device you must create disk partitions as described previously on the different disk drives Each RAID device can have multiple underlying devices partitions Whe...

Страница 314: ...ype and then click Next the Partition Summary screen displays a summary of the chosen device properties Figure 17 21 Partition Summary Screen 8 Click the Finish button to execute the RAID device creat...

Страница 315: ...not being part of a physical disk It therefore resides and is maintained on the device RAID maintenance is divided into two aspects Maintaining the RAID device itself In the RAID Device table in the D...

Страница 316: ...Choose the partition and then click OK After adding a new device RAID1 starts a recovery process in which the content of the existing partition is mirrored to the new device If the addition or recove...

Страница 317: ...bled Enables or disables the print server feature Spool to Disk Allows print jobs to be written to a disk before printing Allow Guest Access Allows network users that have not logged in with a usernam...

Страница 318: ...nter on Windows The procedure below describes how to set up a network printer that is connected to the device USB port and shared by all LAN computers running on the Windows operating system Note The...

Страница 319: ...ter in the previous section allows you to upload Windows print drivers to the device enabling all Windows based LAN hosts to connect to the network printer The device provides two additional protocols...

Страница 320: ...up an IPP printer on Windows XP To set up an IPP printer on Windows 1 In the Network Map screen click the printer icon to view the Printer screen Figure 17 26 Printer Screen IPP URL Windows 2 Copy th...

Страница 321: ...printer on the Internet and then paste the printer s IPP URL in the URL field and then click Next Figure 17 28 Specify a Printer 7 You may be asked to select the driver s make and model or its locatio...

Страница 322: ...ystems You should use CUPS Daemon CUPSD when operating with Linux To set up an IPP printer on Linux 1 In the Network Map screen click the printer icon to view the Printer screen Figure 17 29 Printer S...

Страница 323: ...ual 17 Add On Servers and Disk Management Version 4 4 0 323 MP26x MP27x 4 Click Add Printer Figure 17 31 Add Printer 5 In the Name field type the printer s name and then click Continue Figure 17 32 Pr...

Страница 324: ...Continue Figure 17 34 IPP URL 8 The next window displays a manufacturer drop down list Select your printer s manufacturer and click Continue 9 The next window displays a printer model drop down list S...

Страница 325: ...below describes how to set up an IPP printer on Mac operating systems To set up an IPP printer on Mac 1 On your Mac computer connected to the device open the Print Fax utility from System Preferences...

Страница 326: ...lect IPP b In the Address field enter the device s IP address 192 168 1 1 c In the Queue field enter the section of the path containing the folder and printer names as it appears in the Printer screen...

Страница 327: ...User s Manual 17 Add On Servers and Disk Management Version 4 4 0 327 MP26x MP27x 5 Click the Add button the new printer appears in the Print Fax screen Figure 17 37 Print Fax New IPP Printer...

Страница 328: ...ft Shared Printing Samba The procedure below describes how to set up Microsoft Shared Printing Samba To set up Microsoft shared printing Samba 1 On your Mac computer connected to the device open the P...

Страница 329: ...MP27x 2 Click the add button the Printer Browser screen appears Figure 17 39 Printer Browser Default Browser 3 Click the More Printers button the following screen appears Figure 17 40 Printer Browser...

Страница 330: ...5 Select the Home workgroup and then click Choose Figure 17 41 Printer Browser MP264 6 Select MP264 and then click Choose 7 Select the printer and from the Printer Model drop down list select your pri...

Страница 331: ...ows Before configuring the LPD protocol on a LAN PC ensure that a print driver for the specific printer is installed Note The following configuration must be applied to each LAN PC individually in ord...

Страница 332: ...detect and install my Plug and Play printer and then click Next Figure 17 44 Local Printer 5 Select the Create a new port option 6 From the Type of port drop down list select Standard TCP IP Port Fig...

Страница 333: ...4 0 333 MP26x MP27x 8 Click Next to proceed with the new wizard 9 In the Printer Name or IP Address field specify 192 168 1 1 and then click Next Figure 17 46 Add Port 10 Select the Custom option and...

Страница 334: ...ng parameters a Select the LPR option b In the device s Web interface open the Print Server screen c Copy the printer s name for example Officejet4000 and paste it in the Queue Name field of the port...

Страница 335: ...nd model from the lists If it does not appear in the lists click Have disk to specify the driver location 14 Specify the name you want to give the printer and whether you want it to be the default pri...

Страница 336: ...een appears Figure 17 50 Print Fax 2 Click the add button the Printer Browser screen appears 3 Select the IP Printer tab and the configure the following a From the Protocol drop down list select LPD b...

Страница 337: ...User s Manual 17 Add On Servers and Disk Management Version 4 4 0 337 MP26x MP27x Figure 17 51 Printer Browser LPD Printer...

Страница 338: ...User s Manual 338 Document LTRT 23510 MP 26x MP 27x Multimedia Home Gateway 4 Click Add the new printer appears in the Print Fax screen Figure 17 52 Print Fax New LPD Printer...

Страница 339: ...ping entries 4 Type net use openrg print Admin s password user admin This ensures that you are logged into the print server using the Admin user and have the permissions to upload files 5 Browse to mp...

Страница 340: ...User s Manual 340 Document LTRT 23510 MP 26x MP 27x Multimedia Home Gateway Reader s Notes...

Страница 341: ...a server The procedure below shows how to enable media sharing on the device To enable media sharing In the Advanced screen click the Media Sharing icon the Media Sharing screen page appears Figure 18...

Страница 342: ...Manual 342 Document LTRT 23510 MP 26x MP 27x Multimedia Home Gateway 18 1 Share Music Pictures and Video on My Local Network By default this option is selected To disable media sharing deselect this...

Страница 343: ...ick Apply the screen refreshes A new section appears enabling you to create and manage a list of manually shared partitions and their folders Figure 18 2 Media Sharing Screen Expanded 2 Click the Add...

Страница 344: ...red Partitions You can edit the partition or folder sharing settings by clicking the Edit icon You can also remove a partition or a folder from the shares list by clicking the Remove icon Note If you...

Страница 345: ...he integral Feature Key Note The Feature Key is an encrypted key provided by AudioCodes only The features that can be enabled by the Feature Key include the following Print Server File Server LST 3G B...

Страница 346: ...Feature Key file you received from AudioCodes it should open in Notepad select and copy the key string and paste it into the Key field 3 Click OK the following screen appears Figure 19 2 Reboot Screen...

Страница 347: ...e device by clicking the Upgrade link for more information see Section 19 6 on page 361 To view information about the device In the Advanced screen click the icon in the example below the About MP 264...

Страница 348: ...set the date and time To configure date time and daylight savings time settings 1 In the Advanced screen click the Time Settings icon the Date Time screen appears Figure 19 4 Date and Time Screen 2 F...

Страница 349: ...aving time offset 4 For the device to perform an automatic time update under the Automatic Time Update group do the following a Select the Enabled check box b Select the protocol to be used for time u...

Страница 350: ...Two prerequisites must be met before enabling the backup mechanism The file server feature must be activated and configured The file server must consist of at least two disks Note The backup is done a...

Страница 351: ...ination is an external storage device 6 Choose between full backup incremental backup or both by scheduling a time for the backup operation You can choose between daily weekly or monthly backups in th...

Страница 352: ...ive or only a subdirectory If you choose subdirectory a second field appears in which you must enter the name of the subdirectory relative to the source archive For example to restore A homes john typ...

Страница 353: ...e Section 19 5 3 on page 359 The device allows you to use un encrypted passwords in the configuration file cfg or ini that you want to load and then encrypt the passwords before burning to flash This...

Страница 354: ...ction 19 5 1 on page 355 Note The file is generated according to the selected display option in Step 2 4 To restore your configuration from a file saved on your PC click Upload Configuration File Note...

Страница 355: ...d Configuration File e g MP 264 2 Under the Load the Configuration File From a PC on the Network group click Upgrade Now the screen Upload Configuration File opens Figure 19 11 Loading Configuration F...

Страница 356: ...plied and the Login screen appears prompting you to login again 6 Login with your username and password Note During the load process it is recommended not to power down the device nor stop the file lo...

Страница 357: ...at is as follows protocol server filename conf ini for example ftp 10 10 10 10 MP20x_ MAC conf http 20 20 20 20 MP20x_ MAC ini Where MAC is the MAC address of the device 4 In the Check every field ent...

Страница 358: ...is under the section rmt_config To simplify the procedure it is possible to use the current date in YYYYMMDD format as the version field The remote configuration file must include only a subset of the...

Страница 359: ...ation file cfg or ini file encrypted file is the output file an encrypted cfx or inx file password is the password that is used to encrypt the file salt value is the 8 bytes of a special key value tha...

Страница 360: ...on configure the details of the version to which you want the device to upgrade or downgrade for example rmt_upd check_sync_version 2 6 0_build_1 b You may need to update the URL address from where th...

Страница 361: ...ory of 16 MB which is capable of storing two firmware images In addition to the primary firmware the device also stores a recovery firmware which is used only if the primary image is missing or damage...

Страница 362: ...vice from a software image file located on a local computer or network Note You can only use files with an rmt extension when performing the firmware upgrade procedure To upgrade the device software i...

Страница 363: ...ge file or click Browse and navigate to the rmt file on your PC 4 Click OK the device uploads the file from your PC When loading is complete you are prompted to confirm upgrade to the new version Figu...

Страница 364: ...r New Versions and Upgrade device The device automatically checks for new versions every user defined interval defined in the Check every field at the URL address defined in the URL field You can defi...

Страница 365: ...ion of the upgrade process the device automatically reboots with the new software version 4 If a new version is unavailable a Click the Check Now button to perform an immediate check instead of waitin...

Страница 366: ...gure various device System and Management parameters To configure device System and Management settings 1 In the Advanced screen click the System Settings icon the System Settings screen appears Figur...

Страница 367: ...he following ports Primary secondary HTTP management ports Primary secondary management HTTPS ports Primary secondary Telnet ports Secure Telnet over SSL ports 5 Under the Management Application SSL A...

Страница 368: ...ures the Swap feature that enables you to free a portion of the RAM by creating a swap file on the storage device connected to the device This is especially useful for platforms with a small RAM To ac...

Страница 369: ...ick OK to reboot the device This may take up to one minute 3 To re enter the Web interface after rebooting the device refresh your Internet browser You can also reboot the device using a manual proced...

Страница 370: ...d password To restore the device to default settings 1 In the Advanced screen click the Restore Factory Settings icon the Restore Factory Settings screen appears Figure 19 21 Restore Factory Settings...

Страница 371: ...s icon allows you to test network connectivity In addition it allows you to view statistics such as the number of packets transmitted and received round trip time and success status The test tools are...

Страница 372: ...a few seconds diagnostic statistics are displayed If no new information is displayed click the Refresh button Figure 20 2 Running a Ping Test 20 1 2 Running the ARP Test The ARP test is used to query...

Страница 373: ...address or URL to be tested 2 Click Go a traceroute commences constantly refreshing the screen Figure 20 4 Running a Traceroute 3 To stop the trace and view the results click Cancel 20 1 4 Running th...

Страница 374: ...from the NAC at the other end of the ATM connection The procedure below describes how to run an OAM Ping test in the Diagnostics screen This test is done under the OAM Ping group To run an OAM ping t...

Страница 375: ...view up to the second statistical information about data received from and transmitted to the Internet WAN and about data received from and transmitted to computers in the local network LAN To view n...

Страница 376: ...has occurred on the device To view the system log 1 From the menu bar click the System Monitoring menu 2 Select the System Log tab Figure 20 8 System Log Screen To update the display click the Refres...

Страница 377: ...e the CPU A process in the uninterruptible state is waiting for I O access e g waiting for the disk The averages are taken over the three time intervals The meaning of the load average value varies ac...

Страница 378: ...User s Manual 378 Document LTRT 23510 MP 26x MP 27x Multimedia Home Gateway To view the CPU statistics 1 From the menu bar click the System Monitoring menu 2 Select the CPU tab...

Страница 379: ...User s Manual 20 Diagnostics and Performance Monitoring Version 4 4 0 379 MP26x MP27x Figure 20 9 CPU Screen...

Страница 380: ...TRT 23510 MP 26x MP 27x Multimedia Home Gateway By default the screen is automatically refreshed To disable automatic refresh click Automatic Refresh Off and then click the Refresh button each time yo...

Страница 381: ...s information on VoIP traffic and settings To monitor VoIP traffic 1 From the menu bar click the System Monitoring menu 2 Select the VoIP tab Figure 20 10 VoIP Screen By default the screen is automati...

Страница 382: ...click the System Monitoring menu 2 Select the Internet Connection Utilization tab By default the By Computer tab is selected Figure 20 11 Internet Connection Utilization By Computer Screen 3 To view b...

Страница 383: ...net Connection Please make sure the device is properly connected to an xDSL line No Internet Connection Please make sure the external modem is powered up and the Ethernet cable is connected No Interne...

Страница 384: ...re the device is properly connected to an xDSL line Authentication Error Bad Internet Connection Please check Internet connection s User and Password Please make sure the external modem is properly co...

Страница 385: ...ation exceeds those limits the relevant message will appear snr_margin if xDSL SNR exceeds those limits the relevant message will appear connectivity_test Confirms internet connectivity The device per...

Страница 386: ...User s Manual 386 Document LTRT 23510 MP 26x MP 27x Multimedia Home Gateway Reader s Notes...

Страница 387: ...Part II Device Cordless DECT Phone Part II describes the installation and configuration of the device Digital Enhanced Cordless Telecommunications DECT VoIP telephone...

Страница 388: ...Reader s Notes...

Страница 389: ...g Silent ring mode Stores dialed received and missed calls Last number redial Hands free conversations using handset speakerphone Phonebook directory of up to 150 contacts easy to store and dial Three...

Страница 390: ...User s Manual 390 Document LTRT 23510 MP 26x MP 27x Multimedia Home Gateway Reader s Notes...

Страница 391: ...e product exhibits a distinct change in performance 7 Avoid using a telephone other than a cordless type during an electrical storm There may be a remote risk of electric shock from lightning 8 Do not...

Страница 392: ...User s Manual 392 Document LTRT 23510 MP 26x MP 27x Multimedia Home Gateway Reader s Notes...

Страница 393: ...th On the handset pull out the plastic tab jutting out from the battery compartment This closes the battery circuit and provides power to the handset Figure 24 1 Plastic Tab Jutting out from Battery C...

Страница 394: ...e of the base unit so that the bottom of the phone sits in the base cradle When correctly inserted in the cradle the phone begins charging indicated by the display of the charging levels of the batter...

Страница 395: ...4 2 3 Switching the Base Unit On or Off To operate your phone the base station must be on You can turn the base station on or off as described in the procedure below To switch the base on or off On th...

Страница 396: ...ries in water and do not place in fire Do not mix old and new batteries Do not open or mutilate the batteries Released electrolyte from the batteries is corrosive and may cause burns or injury to the...

Страница 397: ...397 MP26x MP27x 24 3 Getting to Know Your Phone 24 3 1 Overview of the Handset The areas of the handset are shown in the figure below and described in the subsequent table Figure 24 5 Areas of the Han...

Страница 398: ...press and hold to conference your calls 6 Talk On In idle pre dialing mode Press to make a call In Redial list Call List Phonebook entry Press to make a call to the selected entry in the list During r...

Страница 399: ...o toggle between calls 13 Talk Off During a call Press to end a call and go back to idle screen When there are two calls and the second is an outgoing call Press to transfer the first call to the user...

Страница 400: ...dset is in range of the base Additional bars red orange and blue are displayed as the signal strength increases Flashes when the handset is not registered to the base in marginal range or out of range...

Страница 401: ...s submenus 1 Press the Menu softkey 2 Use the 4 way navigation keys to navigate to the required menu 3 Press the Select softkey to access the required menu 4 To drill down submenus use the navigation...

Страница 402: ...cessed using Navigation Keys Pressed Key Accessed Menu Submenu Description Redial List Navigate to the phone number that you want to redial and then press the button For detailed description on redial...

Страница 403: ...mber 1 key provides commonly used characters such as and To select a character Press the key consecutively until the required character is displayed To toggle between upper and lowercase letters Press...

Страница 404: ...The base is available for handset registration To register a handset see Section 24 4 on page 405 Green Flash Fast The base is being upgraded Note Do not power off the unit during the upgrade process...

Страница 405: ...device by using the Web interface as follows 1 Access the device Web interface 2 From the menu pane select the Advanced menu and then click the About MP264 icon the About MP264 screen appears Figure 2...

Страница 406: ...ssigned Line 3 of the device Configuration of this line is done using the device Web interface as described below To define the handset phone line on the device 1 Access the device Web interface 2 Fro...

Страница 407: ...4 base unit press the DECT LED button until 2 5 seconds it starts flashing green the base unit enters registration mode The registration mode remains active for 30 seconds after which the DECT LED sto...

Страница 408: ...s it indicates that the handset is out of range and there is no link with the base unit As the distance between the handset and the base increases so the signal strength decreases and vice versa Notes...

Страница 409: ...o the number before making the call 1 Enter the phone number the number is displayed on the screen You can make changes to the number before dialing Press the Clear softkey to delete digits to the lef...

Страница 410: ...Section 25 13 4 on page 418 To establish a second call do one of the following Making a second call directly 1 Press the Predialing screen appears 2 Dial the desired number and then press again Making...

Страница 411: ...call The phone provides the following indications of a second incoming call A beep tone is sounded The Call Waiting message is displayed on the screen with the details name and number of the calling p...

Страница 412: ...on page 435 25 6 Muting a Call You can talk to someone nearby without letting the caller hear you during a call This is done by muting the microphone of the handset To mute and un mute a call 1 To mu...

Страница 413: ...d shares the key key to turn off the ringer The icon is displayed on the screen 2 In silent mode press and hold the key to turn on the ringer The icon disappears 25 9 Using the Speakerphone While you...

Страница 414: ...lete all entries in the Redial List Note If there are no numbers in the Redial List the screen displays List Empty 25 10 1 Saving a Redial Number to the Phonebook You can save a number listed in the R...

Страница 415: ...the navigation keys to choose the Delete option and then press the Select softkey the Delete Confirm message is displayed 5 Press the OK softkey to confirm deletion 25 10 3 Deleting the Entire Redial...

Страница 416: ...splayed 2 To unlock the keypad In idle mode press and hold the key the icon disappears Note You are unable to make any calls when the keypad is locked 25 12 Paging the Handset You can locate the hands...

Страница 417: ...press to establish the internal call 25 13 2 Transferring an External Call to Another Extension You can transfer an external call i e not a call from another handset received on one handset to another...

Страница 418: ...oftkey and then choose the Transfer option the external call is transferred to the called handset and the current call with the calling handset is terminated 5 On the called handset press or to receiv...

Страница 419: ...hich you want to establish a three way conference call 3 Press the Select softkey the external call is automatically put on hold and the called handset rings 4 On the called handset press or to establ...

Страница 420: ...User s Manual 420 Document LTRT 23510 MP 26x MP 27x Multimedia Home Gateway Reader s Notes...

Страница 421: ...k 1 In idle state press the Menu softkey 2 Press the navigation keys to scroll to the Phonebook icon 3 Press the Select softkey to access the Phonebook 4 Press the navigation keys to choose the Add op...

Страница 422: ...all contacts in your phonebook 1 In idle state press the PB softkey the phonebook opens displaying a list of the contacts 2 Search a contact by performing one of the following Navigation keys Scroll...

Страница 423: ...3 Press the Select softkey to access the Phonebook 4 Press the navigation keys to choose the Delete option and then press the Select softkey 5 Press the navigation keys to choose the contact that you...

Страница 424: ...idle state press the Menu softkey 2 Press the navigation keys to scroll to the Phonebook icon 3 Press the Select softkey to access the Phonebook 4 Press the navigation keys to choose the Delete All o...

Страница 425: ...est call displayed at the top of the list When the Call List is full the oldest call is replaced by a new call Missed calls are marked with an asterisk at the beginning of the missed call entry Once t...

Страница 426: ...he Menu softkey 7 Press the navigation keys to choose the Add to PB option and then press the Select softkey the phonebook is accessed prompting you to enter the contact s details the phone number as...

Страница 427: ...ose the required Call List option e g Missed Calls and then press the Select softkey 3 Press the navigation keys to choose the entry that you want to delete and then press the Select softkey 4 Press t...

Страница 428: ...ty message is displayed To delete a number in the Call List 1 Access the Call List menu see Section 27 1 on page 425 2 Press the navigation keys to choose the required Call List option e g Missed Call...

Страница 429: ...e messages now 1 Press the Call softkey the voice mail is activated 2 Follow the voice mail instructions To listen to voice messages later 1 Press the Back softkey 2 The Voice Message message disappea...

Страница 430: ...User s Manual 430 Document LTRT 23510 MP 26x MP 27x Multimedia Home Gateway Reader s Notes...

Страница 431: ...se the Date Format option and then press the Select softkey 5 Press the navigation keys to choose the desired format and then press the Select softkey the new date format is applied and the Saved mess...

Страница 432: ...lect softkey 4 Press the navigation keys to access the time or date area 5 To set the time To move between hours minutes and AM PM depending on format use the navigation keys If the selected format is...

Страница 433: ...to activate the snooze or press the Off softkey to disable the alarm the current call details is displayed again on the screen If the phone rings for an incoming call and the alarm time is reached the...

Страница 434: ...Saved message is displayed 29 2 3 Disabling the Alarm You can set the alarm to off so that it does not ring at all To set the alarm to off 1 In idle state press the Menu softkey 2 Press the navigatio...

Страница 435: ...n idle state press the Menu softkey 2 Press the navigation keys to scroll to the HS Settings icon and then press the Select softkey 3 Press the navigation keys to choose the Audio Setup option and the...

Страница 436: ...the Select softkey a list of melodies is displayed 5 Press the navigation keys to choose the desired melody and then press the Select softkey the melody is saved 30 2 2 Choosing the External Ringer Me...

Страница 437: ...he Select softkey 4 Press the navigation keys to choose the Ring Volume option and then press the Select softkey a volume bar is displayed indicating the volume level 5 To increase the volume press th...

Страница 438: ...option and then press the Select softkey 5 Press the navigation keys to choose the required key tone Beep a beep is emitted when any key is pressed DTMF only DTMF tones are emitted and this occurs onl...

Страница 439: ...le state press the Menu softkey 2 Press the navigation keys to scroll to the HS Settings icon and then press the Select softkey 3 Press the navigation keys to choose the Wallpaper option and then pres...

Страница 440: ...ation keys to choose whether you want to activate Auto Answer On option or deactivate it Off option 5 Press the Select softkey to save your settings 30 8 Selecting a Base Station Your handset can only...

Страница 441: ...navigation keys to scroll to the HS Settings icon and then press the Select softkey 3 Press the navigation keys to choose the HS Default option and then press the Select softkey you are prompted to en...

Страница 442: ...User s Manual 442 Document LTRT 23510 MP 26x MP 27x Multimedia Home Gateway Reader s Notes...

Страница 443: ...se Settings icon and then press the Select softkey 3 Press the navigation keys to choose the Manage HS option and then press the Select softkey 4 Press the navigation keys to choose the handset that y...

Страница 444: ...s to scroll to the Base Settings icon and then press the Select softkey 3 Press the navigation keys to choose the Manage HS option and then press the Select softkey 4 Press the navigation keys to choo...

Страница 445: ...IN code is incorrect Old PIN Invalid is displayed and you are returned to the Modify PIN option 31 3 Resetting the Base to Factory Defaults You can reset your base settings to default settings When yo...

Страница 446: ...the navigation keys to choose the Product Version option and then press the Select softkey 4 Press the navigation keys and then press the Select softkey to choose the option whose version you want to...

Страница 447: ...ult Handset Settings External Ring Melody 1 Internal Ring Melody 1 Handset Ring Volume Volume 3 Earpiece Volume Volume 3 Speaker Volume Volume 3 Key Tone Beep and DTMF Battery Tone On Language English...

Страница 448: ...User s Manual 448 Document LTRT 23510 MP 26x MP 27x Multimedia Home Gateway Reader s Notes...

Страница 449: ...phone socket 2 Check the base unit plug and the 220V plug remove and plug in 3 Wait until the line is unoccupied 4 Use the original connection cord When Connected to PBX No Connection and or Wrong Co...

Страница 450: ...User s Manual 450 Document LTRT 23510 MP 26x MP 27x Multimedia Home Gateway Reader s Notes...

Страница 451: ...Part III Appendices...

Страница 452: ...Reader s Notes...

Страница 453: ...the same type and rating 5 Unplug this product from the wall power outlet and from the device before cleaning Do not use liquid cleaners or aerosol cleaners Use a damp cloth for cleaning 6 Do not use...

Страница 454: ...ny other unit 11 Note the correct polarity while inserting the batteries 12 Do not immerse batteries in water and do not place in fire 13 To disconnect the Backup Battery Pack unit from the power disc...

Страница 455: ...the device power socket 2 Connect the Backup Battery Pack Signal Control wire to the device RS 9 socket 3 Connect one end of the device AC power cord to the power socket on the Backup Battery Pack and...

Страница 456: ...Off position the unit is not disconnected from the AC mains outlet electric current still flows through this unit Warning In the backup power mode when Backup Battery Pack serves as a stand alone powe...

Страница 457: ...ttery Pack Table A 2 Backup Battery Pack Environment Operating Conditions Condition Description Operating Temperature 0 C 40 C the temperature rise of adapter surface should be less than 20 C Operatin...

Страница 458: ...User s Manual 458 Document LTRT 23510 MP 26x MP 27x Multimedia Home Gateway Reader s Notes...

Страница 459: ...992 3 Annex A B I J L M ADSL2 ITU TG 992 5 Annex A B I J M Multiple VC PPP connections VDSL Profiles VDSL2 8a 8b 8c 8d 12a 12b 17a 30a profiles ITU T G 993 2 Ethernet WAN 10 100 1000Base TMbps Ethern...

Страница 460: ...ltering WPS Web Authentication Voice over IP Signaling Protocols SIP over TCP UDP RFC 3261 Interoperability with leading Softswitches Up to 7 individual SIP accounts with 4 concurrent calls Media Proc...

Страница 461: ...nter administration management and diagnostics via simple web based interface Media Server Optional UPnP AV Media Server 1 0 2 0 for streaming audio video content anywhere in the local network Parenta...

Страница 462: ...ons 170 x 225 x 35mm 560g Power Power 12 VDC 2 5A External Power Adaptor 100 240 VAC 50 60 Hz Environmental Operating Temperature 0 to 45 C Storage Temperature 25 to 80 C Battery Backup Optional batte...

Страница 463: ...iq versions Number of Channels 10 Frequency 1 88 GHz to 1 90 GHz for EU DECT 1 92 GHz to 1 93 GHz for US DECT Operating Range Up to 300 meters outdoors Up to 50 meters indoors Operating Time Standby...

Страница 464: ...AudioCodes CPE Access Gateway Products MP 264 Multimedia Home Gateway User s Manual MP26x MP27x Multimedia Home Gateway Version 4 4 0 Document LTRT 23510 www audiocodes com...

Отзывы: