background image

42

43

positioning

Positioning

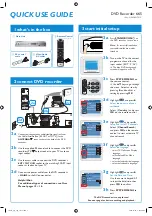
How should I position the soundBadge to make sound level 
measurements?

Th

  e soundBadge microphone is a pressure-fi eld microphone with a special fi lter 

designed to fl atten the frequency response at high frequencies. If you are measuring 
high frequencies (> 8 kHz), the best accuracy is achieved when the sound is coming 
from 90 degrees. We recommend you hold the device in one of its two reference 
directions for these measurements:

• 

Hold the meter vertically while facing the sound source

• 

Hold the meter horizontally with the sound source coming directly from the 
right or left . 

positioning

Positioning

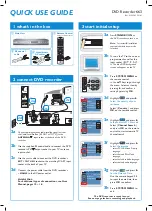
How should I position the soundBadge to measure a personal noise dose?

To measure a personal noise dose, the soundBadge must be worn. Th

  e closer it is worn 

to the wearer’s ear, the more accurate the dose will be. Th

  e included rubber protective 

case has loops that accept a 1” wide strap that can be used to mount it on a helmet 
(strap not included). Th

  e included rubber shoulder mount is designed to position the 

soundBadge optimally (4-6cm from the ear) and clips easily to clothing.

Содержание soundBadge

Страница 1: ...Audio3 soundBadge personal noise dose recorder Manual v2 05...

Страница 2: ...1 in the box acoustic calibration coupler usb cable protective case s o u nd Ba d g e In the box Audio3 Ltd soundBadge Manual version 2 05 Audio3 Ltd 2014...

Страница 3: ...of the most accurate meters ever made due to our true RMS technology This manual gives you information about hearing health and all the instructions you will need to get the most from your soundBadge...

Страница 4: ...age it The glass lens however may be cleaned using a soft lint free cloth dampened with a non abrasive household glass cleaner 6 Connecting and Recharging Connect your soundBadge to a standard compute...

Страница 5: ...tive personal sampling to comply with the monitoring requirements of this paragraph unless the employer can show that area sampling produces equivalent results 1910 95 d 1 ii your hearing health Noise...

Страница 6: ...splay will flash When fully charged the indicator will stop flashing and indicate a full charge How long will the battery last The battery will last 20 hours Each bar on the battery indicator represen...

Страница 7: ...sub measurement dots and a headphone measurement indicator not implemented in all devices getting started Display Explanation DOSE cumulative noise dose from current or the last recording displayed in...

Страница 8: ...calibration and acoustic signal noise dose in units proportional to energy pascals2 hrs noise dose in of daily allowed dose typ 85 dBA for 8 hrs on DOSE page noise dose units are equivalent dBA normal...

Страница 9: ...to advance to the TIME main page If ELAPSED TIME is displayed press to remove it Hold down for 2 seconds to begin to set the clock and calendar The display will show hh with flashing Set the current m...

Страница 10: ...olution When calibrated the levels are within 2 0 dB of acoustic values from 63 Hz to12 kHz or better In accordance with sound metering standards the soundBadge can measure sound levels using a fast r...

Страница 11: ...When a sub measurement is ended the display reverts to its previous value Take an average reading using a main measurement Press to advance to the LEVEL page Press and hold to cycle through to the com...

Страница 12: ...th the soundBadge ThesoundBadgeretainsthemaximumsound levels that occurred during a measurment Levels are compared every 1 4 s Like average levels there are two ways to make a maximum measurement 1 du...

Страница 13: ...re hearing protection must be supplied 140 Hearing protection must be supplied and a noise control Hearing protection must be supplied and a noise control regime must be adopted to limit exposure regi...

Страница 14: ...lding the button for 5 seconds until the timer displays 00 00 and begins to count up This will also reset and record the noise dose max levels average levels and peak level Press to return to the PEAK...

Страница 15: ...Pa2 hrs If AVE is also displayed this is the LAeq or average level not a dose Press and together to end the sub measurement Record the noise dose using a main measurement Press the button to advance t...

Страница 16: ...Press or hold down to select the desired NRR Select the Input Channel soundBadge is mainly used on channel 4 internal microphone however an Audio3 Ltd external microphone may be connected to the micr...

Страница 17: ...5 dBA 8 hr exchange rate 3 dB US regulation 29 CFR 1910 95 specifies criterion 90 dBA 8 hr exchange rate 5 dB 100 measurements Noise Dose Table of actions required according to EU regulations when var...

Страница 18: ...easurement using the count down timer Press the button to advance to the TIME main page If ELAPSED TIME is not displayed press the button to display it Hold down for 2 seconds to begin to set the coun...

Страница 19: ...and each bar represents 2 hours When the memory becomes full the device stops recording and displays FULL About the timer The soundBadge timer is the heart of its measurements It is used to calculate...

Страница 20: ...the digits will flash Press to set the passcode and return to the PEAK page or Hold for 2 seconds to lock the device with the new passcode How do I lock the soundBadge during a measurement Press to a...

Страница 21: ...milar will be displayed and will be flashing Press the button or hold down the button to cycle to the file number you want to delete Only exiting files are displayed If a main measurement is in progre...

Страница 22: ...soundViewsoftware is available to download from audio 3 com A core mission of Audio3 Ltd is to encourage independent unbiased and high quality hearing research so soundView can export the raw data to...

Страница 23: ...ents Hold the meter vertically while facing the sound source Hold the meter horizontally with the sound source coming directly from the right or left positioning Positioning How should I position the...

Страница 24: ...ence between the sound level as measured with the current calibration and your constant 94 0 dB SPL signal the new calibration If a signal of 94 0 dB SPL 5dB is detected soundBadge will auto calibrate...

Страница 25: ...red Response 85dB Z weight target ISO 67672 Type 1 Limits 10 1 10 2 10 3 10 4 30 25 20 15 10 5 0 5 Frequency Hz Magnitude dB re 1kHz Measured Response 85dB C weight target ISO 67672 Type 1 Limits Acou...

Страница 26: ...e soundBadge via the micro USB connector These signals should be in the range 5 0 mVrms 1 0 Vrms Acoustic testing The soundBadge s internal microphone is not removable The best way to test all aspects...

Страница 27: ...ghtings Fast 1 8s Slow 1s Impulse dB C pk Environmental Temperature 10 to 50 C 0 5 dB Humidity 10 90 RH 0 5 dB Static Atmospheric Pressure 65 to 108 kPa 0 5 dB Magnetic Fields Negligible Vibration 1g...

Страница 28: ...ponsibility can be accepted for the unit whilst in transit and customers are therefore advised to insure the unit against loss or damage whilst in transit Audio3 Customer Support 221 New North Rd Lond...

Отзывы: