background image

English

PHONO

LINE

PHONO

“AUX”

Input 

Jacks

Pre-amp 

Selector 

Switch

Stereo System

White 

Red

AC

AC

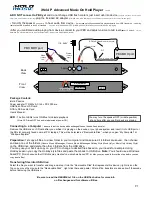
Figure 3

Initial Setup 

(continued)

Setting the Pre-amp (Phono/Line) Switch

For increased flexibility of use, this turntable has an internal stereo 

phono pre-amplifier. The Pre-amp Selector (Phono/Line) Switch is 

located on the back of the turntable. If the stereo system you are using 

has a PHONO input, set the Pre-amp Selector Switch to the “PHONO” 

position. If your stereo system does not have a PHONO input, set 

the Pre-amp Selector Switch to the “LINE” position and connect the 

turntable’s output cables to the AUX or other high-level input on your 

stereo system (described later) (Fig. 3).

Connecting to Stereo System

1.  Connect the red RCA-type pin-plug to the right channel input 

and the white RCA-type pin-plug to the left channel input of 

your stereo system (Fig. 3).

2.  With the tone arm still fastened to the tone arm rest, slowly 

turn the turntable platter 

clockwise

 ten times, to make certain 

the automatic mechanism is fully cycled.

3.  Remove the vinyl tie that holds the tone arm on its rest.
4.  Connect the power cord plug to an AC outlet. Make sure the 

AC outlet supplies the proper voltage for the AT-LP60 you are 

using.

Connecting to Computers or Audio Devices with 3.5 mm Input

The AT-LP60 connects without adapters to devices equipped with RCA 

connectors. For maximum flexibility, we have included two adapter 

cables to fit other popular audio inputs.

Operation

Automatic Operation

1.  Remove the stylus guard from the stylus assembly  

(Fig. 4).

2.  Put a record on the turntable. If needed, use the  

45 RPM adapter (Fig. 5).

3.  Select the size of record:  12" or 7" (Fig. 6).
4.   Select the speed: 33

1

/

3

 RPM or 45 RPM (Fig. 7).

5.  

Start: 

Gently push the START button (Fig. 8a). The turntable 

will start and the tone arm automatically will move to the lead-

in groove. When the record has finished playing, the tone arm 

automatically will return to the tone arm rest and the turntable 

will shut off.

6.  

Stop: 

To stop playing the record before it reaches the end, 

press the STOP button (Fig. 8b). The tone arm will lift and 

return to the tone arm rest, and the turntable will shut off.

7.  

Pause: 

To pause the record before it has completed playing, 

press the tone arm Lift button (Fig. 8c). Press the Lift button 

again to continue playing the record.

The first of these adapter cables–dual RCA to stereo 3.5 mm mini-plug 

(male)–is designed to fit most popular computer* audio inputs. It may 

also be used to connect the turntable’s RCA output to other equipment, 

including:

• a stereo/boombox* equipped with a 3.5 mm mini input   

• powered speakers* equipped with a 3.5 mm mini input   

• a mixer* or PA system* equipped with a 3.5 mm mini jack   

The second included adapter cable–dual RCA to stereo 3.5 mm mini-

plug (female)–permits connection of the turntable output to amplified 

speakers* or similar devices. The 3.5 mm stereo mini-jack on the cable 

adapter accepts stereo mini-plugs.  

To use either adapter cable, connect the turntable’s red and white RCA-

type plugs to the cable adapter’s RCA-type jacks.  

* When using either cable adapter, always set the AT-LP60 

turntable’s Pre-amp Selector Switch to the “LINE” position. 

(Switch is located on the back of the turntable.)

NOTE: If connection is desired to a mono amplifier/speaker, make 

certain to use a stereo-to-mono adapter, available from your dealer or 

an electronic parts store. Inserting a mono plug in the stereo jack will 

disable one of the stereo channels. Other adapter cable configurations 

will be available from dealers and parts stores for connecting to devices 

needing different terminations.

Figure 4

Stylus assembly

Stylus (“Needle”)

Stylus guard

Figure 5

45 RPM adapter

5

Содержание 4961310147143

Страница 1: ...urroie Installation et utilisation Pages 9 15 AT LP60 Tocadiscos de transmisión por correa totalmente automático Instalación y funcionamiento Páginas 16 22 IMPORTANT Turntable belt needs to be attached or turntable will not operate See page 4 for instructions For assistance contact our Audio Solutions Department at 330 686 2600 x5000 or audio solutions atus com ...

Страница 2: ...om being walked on or pinched particularly at plugs convenience receptacles and the point where they exit from the apparatus 11 Only use attachments accessories specified by the manufacturer 12 Use only with a cart stand tripod bracket or table specified by the manufacturer or sold with the apparatus When a cart is used use caution when moving the cart apparatus combination to avoid injury from ti...

Страница 3: ... CENTER SPINDLE Centering pin for record positioning 8 45 RPM ADAPTER Shown in receptacle Adapts 7 records with large center holes to fit center spindle 11 9 9 DUST COVER HINGE HOLDERS Attachment points for removable hinged dust cover 10 DUST COVER 11 TONE ARM HEADSHELL ASSEMBLY Tone arm is permanently attached to the headshell assembly 12 STYLUS ASSEMBLY 13 STYLUS NEEDLE 14 STYLUS GUARD 15 PRE AM...

Страница 4: ...y remove the ribbon Make certain the belt is not twisted NOTE If belt is not correctly positioned around the motor pulley the turntable will not operate Please double check to make sure that the belt is positioned correctly 4 Place the turntable mat on top of the turntable platter Fig 2b 5 If desired the hinged dust cover may be removed Hold both sides of the dust cover and pull upward gently and ...

Страница 5: ...button Fig 8a The turntable will start and the tone arm automatically will move to the lead in groove When the record has finished playing the tone arm automatically will return to the tone arm rest and the turntable will shut off 6 Stop To stop playing the record before it reaches the end press the STOP button Fig 8b The tone arm will lift and return to the tone arm rest and the turntable will sh...

Страница 6: ...ckaging Out Figure 6 Figure 7 In Figure 8 8a 8b 8c Figure 10 Installing a new stylus 10a 10b Caution When the tone arm reaches the end of the record it will lift and return to the tone arm rest automatically When this happens do not interfere with the tone arm s motion or damage to the mechanism may occur If the tone arm does not return automatically to the tone arm rest after the record has finis...

Страница 7: ...Fig 11e Make certain the belt is not twisted between the pulley and the platter s drive rim F Put the record mat back on the platter G While holding the tone arm in its rest position slowly turn the platter by hand clockwise at least 10 rotations to clear the mechanism s automatic cycle Turntable operates but no sound at all 1 The stylus guard is still in place 2 The tone arm Lift button is presse...

Страница 8: ...ale to 3 5 mm 1 8 mini plug female stereo adapter cable 45 RPM adapter Replacement stylus ATN3600L Tips For Better Performance When opening or closing the turntable cover handle it gently moving it either at the center or equally from both sides Do not touch the stylus tip with your fingers avoid bumping the stylus on the turntable mat or a record s edge Clean the stylus tip frequently using a sof...

Страница 9: ...e pas à la prise électrique demandez à un électricien de remplacer la prise hors normes 10 Protégez le cordon d alimentation afin que personne ne marche dessus et que rien ne le pince en particulier au niveau des fiches des prises de courant et du point de sortie de l appareil 11 Utilisez uniquement les accessoires spécifiés par le fabricant 12 N utilisez l appareil qu avec un chariot un pied un t...

Страница 10: ...um montée directement sur l axe moteur 7 AXE CENTRAL Partie de l axe moteur dépassant de la platine pièce à usinage de précision 11 9 8 ADAPTATEUR 45 TR MIN placé dans son logement sur l illustration Pour maintenir autour de l axe central les disques de 17 cm à trou large 9 LOGEMENTS DES CHARNIÈRES DU COUVERCLE ANTI POUSSIÈRE Points de fixation des charnières du couvercle anti poussière 10 COUVERC...

Страница 11: ...x côtés et tirez le vers le haut sans forcer et en exerçant une force égale de part et d autre fig 2c Conservez le couvercle à l abri dans un endroit propre 6 Pour remettre en place le couvercle anti poussière guidez et insérez les charnières du couvercle dans les deux logements situés à l arrière du boîtier du tourne disque Réglage du sélecteur de préamplification phono ligne Pour une plus grande...

Страница 12: ...P60 peut être connecté sans adaptateur aux appareils munis de connecteurs RCA Pour une souplesse maximale le tourne disque est fourni avec deux câbles adaptateurs permettant le branchement sur d autres types d entrées courantes Le premier câble adaptateur double RCA mini prise stéréo 3 5 mm mâle convient à la plupart des entrées équipant couramment les ordinateurs Il permet également de connecter ...

Страница 13: ...Appuyez à nouveau sur le bouton de levage pour abaisser le bras et commencer la lecture du disque Figure 9 Retrait de la pointe Engager dans la cellule d abord Pas d interstice 30 cm 17 cm VITESSE En tenant la tête du bras de lecture abaissez le porte pointe et tirez dessus pour le retirer fig 9 En retirant le porte pointe observez sa position et sentez la des doigts de façon à pouvoir remettre pl...

Страница 14: ...sens des aiguilles d une montre de façon à faire effectuer un cycle complet au mécanisme automatique Le tourne disque fonctionne mais il n y a pas de son 1 La protection de la pointe de lecture est restée en place 2 Le bouton de levage du bras de lecture est enfoncé 3 Les réglages de l amplificateur sont incorrects sélection de sortie erronée contrôle d écoute activé haut parleurs désactivés etc 4...

Страница 15: ...le du tourne disque veillez à ne pas forcer le mécanisme des charnières prenez le couvercle par le milieu ou exercez une force égale de part et d autre si vous le prenez par les côtés Ne touchez jamais la pointe de lecture des doigts évitez de cogner la pointe contre le tapis antidérapant ou sur le bord du disque Nettoyez fréquemment le bout de la pointe de lecture à l aide d une brosse douce bros...

Страница 16: ... su seguridad Si el enchufe que se incluye no encaja en su toma de corriente solicite a un electricista que sustituya la toma de corriente obsoleta 10 Proteja los cables eléctricos de pisadas o presiones especialmente en los enchufes las carcasas de los dispositivos y en los puntos de salida de los aparatos 11 Utilice únicamente los complementos accesorios especificados por el fabricante 12 Utilíc...

Страница 17: ...se muestra en el receptáculo Adapta discos de 7 con grandes agujeros centrales para que ajusten en el eje central 11 9 9 SOPORTES DE LAS BISAGRAS DE LA CUBIERTA ANTIPOLVO Puntos de unión de la cubierta antipolvo abisagrada desmontable 10 CUBIERTA ANTIPOLVO 11 UNIDAD BRAZO DE LECTURA CABEZAL El brazo de lectura está unido de forma permanente al cabezal 12 UNIDAD DE LA AGUJA 13 AGUJA 14 PROTECTOR DE...

Страница 18: ... seguro y limpio 6 Para volver a colocar la cubierta antipolvo sitúe las bisagras en los dos receptáculos situados en la parte trasera de la carcasa del tocadiscos Ajuste del conmutador Phono Line de preamplificador Para aumentar la flexibilidad de uso este tocadiscos dispone de un preamplificador fonográfico estéreo interno El conmutador Phono Line del selector de preamplificador está situado en ...

Страница 19: ...a de la máxima flexibilidad hemos incluido dos cables adaptadores para otras entradas de audio muy utilizadas El primero de estos cables adaptadores RCA doble a miniconector macho de 3 5 mm estéreo está diseñado para ajustarse a las entradas de audio de ordenadores más habituales También puede utilizarse para conectar la salida RCA del tocadiscos a otro equipo por ejemplo Un radiocasete estéreo eq...

Страница 20: ...9 Cómo retirar la aguja Encájela en el cuerpo primero Sin espacio aquí Arriba Figura 7 Abajo Figura 8 8a 8b 8c VELOCIDAD Sujete el cabezal del brazo de lectura y gire la parte frontal de la unidad de la aguja con un movimiento hacia delante y hacia abajo hasta retirarla Fig 9 Cuando retire la unidad antigua fíjese en su posición y observe cómo está instalada eso le ayudará a instalar la nueva Inst...

Страница 21: ...ano en el sentido de las agujas del reloj al menos diez veces para iniciar el ciclo automático del mecanismo El tocadiscos funciona pero no suena 1 No ha retirado el protector de aguja 2 El botón de elevación del brazo de lectura está pulsado 3 Los controles del amplificador están definidos de forma incorrecta la entrada seleccionada no es correcta el monitor de cinta está activado los altavoces d...

Страница 22: ...tor hembra de 3 5 mm 1 8 adaptador de 45 RPM Aguja de repuesto ATN3600L Consejos para un mejor rendimiento Cuando abra o cierre la cubierta del tocadiscos hágalo con suavidad desplácela por el centro o de forma homogénea por ambos lados No toque la punta de la aguja con los dedos evite golpear la aguja contra la estera o contra el borde del disco Limpie la punta de la aguja con frecuencia Utilice ...

Страница 23: ...Español 23 ...

Страница 24: ...Cette garantie n est pas valable en cas de réparation ou de modification effectuée par un personnel non agréé ou dans le cas où la marque du produit aurait été enlevée ou abîmée Pour obtenir notre accord pour le retour et pour tout renseignement concernant le transport veuillez prendre contact avec le département de service après vente Audio Technica U S Inc 1221 Commerce Drive Stow Ohio 44224 A T...

Отзывы: