


CHAPTER 2: INSTALLATION
2-8
VersAtive
®
Pro Mondo – Hardware Interface Manual
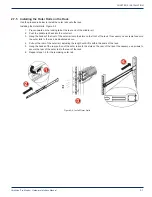
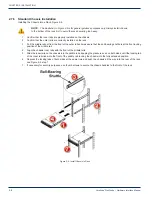
2.7.6 Standard Chassis Installation
Installing the Chassis into a Rack, Figure 2-6.
NOTE:
The illustration in Figure 2-6 is for general guidance purposes only. Always install chassis
to the bottom of the rack first to avoid the rack becoming top heavy.
1. Confirm that the inner rails are properly installed on the chassis.
2. Confirm that the outer rails are correctly installed on the rack.
3. Pull the middle rail out from the front of the outer rail and make sure that the ball-bearing shuttle is at the front locking
position of the middle rail.
4. Align the chassis inner rails with the front of the middle rails.
5. Slide the inner rails on the chassis into the middle rails, keeping the pressure even on both sides, until the locking tab
of the inner rail clicks into the front of the middle rail, locking the chassis into the fully extended position.
6. Depress the locking tabs of both sides at the same time and push the chassis all the way into the rear of the rack,
see
Figure 2-5 step 1.
7. If necessary for security purposes, use thumb screws to secure the chassis handles to the front of the rack.
Figure 2-6: Install Chassis in Rack


