


2 - 6
VC19G/VC19E Mainboard Manual
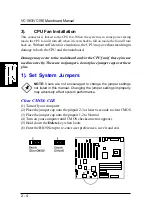
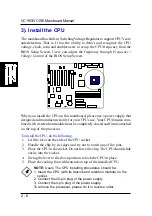
3). Install the CPU
The mainboard has built-in Switching Voltage Regulator to support CPU Vcore
autodetection. That is, It has the ability to detect and recognize the CPU
voltage, clock, ratio and enables users to set up the CPU frequency from the
BIOS Setup Screen. Users can adjust the frequency through
Frequency /
Voltage Control
of the BIOS Setup Screen.
To install the CPU, do the following:
1. Lift the lever on the side of the CPU socket.
2. Handle the chip by its edges and try not to touch any of the pins.
3. Place the CPU in the socket. Do not force the chip. The CPU should slide
easily into the socket.
4. Swing the lever to the down position to lock the CPU in place.
5. Place the cooling fan with heatsink on top of the installed CPU.
When you install the CPU on this mainboard, please use a power supply that
designed and manufactured only for your CPUs use. Your CPU fansink com-
bined with its retention module must be completely closed and firmly attached
on the top of the processor.
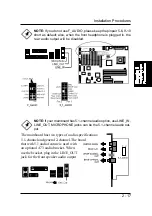
NOTE: Users The CPU installing procedures should be:
1. Insert the CPU (with its fansink and retention module) on the
socket.
2. Connect the 20-pin plug of the power supply
3. Connect the 4-pin plug of the power supply.
To remove the processor, please do it in reverse order.
Содержание VC19E
Страница 1: ...VC19G VC19E MAINBOARD MANUAL DOC No M02702 M02703 Rev A0 Date 9 2002 Part No 25 11657 00 ...
Страница 7: ...1 3 Overview The VC19G VC19E Mainboard ...
Страница 13: ...2 3 Installation Procedures 1 Clear CMOS 2 Front Panel Block Cable Connection ...
Страница 36: ...3 8 VC19G VC19E Mainboard Manual Advanced Chipset Features ...
Страница 52: ...3 24 VC19G VC19E Mainboard Manual This Page Left Blank for Note ...


