


FRONT PANEL LCD DISPLAY
TranScend Chassis – Operation Manual
4-7
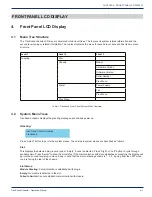
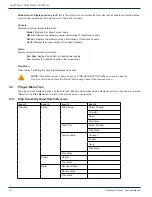
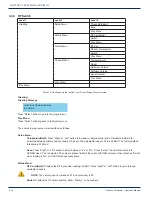
The entries in plug-in menu are described as follows:
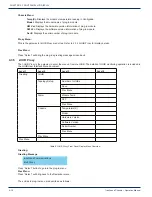
Setup Menu:
Attn Setting Menu:
Sel Ch:
Press “Select” to select the channel for attenuation adjustment. Press “Right” or “Left” button to
cycle through available channels.
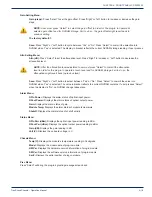
Attn (dB):
Press “Select” to set the attenuation level. Press “Right” to increase or “Left” button to
decrease the attenuation level.
NOTE: After the attenuation level adjustment, user must press “Select” to commit the attenuation
level in order for the plug-in to operate at such level and for NVRAM storage. Fail to do so, the
attenuation will revert back to previous level after the module recovers from power cycle.
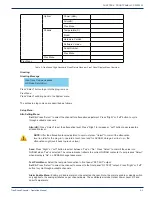
Save:
Press “Right” or “Left” to select between “Yes” or “No”. Press “Select” to commit the value into
NVRAM when “Yes” is selected. The value in bracket refl ects the current NVRAM contents. If user
presses “Select” when display is “No”, no NVRAM change takes place.
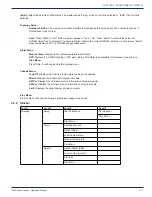
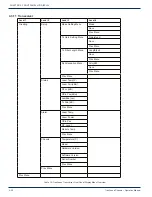
Test Point Menu:
Select the test point connection to front panel “RF TEST” output.
Sel Ch:
Press “Select” to select the channel to connect to the front panel “RF TEST” output. Press “Right” or “Left”
button to cycle through available channels.
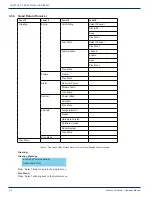
Alarm Enable Menu:
Enable or disable alarms on the selected channel. Note: the alarm enable or disable switch only
applies to the analog attributes on per channel bassis. These attributes include Optical Power Level, RF and Laser
Temperature.
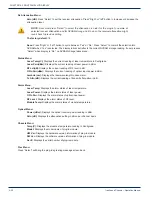
Channel:
Press “Right” or “Left” button to cycle through available channels.
Enable:
Press “Select” to enable or disable the alarm reporting. Press “Right” or “Left” button to cycle through the
available options.
On:
Report alarms on the selected channel
Off:
Disable alarm reporting on the selected channel
Save:
Press “Right” or “Left” to select between “Yes” or “No”. Press “Select” to commit the value into NVRAM when
“Yes” is selected. The value in bracket refl ects the current NVRAM contents. If user presses “Select” when display
is “No”, no NVRAM change takes place.
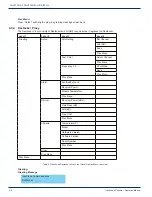
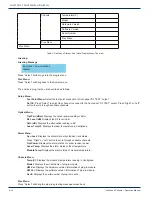
Status Menu:
Opt:
Displays the reading of optical receiver power in dBm. This display does not include the reading after the
decimal point.
Alarm Menu:
Rcvr Pwr:
Displays the alarm status of optical receiver power.
Press “Right” or “Left” button to cycle through available channels.
Module Temp:
Displays the alarm status of module temperature.
Optical Menu:
Power (dBm):
Displays the optical receiver power reading in dBm.
Attn (dB):
Displays the attenuation setting in dB on per channel basis.
Chassis Menu:
Temp(C):
Displays the module’s temperature reading in Centigrade.
Model:
Displays the model name of plug-in module.
HW Ver:
Displays the hardware version information of plug-in module.
SW Ver:
Displays the software version information of plug-in module.
Ser #:
Displays the serial number of plug-in module.
CHAPTER 4:
Содержание TranScend
Страница 1: ...OPERATION MANUAL TranScend Chassis www atxnetworks com www atxnetworks com TranScend ...
Страница 6: ...SCOPE 1 2 TranScend Chassis Operation Manual This page intentionally left blank CHAPTER 1 ...
Страница 12: ...LED DISPLAY 2 6 TranScend Chassis Operation Manual This page intentionally left blank CHAPTER 2 ...
Страница 44: ...FRONT PANEL LCD DISPLAY 4 30 TranScend Chassis Operation Manual CHAPTER 4 This page intentionally left blank ...
Страница 70: ...CRAFT LINE INTERFACE CLI 5 26 TranScend Chassis Operation Manual CHAPTER 5 This page intentionally left blank ...
Страница 76: ...GRAPHICAL USER INTERFACE 6 6 TranScend Chassis Operation Manual CHAPTER 6 This page intentionally left blank ...