Atop EH3408ls Скачать руководство пользователя страница 25

Industrial Managed  
Ethernet Switch 

User Manual 

Configuring

  with  a  Web 

Browser 


Page 

25

 of 

49


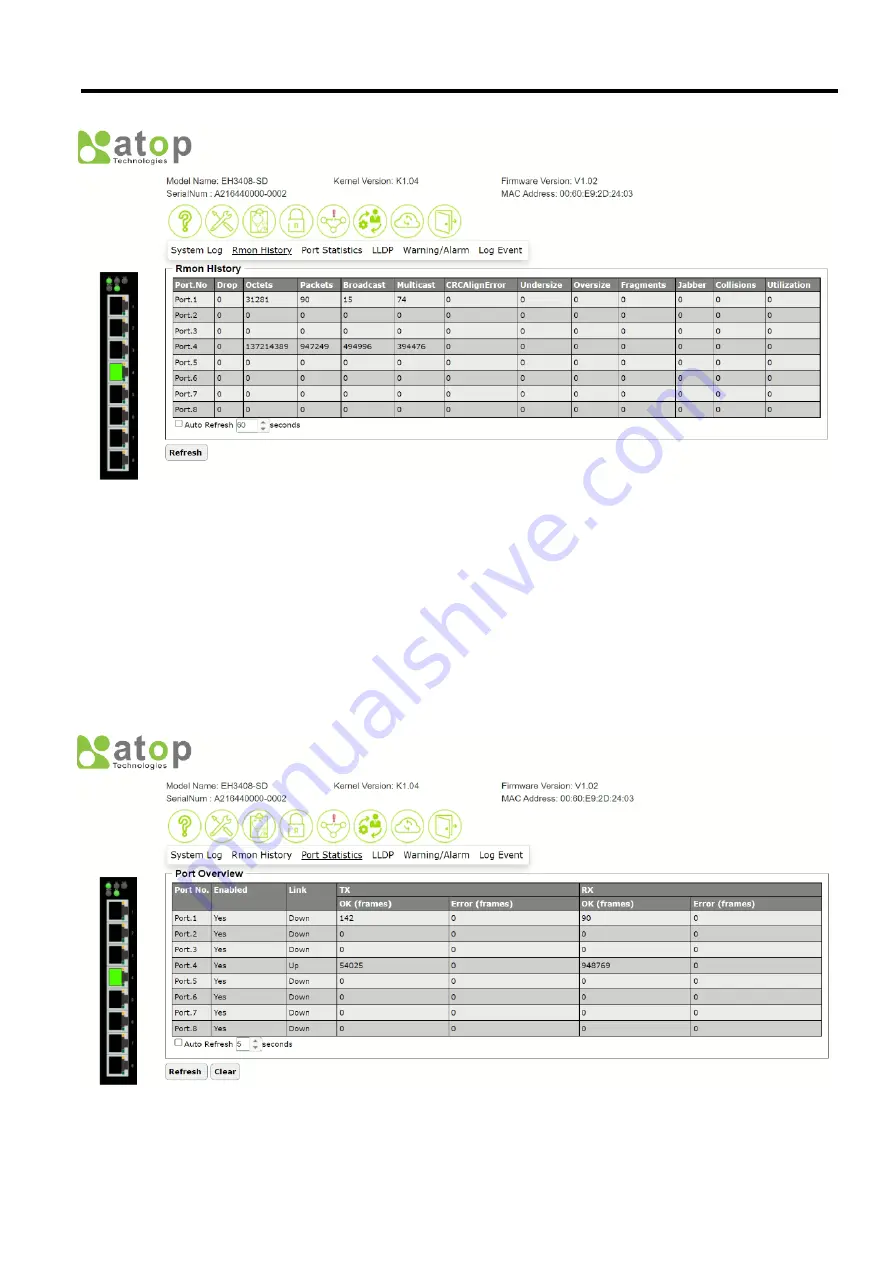
Figure 2.23 Rmon History Feature 


2.4.3


Port Statistics feature 

The 

Port  Statistics

  feature  under 

Diagnostic

  function  provides  overview  information  of  link  status  and 

frame’s 

statistics for each port on the managed switch. 

Port Overview

 table as shown in Figure 2.24 displays the counts of 

OK

 and 

Error

 of transmitting (

TX

) and receiving (

RX

) frames. It also indicates the status of each port whether it is 

enabled or disable and whether the link is up or down. At the bottom of the table, the user can check the box in front 
of 

Auto Refresh

 to enable the automatic refresh of the information in the table and also can specify the duration of 

each refresh in the text box which is in unit of seconds. The user can also click the 

Refresh

 button to obtain the latest 

information. If the user cleck the Clear button, the statistics information will be cleared from the table.  


Figure 2.24 Port Statistics (Overview) Feature 


Содержание EH3408ls

Страница 1: ...9 Industrial Managed Ethernet Switch User Manual V0 1 April 18th 2022 Series covered by this manual EH3408ls EH3408lu EH3408s EH3408u The user interface on these products may be slightly different fro...

Страница 2: ...ternal hyperlinks for ease of navigation For example click on any item listed in the Table of Contents to go to that page Published by Atop Technologies Inc 2F No 146 Sec 1 Tung Hsing Rd 30261 Chupei...

Страница 3: ...sequent editions Suggestions for improvement are welcome All other product s names referenced herein are registered trademarks of their respective companies Preface This manual contains some advanced...

Страница 4: ...ture 26 2 4 5 Warning Alarm feature 27 2 4 6 Log Event feature 29 2 5 Security 30 2 5 1 Storm Control feature 30 2 5 2 VLAN Table feature 32 2 6 RSTP 34 2 7 Management 36 2 7 1 Account feature 36 2 7...

Страница 5: ...ut Feature 36 Figure 2 41 Accout User List Pop up Window 36 Figure 2 42 HTTPS Feature 37 Figure 2 43 HTTPS Setting Pop up Window 37 Figure 2 44 SNMP Feature 38 Figure 2 45 SNMP Agent Mode and SNMP v1...

Страница 6: ...Description of IP Network Settings 15 Table 2 3 Description of Log Entry 15 Table 2 4 Description of System Log Setting Pop up Window 16 Table 2 5 Description of IP Setting Pop up Window 18 Table 2 6...

Страница 7: ...iple account levels allow optimal management with different users accessing different operations All these features are packed in a slim and sturdy enclosure that fits in cabinets with limited space w...

Страница 8: ...atures User Interfaces o Web browser o Telnet Console o Serial Console Dynamic Host Configuration Protocol DHCP Server Relay Client with Option 66 67 Time Synchronization o Network Time Protocol NTP S...

Страница 9: ...rences among these three methods Users are recommended to use the web browser method to configure the system because of its user friendly interface 2 1 Web based Management Basics Users can access the...

Страница 10: ...e Login button to login to the web interface Figure 2 2 Login Prompt After the login process the main interface will show up as shown in Figure 2 3 Under the Atop Technologies Logo there are basic inf...

Страница 11: ...n Configuration Diaganostic Security RSTP Management Maintetance and Logout Note that there is a picture of the front panel of the EH3408 device on the left side of the screen under the function bar T...

Страница 12: ...to the feature s name This gear for particular feature can be used to bring up a pop up window for managing configuration of that particular feature Figure 2 5 Information Function 2 2 1 Information...

Страница 13: ...Loader Version The bootloader version of the device Kernel Version The current kernel version of the device Firmware Version The current firmware version of the device Uptime The duration of time sinc...

Страница 14: ...ble or disable the Dynamic Host Configuration Protocol DHCP on the device as the DHCP client by selecting the corresponding drop down list If the DHCP Client is enabled the manage switch will obtain t...

Страница 15: ...m of the Information function shows a table of at least 5 system logs as shown in Figure 2 10 Each log entry includes Date Time Up Time and Event description Note that the log entries are sorted by da...

Страница 16: ...g Pop up Window Label Description Factory Default Log to Server Enabled Enable Syslog Server Disabled Disable Syslog Server If enabled all recorded log events will be sent to the remote System Log ser...

Страница 17: ...n Function 2 3 1 IP Setting feature The IP Setting feature summarizes the current IP configuration of the manage switch This web page as shown in Figure 2 13 displays information such as DHCP Client I...

Страница 18: ...ress to be used by your network or user can set a new one 0 0 0 0 DNS Server 2 Show current secondary DNS IP address to be used by your network or user can set a new one 0 0 0 0 2 3 2 System Time feat...

Страница 19: ...managed switch can become a networktime protocolserver for the localdevices by enabling NTP Server Setting option The user can either enable or disable this option Finaly the user has an option to en...

Страница 20: ...own list UTC 00 00 England Daylight Saving Enable or disable Daylight Saving Time function Unchecked NTP Server IP 1 Sets the first IP or Domain address of NTP Server time nist gov NTP Server IP 2 Set...

Страница 21: ...n related to a port on the managed switch which are Port No Mode Enabled Link AN Config Actual Speed Config Actual Duplex Config Actual Flow Control Config Actual and Security Note that the last colum...

Страница 22: ...for that port Each port can set the Flow Control mechanism to either On or Off on the eighth column This flow control will be useful to avoid packet loss when there is a network congestion However th...

Страница 23: ...can click on the gear icon next to the System Log Setting title to bring up the System Log Setting pop up window as shown in Figure 2 21 Note that this pop up window is the same feature as described i...

Страница 24: ...Rmon History feature The Rmon History feature under the Diagnostic function contains a remote network monitoring RMON information in a form of table as shown in Figure 2 23 Each entry summarizes the c...

Страница 25: ...ansmitting TX and receiving RX frames It also indicates the status of each port whether it is enabled or disable and whether the link is up or down At the bottom of the table the user can check the bo...

Страница 26: ...Table as shown in Figure 2 25 This webpage allows the user to view the LLDP s neighbor information of the managed switch The Neighbor Information table contains Port ID Chassis ID Remote Port ID Port...

Страница 27: ...tory Default LLDP Choose to either enable or disable LLDP Enabled Tx Interval Set the transmit interval of LLDP messages Range from 5 to 65535 seconds 30 TxTTL Tx Time To Live Amount of time to keep n...

Страница 28: ...on to bring up Warning Alarm Setting pop up window as shown in Figure 2 28 Then the user can independently enable or disable warning or alarm on each port and or power input connector After you finish...

Страница 29: ...hentication Failure and status of each port Figure 2 29 Log Event Feature To configure the SYSLOG event and SYSLOG status for each port the user can click on the gear icon to bring up the Log Event po...

Страница 30: ...rrent setting of the threshold ranging from 0 to 255500 packet per second pps while the Storm Control Information summarizes the current settings for different types of traffic in each port in a table...

Страница 31: ...gear icon to bring up a pop up window as shown in Figure 2 34 On this window the user can set the Threshold value from 0 to 25500 pps The users can enable or disable setting of any Storm Control Type...

Страница 32: ...op down selection Figure 2 35 VLAN Table Feature To configure the VLAN the user can click on the gear icon to bring up the VLAN Setting pop up window as shown in Figure 2 36 On this pop up window VLAN...

Страница 33: ...Industrial Managed Ethernet Switch User Manual Configuring with a Web Browser Page 33 of 49 Figure 2 36 VLAN Setting Pop up Window...

Страница 34: ...s managed switches deploy spanning tree as a tool when the users set up connection or port redundancy or fault tolerance in their network RSTP RapidSpanning Tree Protocol IEEE 802 1W is supported in A...

Страница 35: ...before a link begins forwarding To configure RSTP the user can click on the gear icon of the Bridge Setting to bring up the RSTP Setting pop up window as shown in Figure 2 38 There are three sections...

Страница 36: ...ment Function 2 7 1 Account feature The Account feature is shown in Figure 2 40 with a list of account or user on the managed switch It is presented in a format of table with two columns Username and...

Страница 37: ...anagement Protocol SNMP is a protocol for managing devices on IP networks It exposes management data in the form of variables on the managed systems which describe the system configuration These varia...

Страница 38: ...hed clicking on the Save Changes button to save any changes or clicking on the Save Changes and Apply button to save and apply the setting Figure 2 45 SNMP Agent Mode and SNMP v1 v2c Community Managem...

Страница 39: ...bring up the pop up window as shown in Figure 2 48 On this window there are four sections SNMP v3 User Configuration SNMP v3 Group Configuration SNMP v3 View Configuration and SNMP v3 Access Configur...

Страница 40: ...er the user can click the gear icon next to the SNMP v3 Trap in Figure 2 47 to bring up another pop up window as shown in Figure 2 49 On this window the user can set the SNMP v3 Trap Server IP address...

Страница 41: ...rmware Version under the Upgrade Firmware section On the Select Image Bank section there are information related to Image Banks The EH3408 device has two or dual image banks One of the image banks is...

Страница 42: ...nd save it in a local computer Then the user can choose a local firmware file from a file chooser by clicking on Browse button next to the Select Firmware File option Note that a valid firmware typica...

Страница 43: ...cal device This backup configuration file then can be used to restore the configuration of the managed switch in the future Figure 2 55 Backup Pop up Window To restore a configuration file the user ca...

Страница 44: ...ter The storage device can be a Micro SD card for EH3408ls and EH3408s or USB storage device EH3408lu and EH3408u attached to the EH3408 device The supported formats of the storate device are FAT32 an...

Страница 45: ...w for EH3408lu and EH3408u Figure 2 61 Backup to Micro SD Storage Device Pop up Window for EH3408ls and EH3408s To restore a configuration file from storage device the user can click on the gear icon...

Страница 46: ...and EH3408u or as shown in Figure 2 65 for EH3408ls and EH3408s On this window the user can select Disabled or Enabled the Option from the drop down selection and then clickSave button Figure 2 64 Op...

Страница 47: ...6 Factory Default Feature Figure 2 67 Factory Default Pop up Window 2 8 5 Reboot feature The Reboot feature under the Maintenance function supports the rebooting of the managed switch through the web...

Страница 48: ...and clicking on the gear icon next to the Apply All to bring up the pop up window as shown in Figure 2 71 After clicking on the Apply All button the system wil apply all saved configuration to the dev...

Страница 49: ...ologies Inc www atoponline com TAIWAN HEADQUARTER and INTERNATIONAL SALES 2F No 146 Sec 1 Tung Hsing Rd 30261 Chupei City Hsinchu County Taiwan R O C Tel 886 3 550 8137 Fax 886 3 550 8131 sales atop c...

Отзывы: