background image

Atomos Shinobi – User Manual Edition 1:  February 2019

7

UNLOCKED

LOCKED


Understanding the basic controls and functions 
will save you time in the future. Before you start enjoying 
your Shinobi it will help to review these simple procedures 


a. Screen Lock 
b. Firmware Updates


5. Using the Shinobi - Best Practice

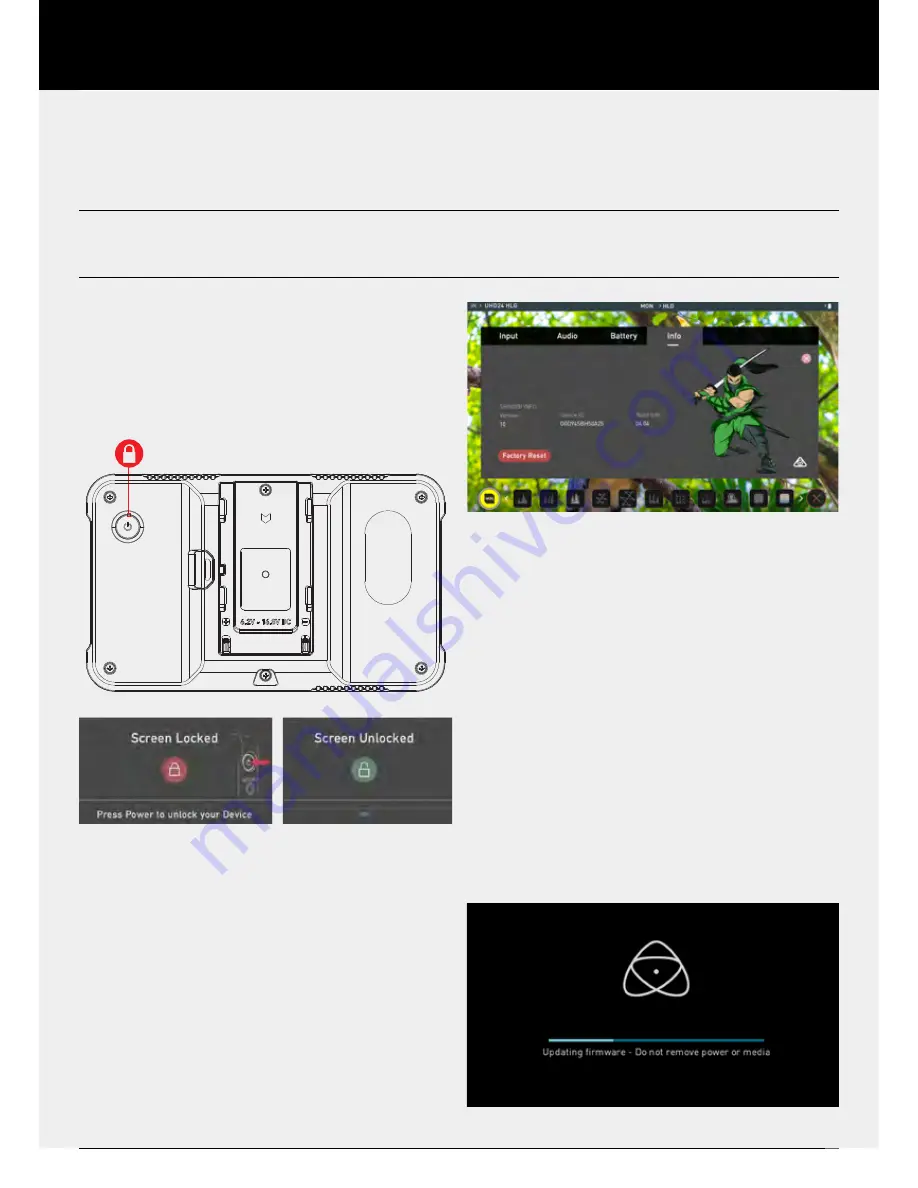
a. Screen Lock

Lock the Display Screen
You can lock the display of the Shinobi by tapping the power button. This 
will ensure no changes can be made by mistakenly touching the screen.
The screen lock function will simultaneously lock or unlock both Channels 
of the Shinobi. 
Short tap the power button again to unlock the unit. 

b. Firmware Updates (AtomOS)

From time to time we will issue software updates for your Shinobi. To 
update the firmware (that’s the software that runs inside your Shinobi), 
there is a simple procedure you have to follow.
 
•  Check your current Firmware version

Navigate to the Info tab by first pressing the input indicator and then 
navigating through the menu. The info screen contains the firmware 
version number and other important information about your Shinobi. 
Determine if your device is up-to-date or if a firmware update is 
required. 

•  Go to www.atomos.com/support
•  Locate and download the firmware upgrade

 
1.   Extract the files ATOMSHBHF.bin and ATOMSHBHV.bin from 
 

the firmware zip file.

2.   Copy these files onto a SD Card.


a.   Atomos recommends you use a freshly formatted


     compatible SD Card (FAT32 aka. MS-DOS).


b.   Ensure that the firmware update file is on the root of    

 the SD card, and not in a folder or sub folder.

3.     Use a freshly charged battery on your Shinobi or connect to mains 

power. It is very important that your Shinobi does not lose power 
during a firmware upgrade.

4.   Power down your Shinobi.
5.  Insert the SD Card with the ATOMSHBHF.bin and 
       ATOMSHBHV.bin files.
6.   Power up your Shinobi with a short press of the Power Button.
7.    Watch the screen. The Atomos logo will appear, and then be replaced 

with a Please Wait message and after a few seconds the firmware 
upgrade will start.

8.     While the firmware upgrade is happening, an ‘updating firmware’ 

screen will appear.

9.    The firmware upgrade will take up to a few minute

s.

Содержание SHINOBI

Страница 1: ...NOBI Register your SHINOBI to receive the latest software updates and user information User Manual EDITION 1 FEBRUARY 2019 Registering your product ensures you receive communication on all future upda...

Страница 2: ...HDMI cables Please remember that almost all HDMI cables do not use locking connectors and will simply pull out if they are jerked or tripped over Please ensure your cables make a secure connection an...

Страница 3: ...rwise using the Software you agree to be bound to the terms of this EULA If you do not agree to the terms of this EULA ATOMOS is unwilling to license the Software to you 1 Eligible licensees This Soft...

Страница 4: ...arbonate ABS chassis and an array of essential production tools including waveform monitoring vectorscope luma focus assist and the world s leading support for HDR monitoring This user manual will get...

Страница 5: ...MI cables which are ideal for connecting between your camera and Shinobi We advise the use of Atomos HDMI 2 0 cables Not all HDMI cables are created equal and there are a variety of different qualitie...

Страница 6: ...of the battery is possible up to 80 capacity and the remaining 20 will then charge at a slower rate to maintain good battery life Batteries do not charge in a linear way At first they charge very qui...

Страница 7: ...n by pressing the power button for five seconds Five seconds can seem like a long time We ve made it this way to make absolutely certain that the Shinobi can t be turned off accidentally Do not press...

Страница 8: ...t A 3 5mm headphone jack is located below the HDMI port Volume for headphone monitoring is via the on screen audio controls menu accessible by touching the audio meters in the upper right side of the...

Страница 9: ...the menu The info screen contains the firmware version number and other important information about your Shinobi Determine if your device is up to date or if a firmware update is required Go to www a...

Страница 10: ...upted download In the unlikely event of your Shinobi becoming unresponsive there is a built in recovery mechanism All you have to do is press and hold the on off button for 10 seconds If you do this y...

Страница 11: ...Monitor When in movie mode users will be able to monitor their footage with a wide range of tools Essential monitoring tools include Focus peaking 4 1 2 1 1 1 zoom Zebra False Color Analysis view mul...

Страница 12: ...me rate from input device MONITORING GAMUT Shows current gamut input applied to the signal from the source device Touch this control to ensure it matches the output coming from your camera or other in...

Страница 13: ...hed via a compatible HDMI cable Log HDR Turn on to enable HDR image processing inside the Shinobi Bring the control of post into your shoot record preview and review using HDR Camera Tap to scroll thr...

Страница 14: ...tery When using the supplied Battery Eliminator the remaining power indicator will remain green and show 100 full The displayed voltage will be determined by the input source Refer to your Shinobi qui...

Страница 15: ...waveforms adjust transparency LUTs Focus Peaking and more EDIT EDIT Luma Waveform A great way to visualize the dynamic range of your image RGB Parade Monitor the level of red green and blue from an i...

Страница 16: ...g the focus remains on calibrating your image If the MON button is pressed the WFM will move in to the bottom icon line up RGB Overlay RGB Overlay monitors the level of Red Green and Blue from an inpu...

Страница 17: ...orrectly on the camera RGB Histogram RGB Overlay monitors the level of Red Green and Blue from an input Analysis The Analysis feature allows you to see Waveforms Histograms and Vectorscopes simultaneo...

Страница 18: ...or how peaking is displayed it can overlayed over the color video image over a greyscale image or just show the peaking my selecting the corresponding icon Focus Peaking Color Focus Assist Outline You...

Страница 19: ...the screen or selecting a portion of the indicator box 4K 2 1 shows 1 16 of the 4K UHD image Cinema Guides Safe Areas Anamorphic De Squeeze AtomOS 10 has advanced frame guides and safe areas You can...

Страница 20: ...nt look to your footage Atomos support 3D LUTs in the industry standard CUBE format and provides 8 LUT memory slots for you load your LUTs in to 1D LUTs are not supported and will need to be converted...

Страница 21: ...h Dynamic Range HDR Using Standards Native Rec 709 HLG PQ AtomOS10 uses predefined settings to display your video when viewing in HDR This is similar to the HDR slider in previous Atomos Operating Sys...

Страница 22: ...gine of the Shinobi to display the High Dynamic Range capabilities of a Log gamma input HDR monitoring in AtomOS10 is the result of the research and development by Atomos that allows control of all as...

Страница 23: ...accordingly Adjustments can also be made to the Lift Gamma and Gain of the display You can tap the icon on the left of the menu to scroll through the options and adjustments are again made by moving...

Страница 24: ...print technology Video Input HDMI 1 x HDMI 1 4 Signal Up to Uncompressed true 10 bit or 8 bit 422 camera dependent Supported Formats Video Input 4K 4096 x2160 23 98p 24p 25p 29 97p UHD 3840 x 2160 23...

Страница 25: ...Shinobi User Manual Edition 1 February 2019 23 Atomos 2019 TM All trademarks and registered trademarks are the property of their respective owners atomosglobal atomosvideo Atomos_News AtomosVideo atom...

Отзывы: