background image

16

F U N C T I O N S

PHOTO MODES

From the Homescreen: press the LEFT button 

 to TAKE A PHOTO. 

Depending on the selected mode you will make one or several photos. You 

can choose from the various photo modes in the System Settings.

NOTE

You must have a microSD card inserted in the device for these features 

to work, and all files will be stored on the microSD card.

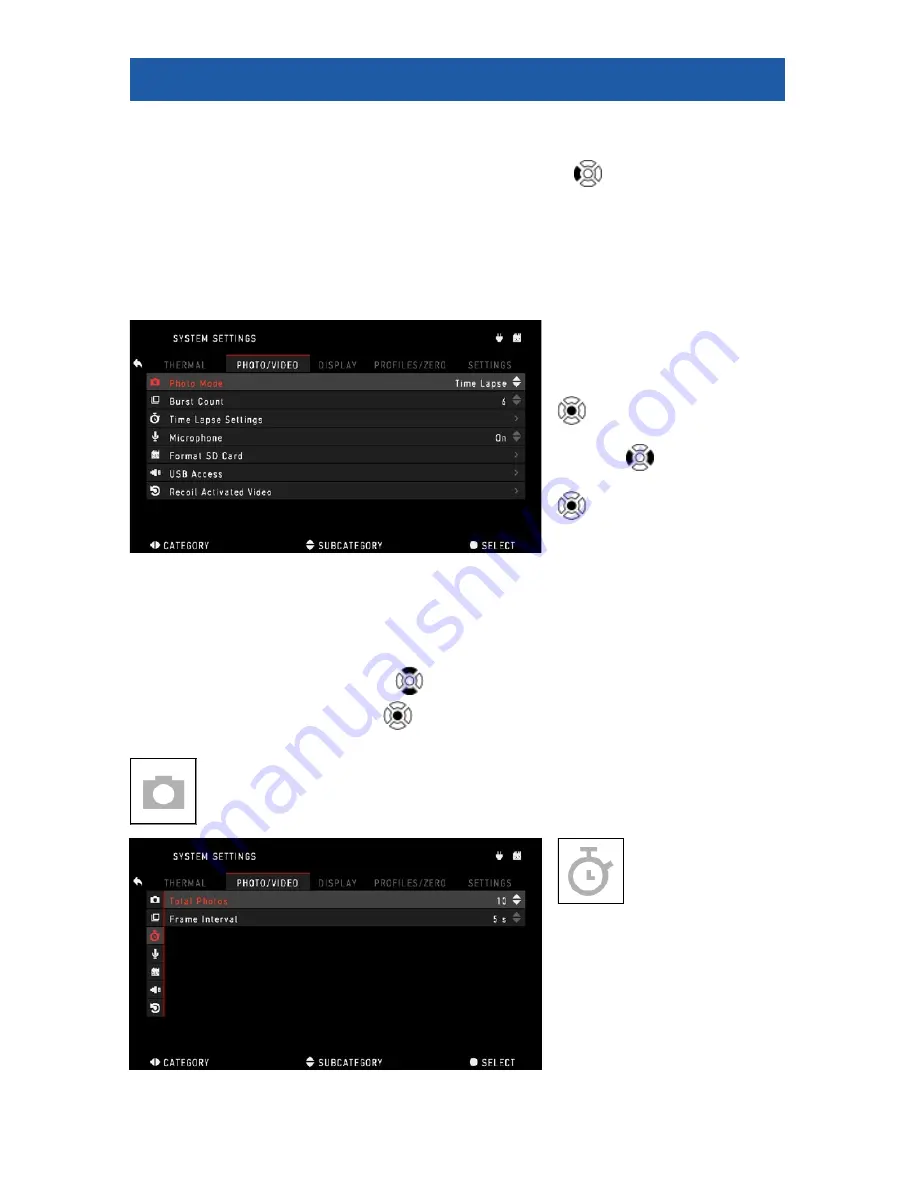
To enter the System Set-

tings:

1.  Open Shortcut Car-

ousel with ENTER button 

 and select the wrench 

icon with RIGHT or LEFT 
buttons 

.

2. Push ENTER button 

 to enter the menu. Use 

the Right button till you 

select Photo/Video tab.

NOTE

There are three photo modes to choose from. Switching between 

modes is done in the System Settings from Photo/Video tab, subcategory 

Photo Mode.

3. Use UP or DOWN buttons 

 to switch between modes. 

4. Press the ENTER button 

 to select a particular value (once selected it 

will turn red).

NORMAL
This default mode allows you to take one photo at a time.

TIME LAPSE
A sequence of 

images with an 

interval of time between 

each image. The interval 

and the number of photos 

taken can be changed in 

the System Settings.

Содержание ThOR-HD 384 1.25 - 5x

Страница 1: ...ThOR HD Series THERMAL SMART HD RIFLESCOPE M A N U A L THOR HD USER S GUIDE REV 4 AUGUST 2017 AMERICAN TECHNOLOGIES NETWORK CORP ...

Страница 2: ...s not to be construed as a commitment by ATN Corp ATN Corp assumes no responsibility or liability for any errors or inaccuracies that may appear in this book 2017 ATN Corp All rights reserved PICATINNY RAIL DIOPTER ADJUSTMENT RING MOUNTING SYSTEM POWER BUTTON FOCUS ADJUSTMENT RING BATTERY HOUSING CAP START STOP VIDEO RECORDING ENTER BUTTON TAKE A PICTURE ZOOM IN ZOOM OUT MICROSD MICRO HDMI MICRO U...

Страница 3: ... calibration 10 INTERFACE 11 Homescreen 11 Main operations 12 Shortcut carousel 13 Using System Settings 14 FUNCTIONS 16 Photo modes 16 Recoil Activated video 17 Rangefinder 19 Zeroing 21 Ballistic Calculator 22 How to perform a NUC 26 Pixel Correction Procedure 26 Reticle style adjustment 27 SYSTEM SETTINGS 28 Thermal 28 Photo Video 28 Display 29 Profiles Zero 29 Settings 30 SERVICING 31 Warnings...

Страница 4: ... to make bigger and better updates to its award winning thermal product line Record videos and photos onto a microSD card Never again forget to record that perfect shot with ATN s patented RAV Recoil Activated Video Use ATN s Smart Range Finder to quickly range in on your target and allow the ballistic calculator to make instantaneous corrections to your POI Point of Interest on the fly Plus take ...

Страница 5: ...on 1 25 5x 2 8 4 5 18 9 36 1 10 1 5 15 2 5 25 5 50 Angle of view 16 12 5 12 9 5 6 4 7 3 2 4 32 25 24 19 12 5 9 7 6 4 7 Objective lens focal length 19 mm 25 mm 50 mm 100 mm 19 mm 25 mm 50 mm 100 mm Micro Display HD Display Core ATN Obsidian T II Eye relief 65 mm Waterproof rating IP rating Weather resistant Video Record Resolution 1280 960 30 fps Microphone Yes MicroSD card Up to 64 GB Micro USB Ye...

Страница 6: ... 35 double lever LaRue LT270 American Defense AD 170 Battery life Li ion 8 hr Battery type 4 AA Lithium Recommended Dimensions 6 85 3 16 3 14 174 80 26 80 mm 8 81 3 16 3 14 224 80 26 80 mm 10 67 3 97 3 47 271 101 88 mm 6 85 3 16 3 14 174 80 26 80 mm 8 81 x 3 16 x 3 14 224 80 26 80 mm 10 67 3 97 3 47 271 101 88 mm Weight 1 55 lb 0 68 kg 1 85 lb 0 84 kg 2 75 lb 1 24 kg 1 55 lb 0 68 kg 1 85 lb 0 84 k...

Страница 7: ... highly recommend using lithium AA batteries They will provide much longer bat tery life Use only 1 5 V batteries Install batteries as follows 1 Remove the battery cap by unscrewing it counter clockwise 2 Insert batteries as shown 3 Return the battery cap into the housing socket screw clockwise until finger tight Make sure that the Red O Ring is not visible to pre vent shut off issues due to recoi...

Страница 8: ...w when the new firmware becomes available To update the new firmware you will need a microSD card and batteries that are fully charged NOTE In the event of a power failure during an update The device may crash corrupting its system files It will need to be sent back to the ATN factory for service DO NOT USE an additional source of power during firmware update Update the new firmware as follows 1 D...

Страница 9: ...process correctly USING KEYPAD The KEYPAD is programmed to be used in two different ways Short and Quick Taps used for most functions and to get around the menu Press and Hold designed to be used in the following situations ON OFF ZOOM and SHORTCUT MENU NOTE Using LEFT or RIGHT buttons in the Menu will allow you to quickly choose Exit Shortcut from any position FOCUSING DIOPTER ADJUSTMENT Look thr...

Страница 10: ...ATN rec ommends using Loctite to ensure screws do not loosen up during shooting COMPASS CALIBRATION When the compass needs to be calibrated the word CAL appears instead of the Compass Scale To cal ibrate rotate the three axis points as pictured on the left on the device NOTE After calibrating the de vice please remember that the compass will work best when holding the ThOR HD parallel to the groun...

Страница 11: ...ctive icons become invisible only the important information will show at the moment Battery appears when energy level is low SD Card shows the presence of memory card Ballistic Calculator Bluetooth GPS and WiFi shows when a function is enabled WIDGETS There are interface elements that provide quick access to useful informa tion There are several types of widgets icons without value are used for mo...

Страница 12: ...ypad 2 Current Zoom Level is displayed in the Zoom widget on the Homescreen NOTE You will need to configure the lens option in the pop up window before zooming when the device is activated for the first time Your reticle can be offset from the center point of the screen while using Bal listic Calculator During the Zoom In Action it will move to the center TAKING PHOTOS Press the LEFT button to TAK...

Страница 13: ...WN buttons between switches 5 To turn a switch ON or OFF you should click the ENTER button while having the switch selected Example WiFi Press the UP or DOWN buttons to activate the switch Press the ENTER button once again to keep the setting EXIT Exit Carousel NUC Allows you to make a non uniformity compensation NUC RANGEFINDER Activates the Smart Rangefinder feature If the Ballistic Calculator i...

Страница 14: ...e Ballistic Calculator RAV Recoil Activated Video USING SYSTEM SETTINGS To enter the System Set tings 1 Open the Shortcut Carousel with ENTER button and select the wrench icon with RIGHT or LEFT buttons 2 Push the ENTER but ton to enter the menu The System Settings consists of Tab Bar at the top of the screen and a list of subcategories in the center Help Information can be found at the bottom TAB...

Страница 15: ...egories To select a particular subcategory you should use the UP and DOWN buttons and press ENTER button to select it FIRST LEVEL SECOND LEVEL THIRD LEVEL To change a particular value 1 Select the subcate gory you need by moving the UP or DOWN buttons 2 Press the ENTER but ton to select a particu lar value once selected it will turn red 3 Change the value with the UP and DOWN buttons 4 To select a...

Страница 16: ...the wrench icon with RIGHT or LEFT buttons 2 Push ENTER button to enter the menu Use the Right button till you select Photo Video tab NOTE There are three photo modes to choose from Switching between modes is done in the System Settings from Photo Video tab subcategory Photo Mode 3 Use UP or DOWN buttons to switch between modes 4 Press the ENTER button to select a particular value once selected it...

Страница 17: ...sing picture pre view appears after a pho tograph is taken It will appear on the bottom of the screen for several sec onds RECOIL ACTIVATED VIDEO Recoil Activated Video patent pending offers a unique approach to taking videos with your Smart Sight RAV offers you the ability to take a video before during and after your shot has been fired Perfect for those hunting moments when one must concentrate ...

Страница 18: ... with ENTER button and select the wrench icon with RIGHT or LEFT but tons 2 Push ENTER button to enter the menu NOTE You must have a mic roSD card inserted in the device for these features to work 3 All files will be stored on the microSD card Recorded videos can be found in the Gallery of the device The scope allows you to record videos in two modes NORMAL This is the default mode and the Counter...

Страница 19: ...eo prior to the shot be ing taken the moment of and some time after Exact settings may be adjusted in the System Settings RANGEFINDER Using the Smart Range finder you will quickly be able to estimate the dis tance to your target as long as you have reason able knowledge of the size of your target NOTE Once the distance is measured the value will be automatically inte grated into your Ballistic Cal...

Страница 20: ...ure ment process you can zoom in and out using standard buttons UP and DOWN If the Target Height is in correct you can change it press the RIGHT but ton to enter the Menu choose one of the pre sets or input the height manually accept the height with EN TER button and go back to the Main Screen DISTANCE ENTRY Allows you to input or correct the distance manu ally To launch select from the Shortcuts ...

Страница 21: ...ocess better Under the Profiles Zero Category you will find Cur rent Other Import from SD card andExporttoSDcard Select Other Select Profile 1 Create New Profile and or edit make changes to it Once you selected a profile press the ENTER button to load it Also your load pro file will become your current profile Profiles are primarily used in order to utilize your scope on various weap ons This way ...

Страница 22: ...ou time when you want to use the Ballistic Calculator at a later time Proceed to Zero the Ret icle Press the ENTER button to select Zero Reticle You will see on your screen a cross hair reticle While keeping the gun as steady as possible fire a round Use the key pad to move the Red cross hair to the point of impact while keeping the White crosshair in the same place you where aiming Once you have ...

Страница 23: ...t you con tact the manufacturer of the ammunition and or the weapon that you are using Generally this info should be found on the manufacturer s website Once your profile has been setup you are ready to activate the Ballistic Cal culator on your sight Open the Shortcut Carousel and locate the following set of Icons You will need to scroll with UP and DOWN but tons to find the Ballis tic Calculator...

Страница 24: ...on are needed if you plan to make accu rate shots You can enter the information through the Environment shortcut or you can utilize your mo bile device running the Obsidian App with a WiFi connection to your scope whichever you find easier Relative Humidity Humidity and Temperature must also be entered through the Environment short cut or by utilizing your mobile device Barometer Pressure Altitude...

Страница 25: ...ton wait for the scope to take the readings it will take a number of readings so try to keep your weapon steady 2 put the arrow mark under the target and press the EN TER button 3 if satisfied with the value press the LEFT button to go back to the Homescreen or repeat steps 1 and 2 if necessary NOTE During the measurement process you can zoom in and out using stan dard buttons UP and DOWN While us...

Страница 26: ...e of temperature continues viewing of a particular warm object movement from one environment to another all may cause image deg radation To clean up the image you will need to press the NUC from the Shortcut Carousel while closing the objective lens with a solid object lens cap hand book etc PIXEL CORRECTION PROCEDURE Pixel Correction Procedure is intended to correct neutral pixels that are visibl...

Страница 27: ...iformed correction in the FOV RETICLE STYLE ADJUSTMENT You can manage reticle style in the System Settings Display section To enter the System Settings you should open Shortcut Carousel with ENTER button and select the wrench icon with RIGHT or LEFT buttons Then push ENTER but ton to enter the menu Choose Display in Tab Menu Movement between the tabs is carried out using the LEFT and RIGHT buttons...

Страница 28: ...rom 1 to 5 or select Auto THERMAL SENSITIV ITY High Medium and Low METERING MODE Center of Matrix Center is when the sensor concen trates on the center of the Thermal Sensor Matrix is when the Thermals Sensor gathers the thermal info from the entire Thermal Sensor POWER BUTTON NUC On or Off You can quickly NUC the scope by tapping once on the Power Button COLOR PALETTES This is where you can selec...

Страница 29: ...r 5 30 sec DISPLAY SCREEN BRIGHTNESS 1 5 with 1 being the dim mest and 5 the brightest It is recommended that you use the brightest setting during the day for optimal performance DISPLAY WIDGETS allows you to disable sev eral widgets Minimal Ex tended LANGUAGE allows you to select a interface language English German Spanish Italian Chi nese Russian Polish SLEEP MODE Sleep mode is activated when yo...

Страница 30: ...Velocity is the velocity of the projec tile as soon as it leaves the barrel Zero Range is the range that a firearm is sighted at Sight Height is re ferring to the distance be tween the center of the optics and the center of the barrel OTHER Profile Name list of existing profiles Create New Profile allows to create up to 6 profiles SETTINGS UNITS can be Metric or Standard system DATA AND TIME Clock...

Страница 31: ...der to make sure that you are getting emails when new firm ware versions become available We are constantly working on new features functions and improvements that we provide to you free of charge via firmware upgrades SERVICING CLEANING EYEPIECE Over time debris or dust particles may find themselves on the micro display in your eyepiece Please follow the following instructions to remove the debri...

Страница 32: ...ce and view live streaming Connect a phone or tablet and view everything simulta neously Want to see what you ve re cor ded so far No problem once connected to the app via WiFi open up the Gallery and playback your latest adventures All your photos and videos are right at your fingertips In order to download the latest version of the ATN Obsidian App Please visit the iOS store or Google Play store...

Страница 33: ...33 Notes ...

Страница 34: ...34 ...

Страница 35: ...35 ...

Страница 36: ...on For customer service and technical support please contact American Technologies Network Corp 1341 San Mateo Avenue South San Francisco CA 94080 phone 800 910 2862 650 989 5100 e mail service atncorp com www atncorp com ...

Отзывы: