


Installation Guide
2
AT-OME-SR21
AT-OME-SR21
OUTPUT
LAN
DC 24V
RELAY
C1 COM C2
HDBaseT IN
L
R
+
+
1
IP MODE
RESET
RS-232
1
2
RX
RX
TX
TX
2
AT-OME-SR21
OMEGA
TM
PWR
LINK
HOST USB
HDMI IN
USB HUB
OMEGA
TM
INPUT
PATTERN
DEVICE IP
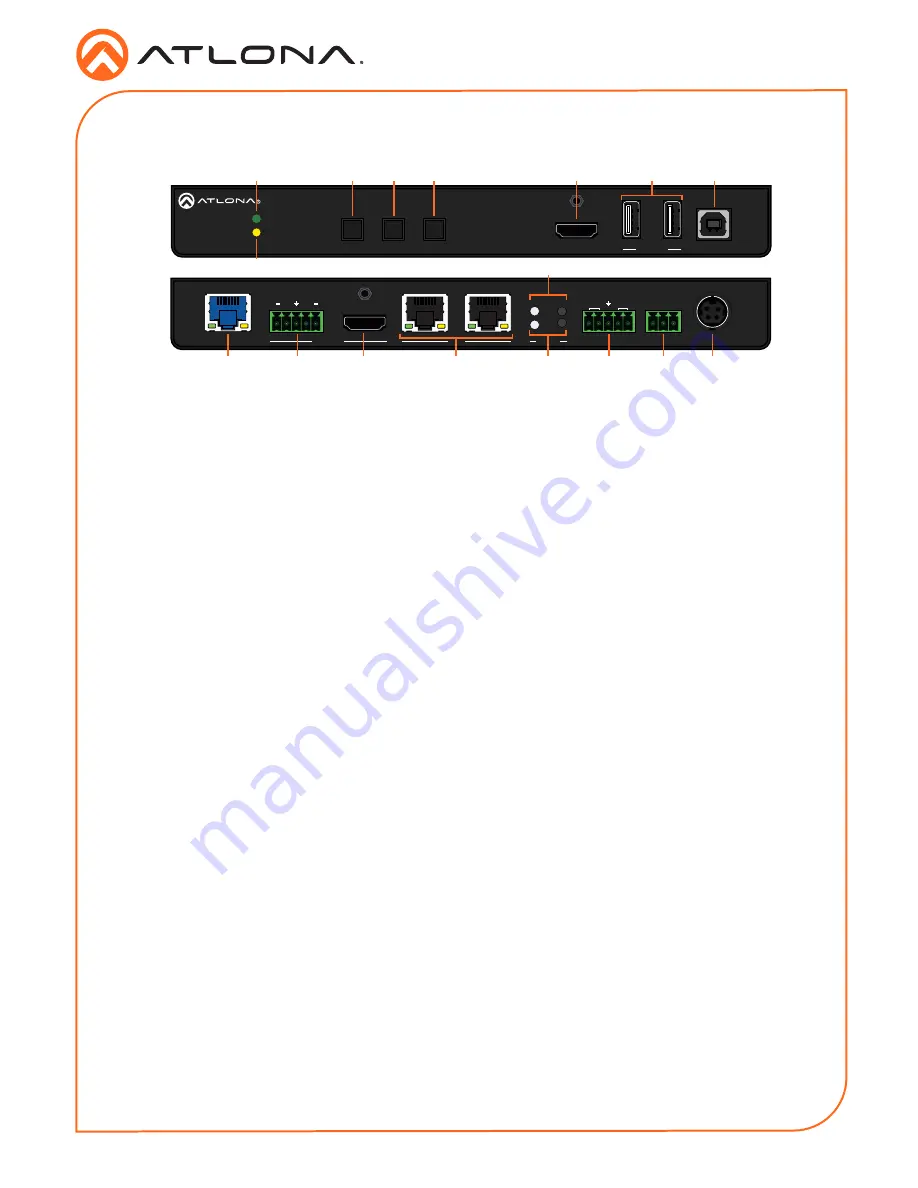
Panel Descriptions
10
14
13
11
12
15
16
17
1
2
3
4
5
7
9
8
6
1
PWR LED
Illuminates green when receiving power.
2
DEVICE IP button
Press to display the unit IP in the top left
corner of the connected display.
3
INPUT button
Use to switch between the HDMI and
HDBaseT inputs. If the device is currently
showing a pattern for source, pressing the
input button will bring up the last selected
input.
4
PATTERN button
Use to send one of the three source
patterns built into the unit. Press to cycle
through all three patterns.
5
HDMI IN
Connect an HDMI cable from an HDMI
source to this port.
6
USB HUB
Connect USB devices to these ports. e.g.
usb camera, mouse, etc.
7
HOST USB
Connect to a computer using a USB B to
USB A cable.
8
LINK LED
Illuminates yellow when receiving signal
from the HDBaseT input port.
9
IP MODE button and LED
Press and hold the button for 5 seconds
until the LED blinks to switch the IP mode
between DHCP and Static IP modes. The
LED will blink 2 times for DHCP and 3
times for static IP.
10 HDBaseT IN
Connect a compatible HDBaseT
transmitter to this port.
11 AUDIO OUT
Connect to an audio DSP, amplifier, or
other audio distribution devices.
12 HDMI OUT
Connect an HDMI cable from here to an
HDMI display.
13 LAN
Connect Ethernet cables to these ports for
control of the unit and/or to pass Ethernet
to a local device.
14 RESET button and LED
Press and hold the button for 5 seconds
until the unit resets. The LED will blink as
the unit resets to factory default settings.
15 RS-232
Use for device and display control.
16 RELAY
Dual low-voltage signal relay to control
devices such as electric screens and
display lifts.
17 DC 24V
Connect the included DC 24V power
supply to this port.


